
Introduction
The Sorceress class was one of the ‘original’ 4 classes in Black Desert. She is a dark magic user with a mixture of mid-range to melee skills. The Sorceress class uses an Amulet as their primary weapon and Talisman as their secondary weapon. At level 56, Sorceress unlocks their awakening weapon which is a Scythe. The Sorceress class uses mostly melee range spins and slashes with her Scythe, as well as some ranged abilities and massive AoEs.
Sorceress is strong in 1v1 and 1vx situations because of her many iframe abilities making her difficult to catch. She is able to kite whilst staying protected and look for engages when it favours her. Sorceress is one of the harder classes to master. You need to be able to manage cooldowns and your stamina effectively. Getting caught or messing up your skills in PvP can result in a very quick and painful death.
Awakening VS Succession
Sorceress Succession and Awakening can be unlocked after level 56 after speaking to the Black Spirit and completing the Awakening and Succession quests under the suggestions tab.
- The Awakening will unlock a completely new skill tree, which will be your primary skills from now on. The skills in the pre-awakening are mostly utility skills, and your main damage dealers will be your Awakening skills.
- The Succession skill kit enhances your amulet skills instead and only has a few awakening skills.
Your awakening weapon still affects your succession damage and vice versa. For example, if you are using the Succession kit, then 30% of your Awakening AP is still applied to the damage of Succession skills, as well as the additional item stats on the awakening weapon, such as Human/Species Damage and Accuracy.
Both Succession and Awakening are pretty good and equal at the moment for PVE, with Succession usually slightly better. However, it really comes down to the grind spot. I would try out both specs and go with which playstyle you prefer.
Skill Builds
Since the skill point update in late 2022, you can obtain all skills for approximately 1,000 skill points. Focus on your main skills first, then level the passives. The Weight Training skill should be leveled last since it only gives you weight limit increase.


Protected Skills
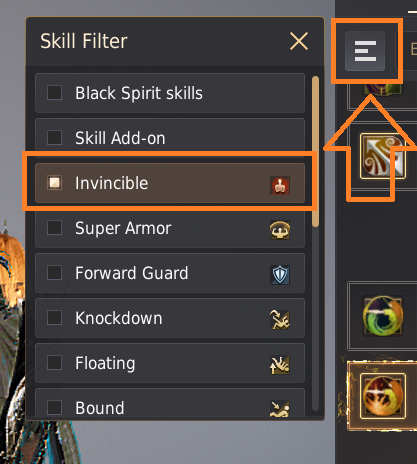
It is important to read through your skills to understand which skills have protection and crowd control effects. Read through your skills carefully to get familiar with what each skill does. You can also filter the different effects in the Skill Window (K).
 Super armor (SA)
- This means you cannot be crowd controlled while this effect is active (except grab/grapple), but you will still take damage from any attacks
 Forward guard (FG)
- This means you will block damage and crowd control effects coming from the front direction of your character. The block can be broken if you take enough damage and you will see a blue shield with a number, indicating the % left of the block.
- Some classes have an “S block”. This means you will automatically use Forward Guard when moving backward with “S”.
 Invincible (I-frame)
- This means that you will not take damage and cannot be crowd controlled from any direction for the duration of the effect
Locked Skills
To lock a skill, press the lock icon on the top of each skill icon in the skill window (K).
These are the skills I recommend locking to help prevent messing up combos during PVP.
 Evasion
 Bloody Contract
 Shadow Kick
 Rushing Crow
Hotbar Skills
These are the minimum skills I recommend putting on your hotbar.
Dark Trade, Absolute: Darkness Released, Shard Explosion, Flow: Soul Reaper, Shadow Leap, Shadow Kick, Dark Tendrils, Rushing Crow, Shadow Hellfire
![]()
![]()
![]()
![]()
![]()
![]()
![]()
![]()
![]()
You may also want to put more skills on your hotbar and cooldown slots to keep track of them. For more information about how to do this, check out our Edit UI and Settings Guide.
Core Skills
Core skills are a way of upgrading 1 skill from your awakening skill kit.
Core skills are usually down to preference but most players choose between Grim Reaper’s Judgment for PVP or Dead Hunt for PVE.
 Core: Dead Hunt: Forward Guard while using the skill.
 Core: Violation: Forward Guard while using the skill
 Core: Grim Reaper’s Judgment: Super Armor while using the skill.
 Core: Turn-back Slash: Super Armor while using the skill
 Core: Cartian’s Nightmare: Stiffness on 1st good hit.
 Core: Swirling Darkness: Floating on 1st good hit.
Skill Enhancement (Rabam) Skills
Skill Enhancement skills can be obtained in the Skill Window (K) under the “Skill Enhancement” tab at the top. At levels 56, 57, and 58, you will have 2 different options to choose between. These skills have no skill points cost, but you have to have other skills leveled up to be able to take them.
Level 56 – [SHIFT + X]
 Shadow Ignition – Requires [Bloody Calamity] and [Shadow Eruption IV]
- (Preferred Choice}
 Crow Nightmare – Requires [Bloody Calamity] and [Rushing Crow II]
Shadow Ignition is simply the better choice out of the two due to the high damage and low cooldown, combined with the fact the skill has air smash. It can often be used immediately after an iframe to catch players out or in a combo after skills with a float CC.
Level 57 – [SHIFT + Z]
 Engulfing Shadow – Requires [Crow Flare III] and [Midnight Stinger II]
- (Preferred Choice)
 Abyssal Blow – Requires [Crow Flare III] and [Abyssal Flame III]
Engulfing Shadow is usually the preferred choice out of the two.It is a gap closer with super armor and also has good damage. Abyssal Blow is a mid-range skill with a front guard. The skill also heals you for a decent amount.
Level 58 – [Quickslot Only]
 Shadow Hellfire – Requires [Shadow Eruption IV] and [Ultimate: Dark Flame]
- (Preferred Choice)
 Shadow Wave – Requires [Shadow Eruption IV] and [Black Wave IV]
I would recommend Shadow Hellfire. The skill has a forward guard and is a movement skill. It is used for protected damage.
Skill Add-ons
Below are some examples of PVE skill add-ons you can take.
If you would like example skill add-ons for other scenarios, please refer to the Class Discord and its resources.
I recommend experimenting with your add-ons and figuring out what is best for you because it really depends on your personal preference and how you play your class. If you’re simply not sure what to take then you can blindly follow the examples below and they will still be effective.
You can also check our Skill Add-on guide for a complete list of Skill Add-ons.
| Awakening PVE Add-ons (Credit: Chayu) |
|
|---|---|
| Back Attack Damage +3% for 5 sec | |
| Succession PVE Add-ons: | |
|---|---|
|
Critical Hit Damage +3% for 5 sec
|
|
Weapons
Armor
For your armor, you will make a choice between Damage Reduction or Evasion gear. I recommend reading our guide about the two different DP stats if you want to learn what the two different stats do.
Generally, you are recommended to build Damage Reduction on Sorceress. Evasion is viable on Sorc and you can switch to Evasion when you reach high gearscore if you want to swap offensive for more defense.
Accessories
There are various different accessories in the game. At first, just focus on using the accessories that give you the highest AP in each slot.
There are also “free” accessories that all new players should get:

Common Starter PVE accessories:
- TET Black Distortion Earrings
- TET Basilisk’s Belt (or PEN Capotia Belt)
- TET Ring of Crescent Guardian
- TET Ogre Ring/Laytenn’s Necklace (or PEN Capotia Necklace).
Crystals
Below is an example starter Crystal build for PVE. Some of the crystals are expensive. You can obtain the Rebellious Crystal by completing the main story questline. For more example crystal builds, including an end-game PVE crystal build, and PVP Crystal builds, check our Crystal Preset Guide.
 Ah’krad Crystal x2
 Rebellious Spirit Crystal x2
 Red Battlefield Crystal: Adamantine x2
 Ancient Magic Crystal of Crimson Flame – Power x2
 Dark Red Fang Crystal – Valor x2
 Corrupted Magic Crystal x2
- Max HP +350
- All AP +34
- All Accuracy +6
- Extra Damage to Monsters +20
- Hidden Damage Reduction -4
- Knockdown/Bound Resistance +50%
- Stun/Stiffness/Freezing Resistance +10%
- Critical Hit Level +4
- Critical Hit Damage +22%
- Skill EXP +10%
This is an example PVP Build for Sorcs using Damage Reduction Armors and going full Human Damage (glass cannon). For more example crystal builds, check our Crystal Preset Guide or the Class Discord.
-
 Glorious Crystal of Gallantry – Olucas x2
 Red Spirit Crystal x2
 Crystal of Elkarr x2
- Corrupted Magic Crystal x2
 JIN: Magic Crystal – Viper x2
 Red Battlefield Crystal: Viper x2
 Red Battlefield Crystal: Carmae x2
 Ancient Spirit’s Crystal – Swiftness x1
- All accuracy +70
- Ignore All Resistance +20%
- Max HP +200
- All AP +14
- Extra Damage to Humans +56
- All Damage Reduction -4
- Critical Hit Damage +22%
- Attack, Casting Speed +2%
- Attack Speed +6
- Casting Speed +4
- Critical Hit +2
- Movement Speed +2
Artifacts and Lightstones
There are few different viable choices for both Artifacts and Lightstone combos. Sorceress is the “Magic Damage” type so you want to go for Magic Accuracy and Magic Damage for offensive artifacts.
For PVE Lighstones there are a few different options to min-max. For certain spots, you may want to use Species damage combos (eg. The Wild: Demihumans, The Wild: Kamaslyvia, The Wild: Humans). Species damage combos perform better if you are reaching the monster AP caps at a certain zone.
A more generic PVE combo is listed below that is recommended for your class and will work at any spot.
You can also find more information about Artifacts and Lightstones, and how to obtain them, in our guide. We also have a list of Best in slot Artifacts and Lightstones.
Artifacts for PVE:
![]() Marsh’s Artifact – Extra AP Against Monsters
Marsh’s Artifact – Extra AP Against Monsters
- (Extra Damage to Monsters +6)
![]() Lesha’s Artifact – Monster Damage Reduction
Lesha’s Artifact – Monster Damage Reduction
- (Monster Damage Reduction +9)
Artifacts for PVP:
![]() Marsh’s Artifact – Magic AP
Marsh’s Artifact – Magic AP
- (Magic AP +4)
![]() Marsh’s Artifact – Magic Accuracy
Marsh’s Artifact – Magic Accuracy
- (Magic Accuracy +8)
| PVE Lightstone Combo | |
|---|---|
[Vicious Shadows] Fire: PredationFire: PredationFire: Shadows Fire: Strike Fire: PredationFire: PredationFire: Shadows Fire: Strike |
Total Combo Effects: Monster AP +13 Back Attack Damage +6% Critical Damage +3% |
| PVP Lightstone Combo | |
|---|---|
[Target Openings]Fire: RageFire: Marked Wind: Lungs Fire: Strike Wind: Lungs Fire: Strike |
Total Combo Effects: All AP +10 All Accuracy +16 Maximum Stamina +100 Critical Damage +6% |
Useful Links/Credits
I highly recommend checking out the Sorceress Class Discord for resources about your class. The class discords always have the most up-to-date information and tons of experienced players that can help with questions or gearing advice. I would like to give a shoutout to the Moderator and Helpful Roles in the Sorceress discord for all their hard work gathering resources. You can find some of their own guides below. I honestly cannot recommend enough to join the discord.
Useful links to check out:
- Official Sorceress Forums
- Ultimate Sorceress Gearing Guide by the Sorc Discord
- Sorceress FAQ/Info by the Sorc Discord
- Awakening Sorceress Guide by Heedun
- Awakening Sorceress Advanced Guide by eyesack
- Awakening Sorceress PVE Guide by Emmi
PVP Montage Videos:
Credits Disclaimer: Since there are now 26 BDO classes, it is impossible for me to keep class guides fully maintained. My main class is Ranger and I don’t claim to be the best in any class. Therefore, I use resources and recommendations from the Class discords since (as all other players would agree) this is the best source. I also ask for advice from friends who are more experienced in the class. Where possible, I credit specific players for information such as Add-ons, and combos. However, sometimes there is no player mentioned as the original sharer. If there are any issues with credit or you would like certain information removed/changed, please reach out to me!


This wall of text goes into my experience on how epic the Sorc’s self sustain is. I may be slightly wrong on some of the cooldowns, just a heads up.
Got the skill add-on for Blood Calamity to recover more health, never used a health pot. Got the skill add-on for Dream of Doom where you recover MP, never used a mana pot.
As long as you can group 3+ mobs you can pretty much fully recover all your health if you need to or mana if you need to (the more mobs grouped up, the more you recover).
Dream of Doom has a pretty short cooldown, I never waste all my mana in less than 10 seconds so basically my mana is always full thanks to this skill, its add-on, and of course the using Q at 30 shards also helps. Blood Calamity on the other hand has a 40 second cooldown and withing those 40 seconds you may need something to recover health, this where Abysmal Flame comes into play (LMB + RMB, remember you can instant cast this with combos!) and if you’re 56 the scythes S + LMB can recover health as well (the scythes S+LMB health recovery has a cooldown too
so you have to switch between amulet/scythe to use abysmal flame/S+ LMB til you recover a good amount of health or until Blood Calamity is off cooldown).
I’ve seriously been playing this class from 0-56 all the way up to farming Sausans and never ever used a pot.
My main used to be Tamer and I always had to carry 100+ health/mana pots on me and had to haul a wagon around for more, not sure if awakening or anything else has changed this or if I was just extremely bad at the class.
Hope this helps or informs people or at least shows you a different viable play style for Sorc!
@ Teoria If you play your cards right, then you don’t even need hp potions as well. Sometimes maybe with those hard hitting mobs like giants (used 2 hp pots there after being chased by 3 of them)
The sorc is probably one of the strongest classes and you’re able to defeat even purple enemies.
When i started with the game with the second closed beta i tried then a few classes and the first one was a sorc. After the end of cbt2 i made then my deciscion for the full release; sorc was gonna be my first class. When the full release was finally there i then picked the sorc as first. Sorc ain’t really hard to play it. Ok, the combo’s can be complex sometimes, but not as complex as that of the kunoichi. It has a low defense yes, but the power a sorc possess makes up for it. I use claws of darkness as main attack and also use abyssal flame (i usually start with that), dark wave and dream of doom (very usefull skill, even below 100%) I don’t use mark of shadow that often, since it draws MP quick, it takes time and enemies often ignore it, meaning while you drown their health they bash you all the time. And with hard hitters like trolls and giants that means you probably end up dead instead. Mark of shadow is only usefull against weak foes and casters and even then there are better options.
Currently i use the grunil set, yuria amulet and helrick talisman. Yes, i progress slow and have been out for a while as well. I don’t like to rush levels.
Good guide. Now you can add all combos to the guide and mark it as complete.
Hidden combos is not a thing anymore as PA decided to add in descriptions for all the combos.
So….secret is no more.
Cheers!
Can’t say I like the skill build very much. In my book the 2 basic attacks (melee and ranged) are very useful because they are fast and they not only don’t use MP but they regenerate it. With the build you suggest you need to relay on mana potions, but I prefer to carry life potions because of the sorceress low defense.
Some skills are of doubtful use, in particular Table of Pain. It has to land a successful hit to have an effect and it is (too) slow. Much better to invest these SP in the 2 basic attacks IMHO.
Nice site! Gongratulations for all the team and the others involved!
Man, have you mastered Sorceress already? I “just” started playing as Sorceress on RU server, pretty stylish, huh? I’m looking for Lockdown/Stunlock Combos and Hidden Combos, do you know any? I tried to search for it but I didn’t find anything good, at least not in english x_x. I’m trying to figure out some. Just started PvPing against some people in arenas in order to practice.
Anyway, nice guide, helped me ^^
PM me if you want to pvp on RU
Nick: Caitriona