
Introduction
Blackstar gear is an alternative to boss gear. Blackstar Weapons have Extra Monster AP which makes it the best-in-slot for PVE. Whilst Blackstar Armor has Monster Damage Reduction and increased DP compared to boss armor. Blackstar Armor is not recommended because of the cost to make it compared to PEN boss armor. However, if you do choose to craft Blackstar armors, you can upgrade them using materials from Serendia Elvia grind spots.
There is also the Godr-Ayed weapon, which is an alternative to Blackstar, it has the exact same stats at PEN, but uses a different enhancing method.
Blackstar gear cannot have caphras levels and is harder to obtain and enhance compared to boss gear.
Should I use Blackstar?
The Blackstar Mainhand weapon is recommended for PVE because of its high AP and additional monster AP. The monster AP works for both your main hand and awakening skills, so going for a TET Blackstar can be better in PVE than a PEN Kzarka. Eventually, a PEN Blackstar would be best-in-slot for PVE and due to it being difficult to enhance, it is a good item to use J Hammers on. You can also go for the Godr-Ayed Weapon, which is an alternative to Blackstar with the same stats. The Godr-Ayed weapon uses a different enhancing method.
The Blackstar Awakening weapon is also an “ok” choice, but it has less monster AP so it is better to only get it after you have acquired a TET/PEN Blackstar main hand.
Blackstar Offhand weapon is not recommended unless you are reaching endgame gear. A PEN Blackstar offhand is very similar stat-wise to a PEN Kutum with caphras level 20, but a Kutum with caphras levels is much easier to obtain. Even a TET Blackstar offhand is not much better than a PEN Kutum, and the PEN Kutum will outscale it quickly with just a few caphras levels.
Blackstar Armors are not recommended due to them being much more difficult to enhance. It is much easier and more obtainable to get a PEN boss armor and put caphras levels into it for immediate gains. Blackstar Armor can be upgraded (like caphras levels) using the Serendia Elvia materials, but these cannot be bought from the market and require hundreds of grinding yourself. In addition, you need a PEN Blackstar Armor to upgrade to Fallen God/Labreska (best in slot armors), which is far more difficult than needing a PEN Boss armor with level 10 caphras.
Blackstar Gear Stat Comparison
Blackstar Gear Appearance
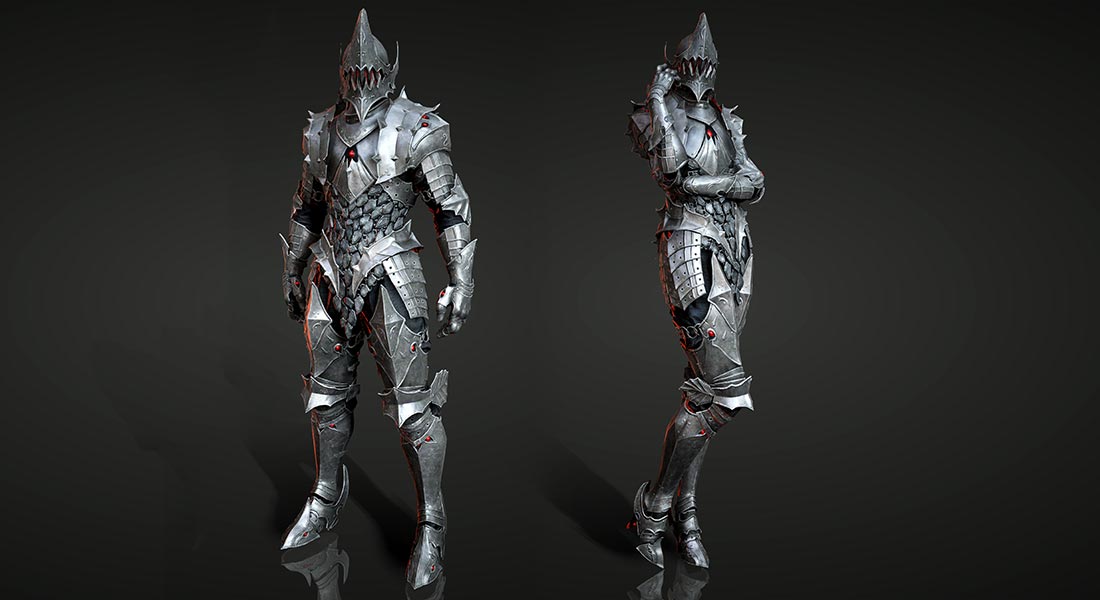
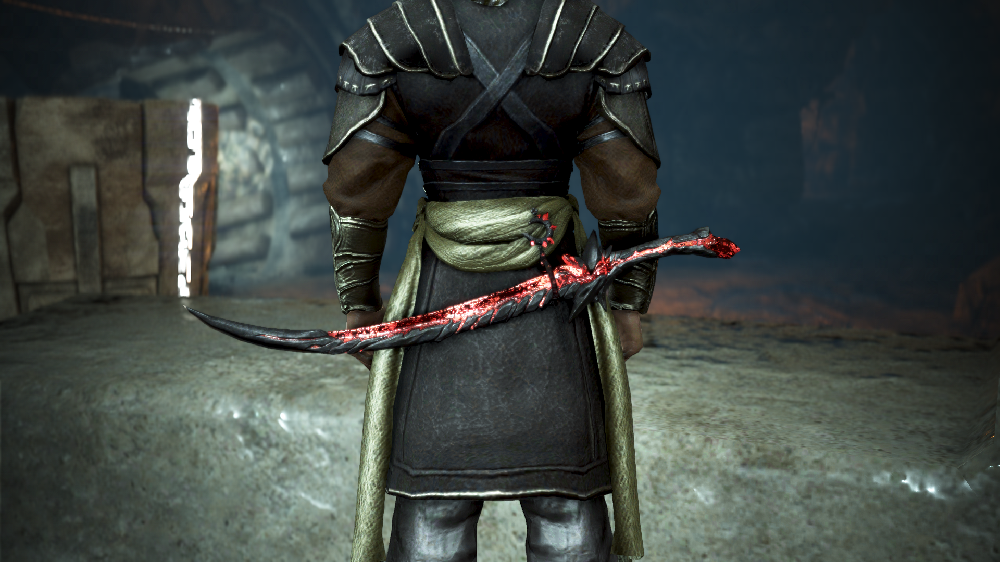
<Credit goes to u/PackaPunchx from Reddit for this amazing screenshot of the Blackstar Shamshir>
Free TET and PEN Blackstar Weapon
All players can obtain 2 free TET (IV) Blackstar weapon and 2 free PEN (V) Blackstar weapon of their choice.
The TET (IV) Blackstar Weapon Box can then be obtained from your (Y) Challenge Rewards.

You can select either x1 TET (IV) Blackstar weapon (main/awakening/sub-weapon) or x10 [Event] Dim Origin of Dark Hunger
Once you have selected the Weapon Box, it can be opened on any class to receive a weapon suitable for that class.
-
Shai cannot open the TET (IV) Blackstar Awakening Box.
-
TET (IV) Blackstar weapons obtained from the box cannot be registered on the Central Market.
-
Only non-season characters can open the TET (IV) Blackstar weapon box and equip the claimed weapon.
| ▼ 4 Choices (Choose 1) ▼ | |||
|---|---|---|---|
| TET (IV) Blackstar Weapon (1 Main/Awakening/Sub-weapon) |
[Event] Dim Origin of Dark Hunger x10 | ||
|
TET (IV) Blackstar Main Weapon Box
|
TET (IV) Blackstar Awakening Weapon Box
※ Not recommended for Shai Class
|
TET (IV) Blackstar Sub-weapon Box
(Recommended for new players)
|
 [Event] Dim Origin of Dark Hunger x10
※ For veteran adventurers who do not require TET Blackstar weapons. |
The PEN (V) Blackstar Weapon Box can also be obtained from your (Y) Challenge Rewards.


Right-click the box to open the options and choose between a mainhand weapon or awakening weapon box.
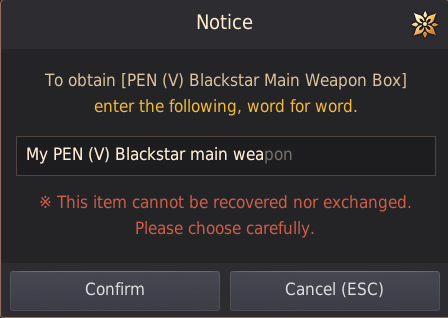
You will be asked to type a specific sentence into a pop-up box to confirm your choice.
Type one of the following sentences depending on your choice:
- My PEN (V) Blackstar main weapon
- My PEN (V) Blackstar awakening weapon

Once you have selected the Weapon Box, it can be opened on any class to receive a weapon suitable for that class.
-
Shai cannot open the PEN (V) Blackstar Awakening Box.
-
PEN (V) Blackstar weapons obtained from the box cannot be registered on the Central Market.
-
Only non-season characters can open the PEN (V) Blackstar weapon box and equip the claimed weapon.
DEC Tuvala Weapon Exchange
After graduating from the season servers, you can complete a once-per-family quest which will allow you to start enhancing 1 PEN Tuvala weapon and 1 PEN Tuvala Accessory, obtained from the Season Servers, up to DEC (X) enhancement level.
Once you reach DEC enhancement, you can swap the weapon for a PEN Blackstar Weapon, and the accessory for a TET Kharazad Accessory. These are both endgame items. Take a look at our DEC Tuvala Gear Guide to get started.
I recommend enhancing your PEN Tuvala Awakening weapon and PEN Tuvala Belt up to DEC. This is because you will select the FREE PEN and TET Blackstar for the other 2 weapon slots.

How to obtain other Blackstar Gear
To obtain Blackstar Gear, you must finish a questline which can only be completed once per character for each different piece of gear. After completing the questline you have to buy the gear from the marketplace to receive another. You can buy the gear straight from the marketplace and equip it without needing to do the quest, but if you would like to create your own Blackstar gear you have to do the quest yourself.
Requirements:
- Level 56+ on your character
- Calpheon and Mediah main story questlines must be completed
- Knowledge of “The Three Legendary Blacksmiths of Mediah”
- This can be obtained by completing a short questline. Press “O” to open your quest log then the “Suggested” tab. You will then find the questline “[Lv. 51] Mediah: The Legendary Blacksmith” which starts at Tulem, the arms dealer in Altinova.
- 3 Boss Gear pieces at +0 to sacrifice for the quest
- For any of the Blackstar weapons quests, you will need to use Kzarka, Kutum, Nouver, Offin Tett, or Dandelion
- For any of the Blackstar armor quests, you can use any boss weapon or armor piece
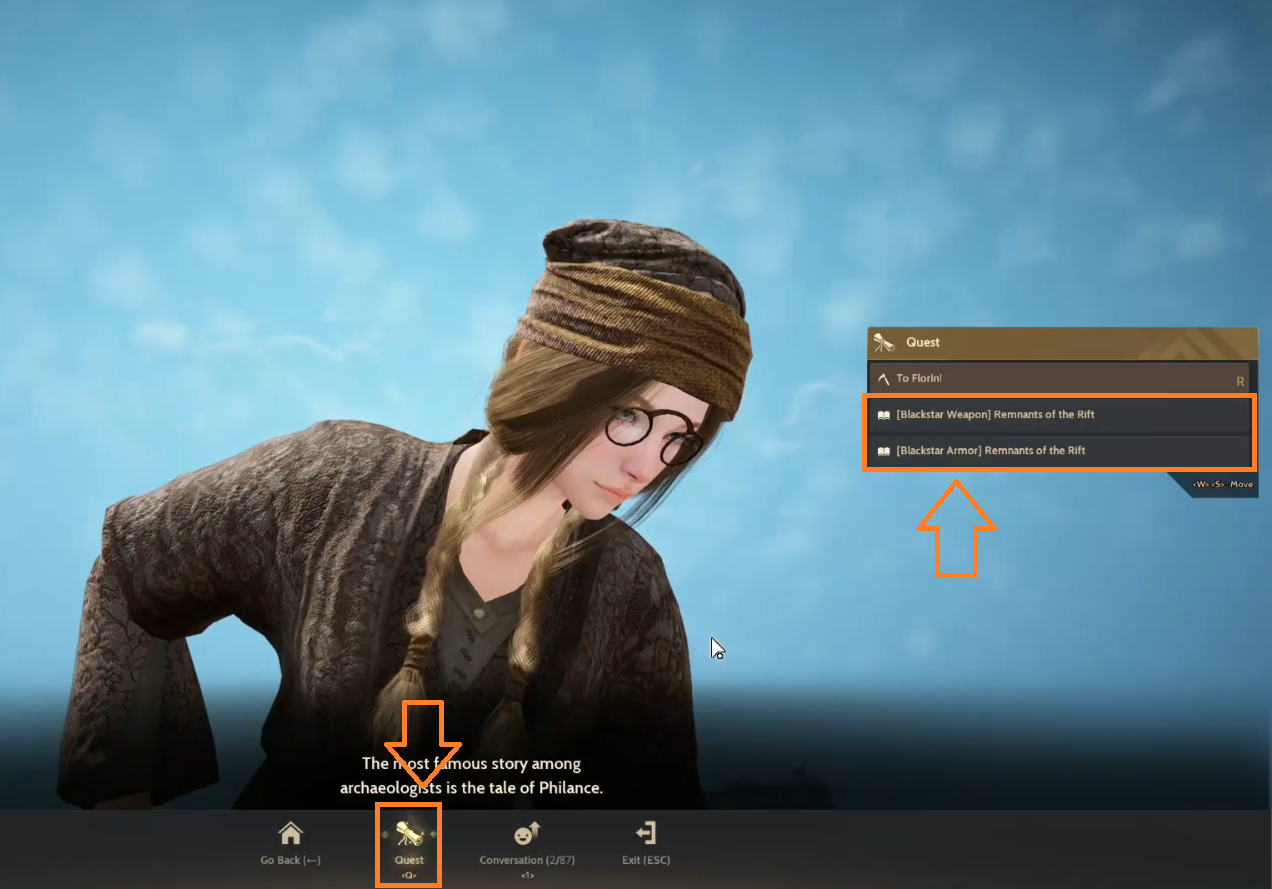
 Remnants of the Rift x1
- Obtained as a rare drop when defeating Dark Rift bosses.
- Can also be obtained as a rare drop from Golden Treasure Chests which require a Gold Key to open.
 Specter’s Energy x1 (not required for mainhand weapon)
- Obtained as a rare drop when killing monsters at Bashim Base, Titium Valley, Desert Naga Temple, Waragon Nest, Gahaz Bandit’s Lair, Cadry Ruins, Crescent Shrine, Taphtar Plain, Basilisk Den, Pila Ku Jail, Roud Sulfur Mine, Polly’s Forest, Loopy Tree Forest, Manshaum Forest, Tooth Fairy Forest, Tshira Ruins, Blood Wolf Settlement, Sherekhan Necropolis, Protty Cave, Sycraia Underwater Ruins (Upper Zone)
It is also worth noting that if you are doing the weapon questline you will receive a weapon for the class that you complete the quest on.
Questline Walkthrough
Right-click the ![]() Remnants of the Rift item in your inventory to begin. You will be taken to Martha Kiyen located at Northern Wheat Plantation. You can then choose which of the Blackstar quests you would to complete. In this example, we will be walking you through the Armor questline since it has extra steps at the end, but both are very similar.
Remnants of the Rift item in your inventory to begin. You will be taken to Martha Kiyen located at Northern Wheat Plantation. You can then choose which of the Blackstar quests you would to complete. In this example, we will be walking you through the Armor questline since it has extra steps at the end, but both are very similar.
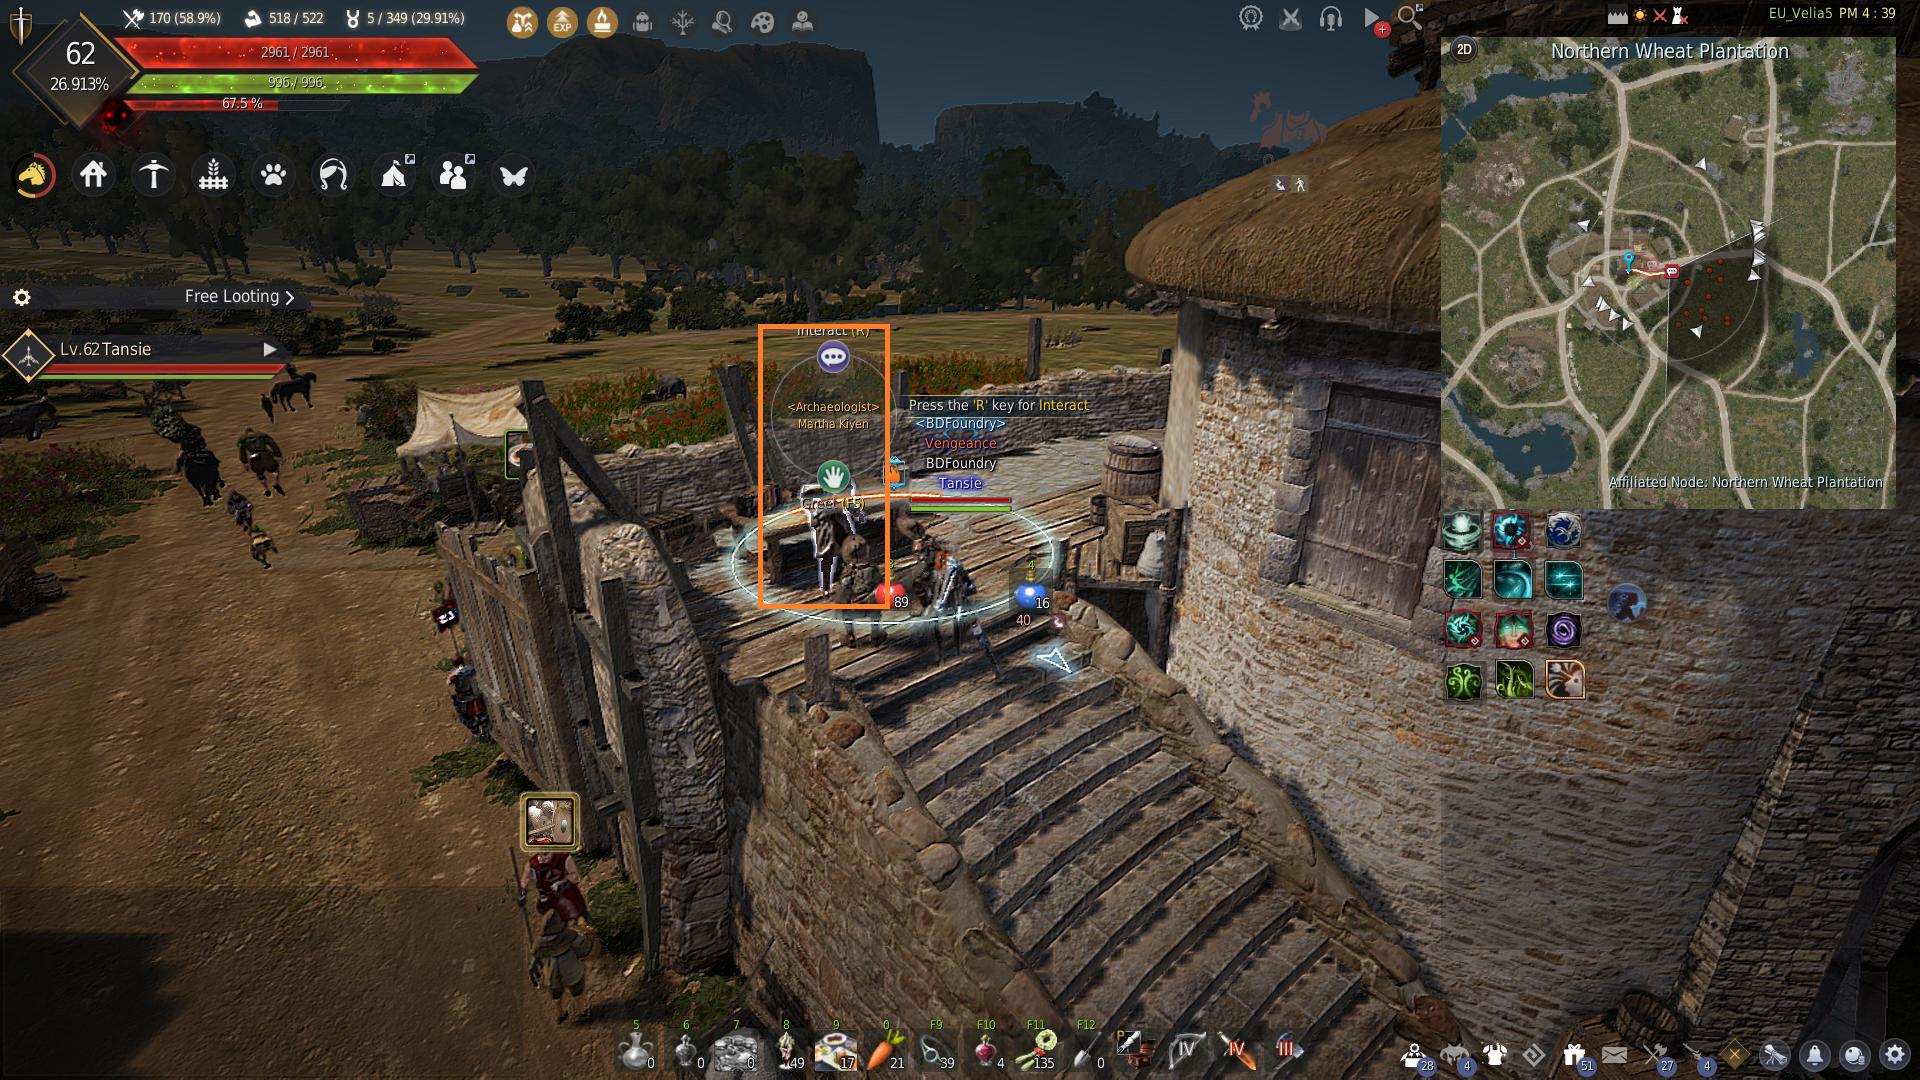
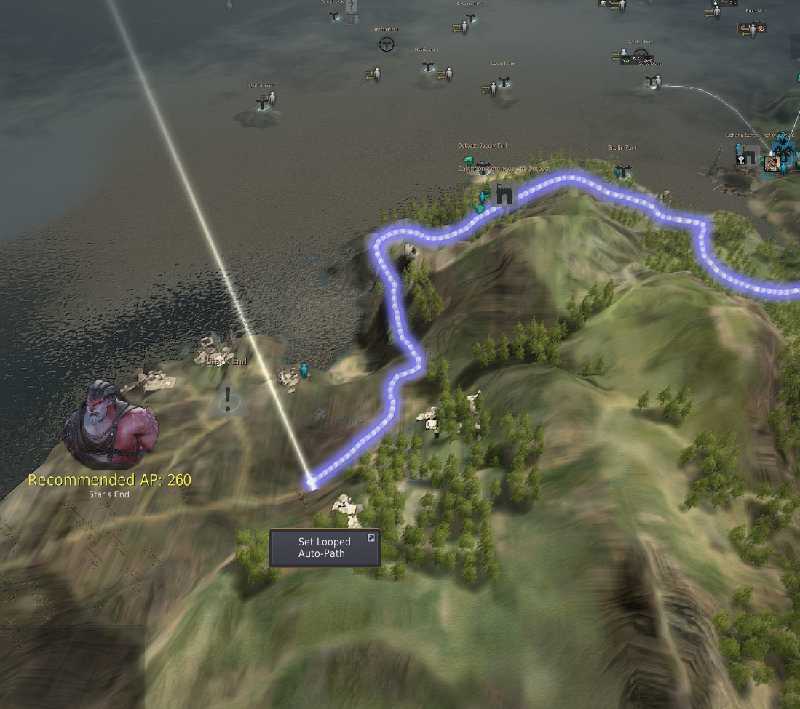
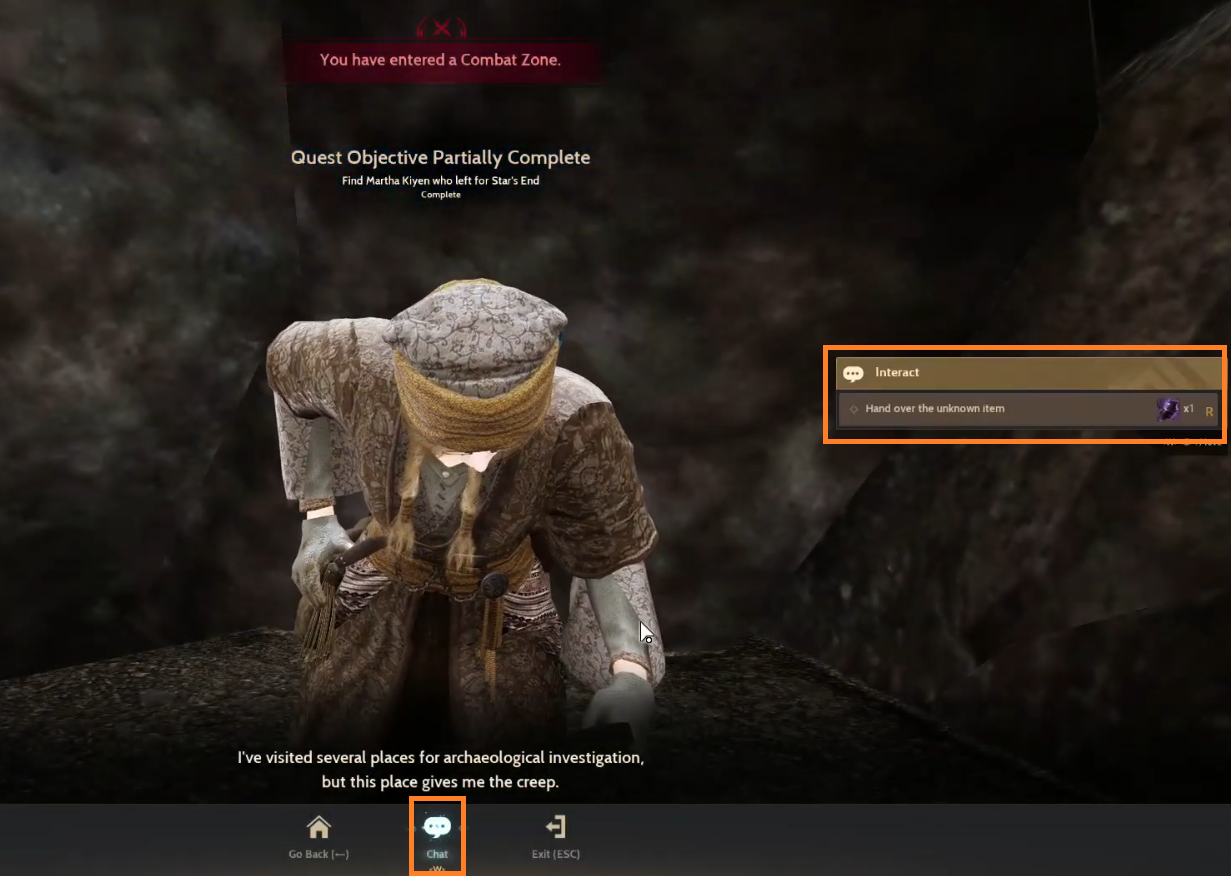
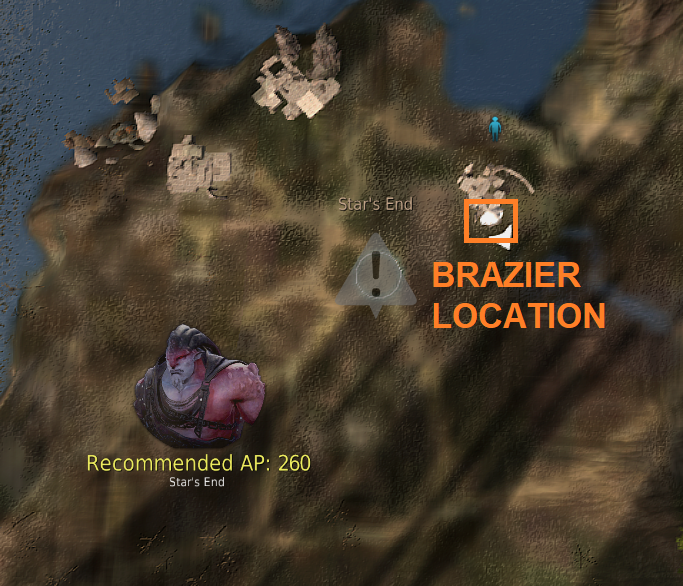
Next, you will be taken to Star’s End to meet up with Martha and hand over the Remnants of the Rift.
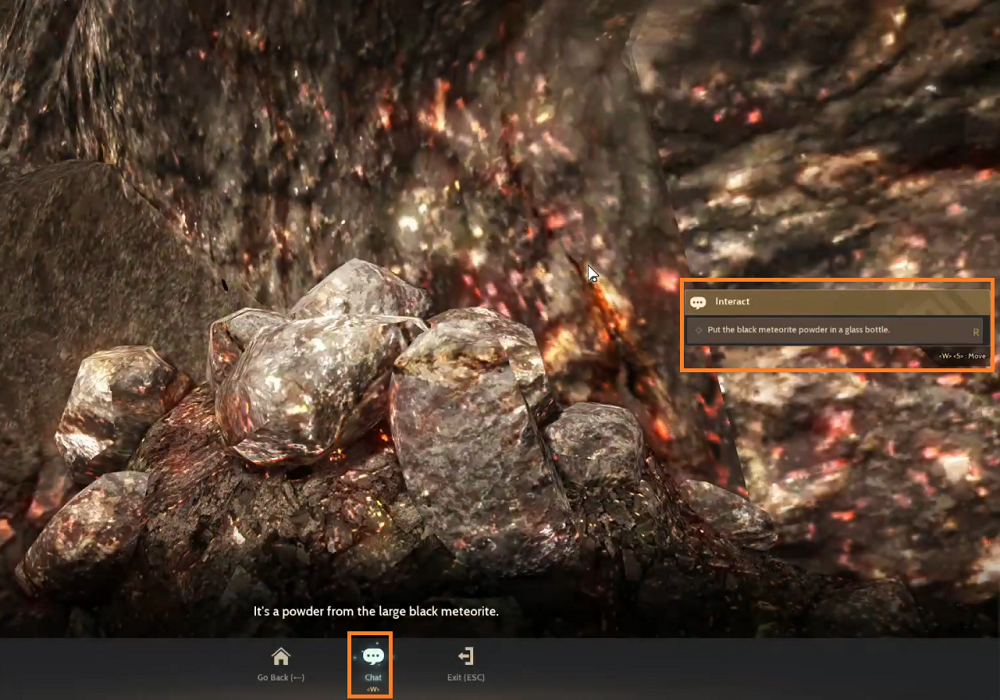
Go to the marked location and interact with the two Black Meteorite located around Star’s End then go back to complete.
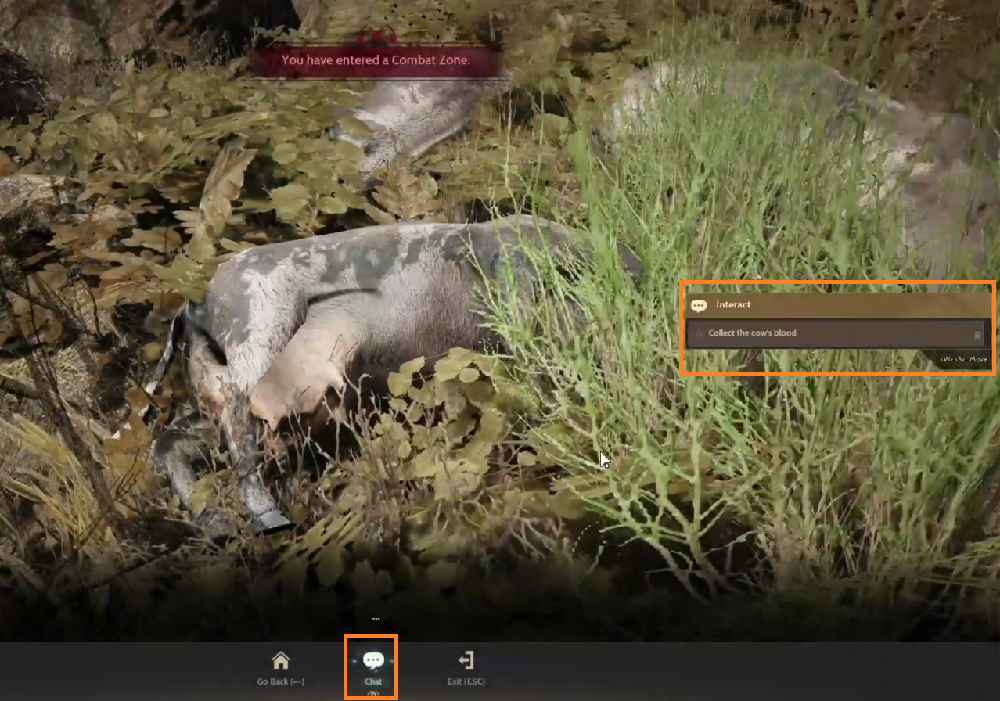
The next quest requires you to interact with the Cows nearby to collect their blood. Go back to Martha afterward to hand it over and complete the quest.
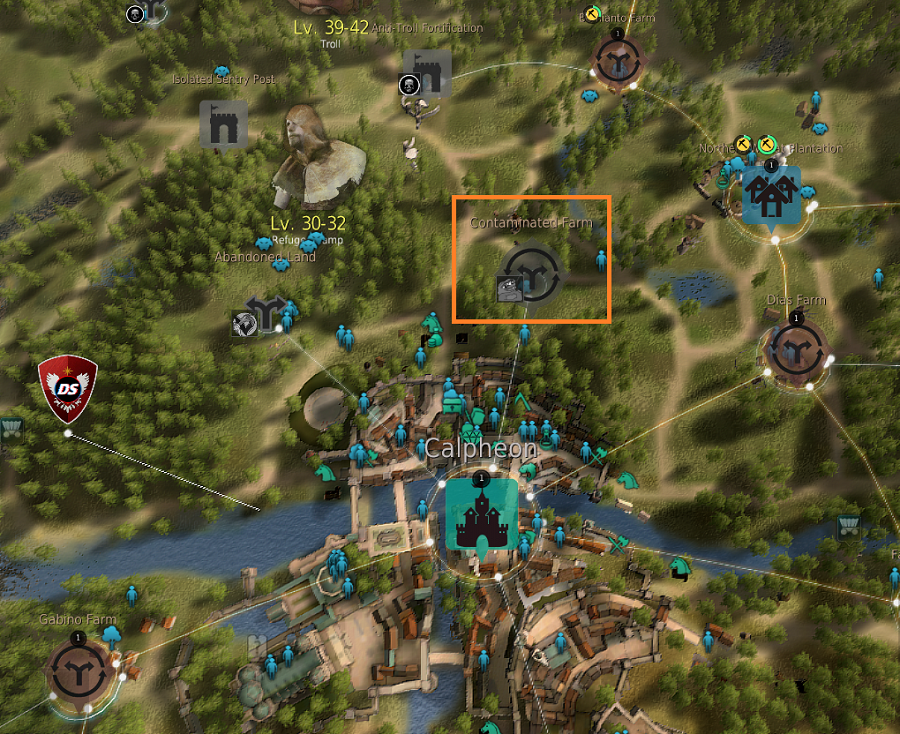
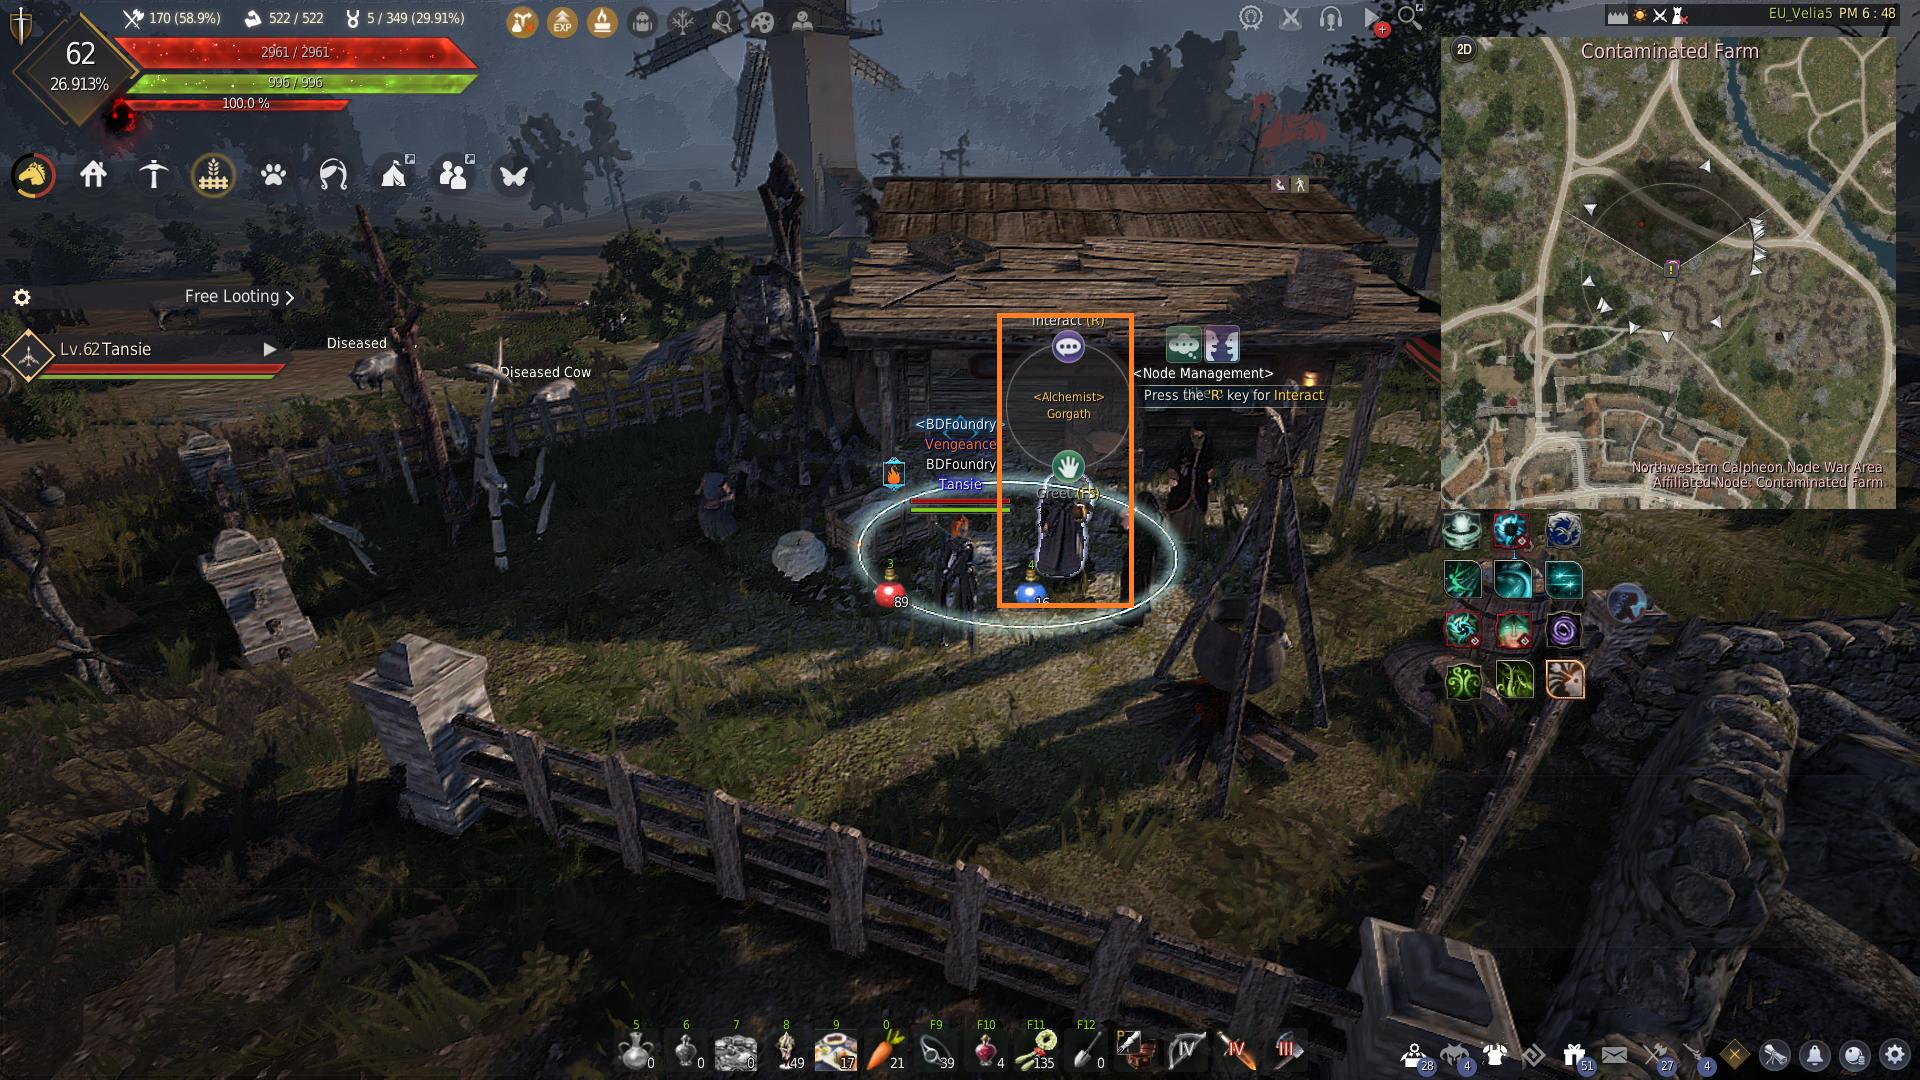
Head over to Contaminated Farm now which is located just north of Calpheon. Speak to Gorgath and pick up the next quests. Use the chat option and select “Analyze the blood sample together” to complete and continue.
The next location is Caphras Cave which is located west of Florin. Go inside the cave into the secret part of the cave and interact with the Caphras Journal on the bookshelf above the ladder (on the right side of the cave).


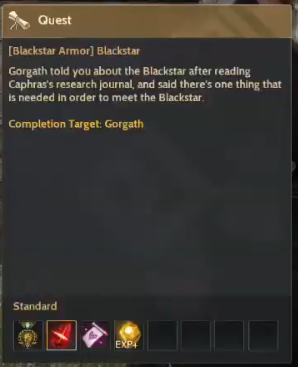
You must then go back to Contaminated Farm to speak to Gorgath again. He will give you an item called “Eye of Anguish” which is required later on. At this point, the questline will also split into two and you can choose between the easy or hard route.
- It is recommended to choose the hard questline option.
- The easier questline will send you to Tarif and then give you a quest to kill 1000 monsters at Helms Post but will give you an easier boss in return.
- Choosing the hard option allows you to go straight to the Star’s End Brazier and will save you time.
Once you are at the Brazier, create the Eye of Desolation. This is done by first Processing (L) > Heating, three base boss gear items. You can use any boss weapon or armor but it must be unenhanced. This will give you an item called Concentrated Boss Aura. Once you have 3 of these, use the Manufacture option to combine the Eye of Anguish and Concentrated Boss Aura to create the Eye of Desolation. This is used to summon the harder version of the boss which has a recommended AP of 260.

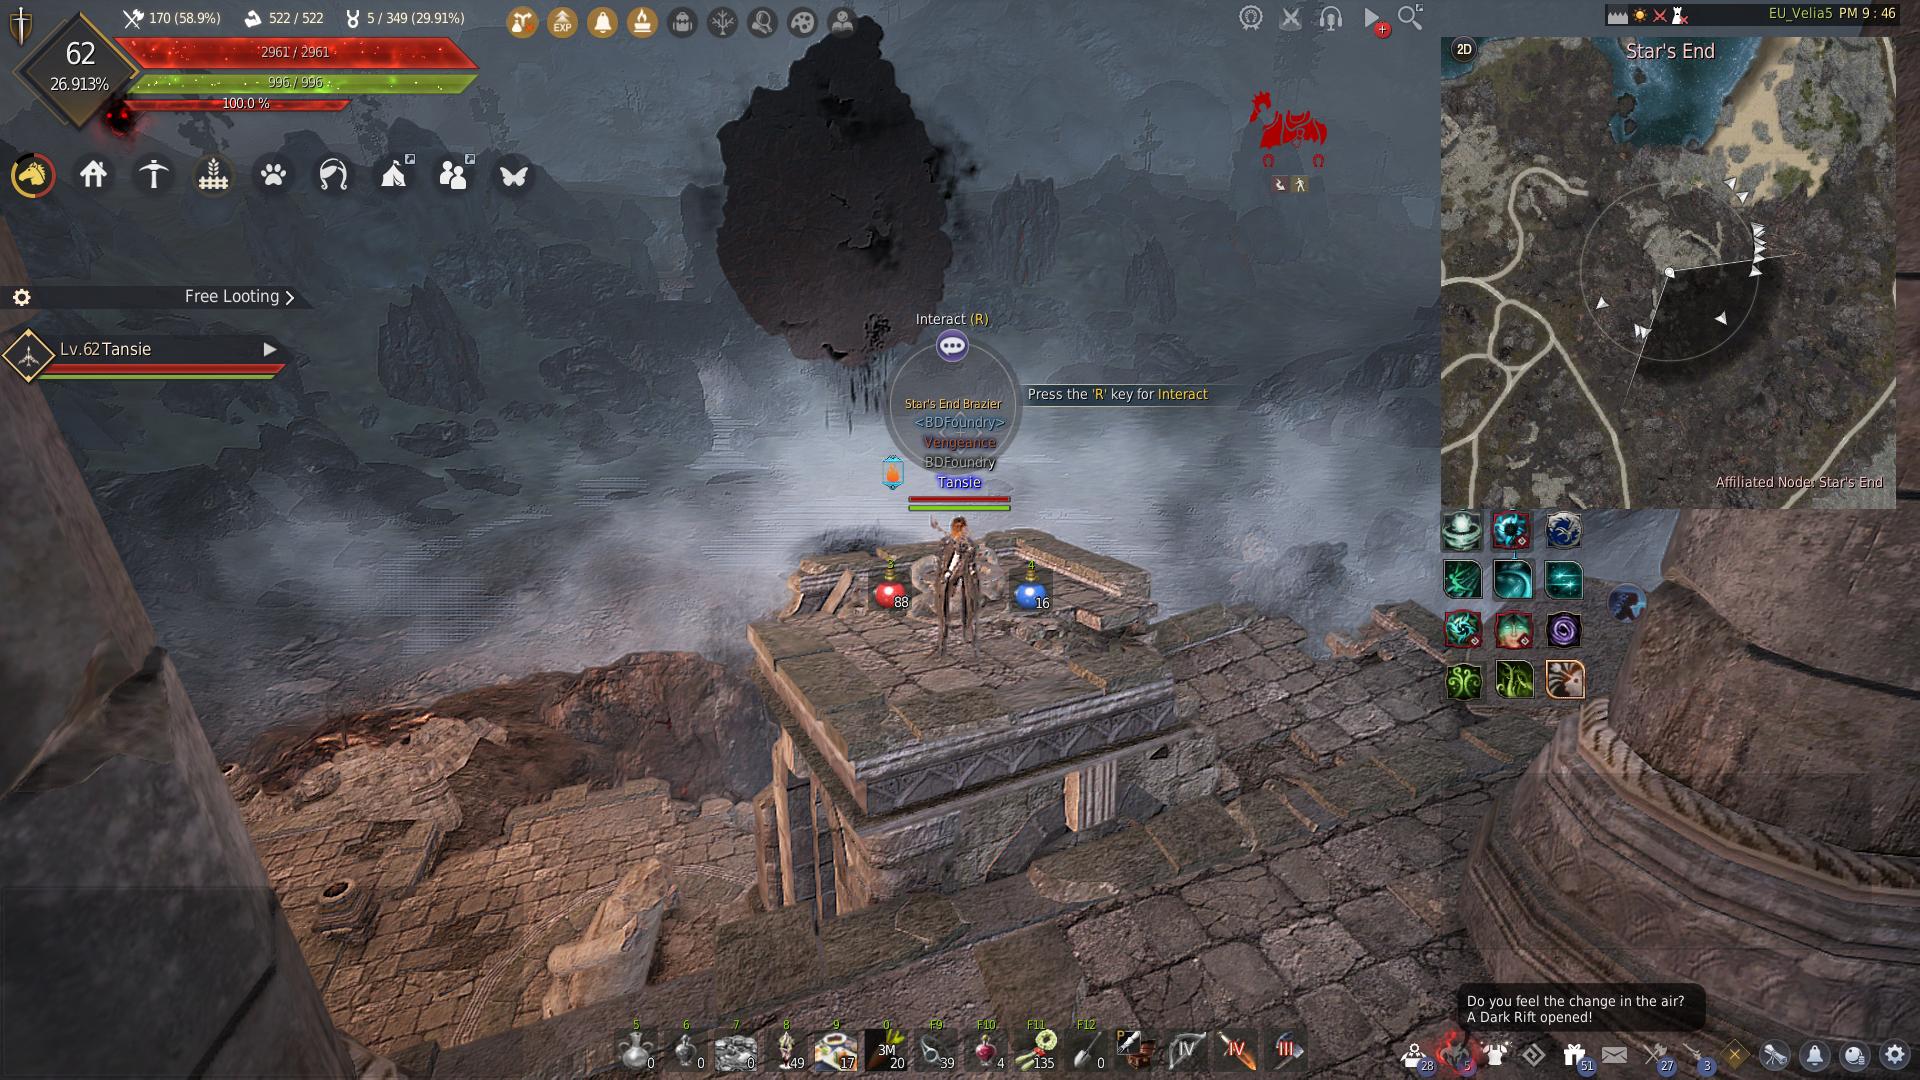
After defeating the boss, go back to the Brazier to complete then head to Calpheon and speak to Dobart. He will then send you to Helms Post where you will complete the final part of the questline.

Head inside the cave at Helms Post and speak to Dorin Morgrim. Give the Blackstar’s Claw to him then use the chat option again. Interact with the Crystal Ball in the center of the room then speak with Dorin Morgrim again.
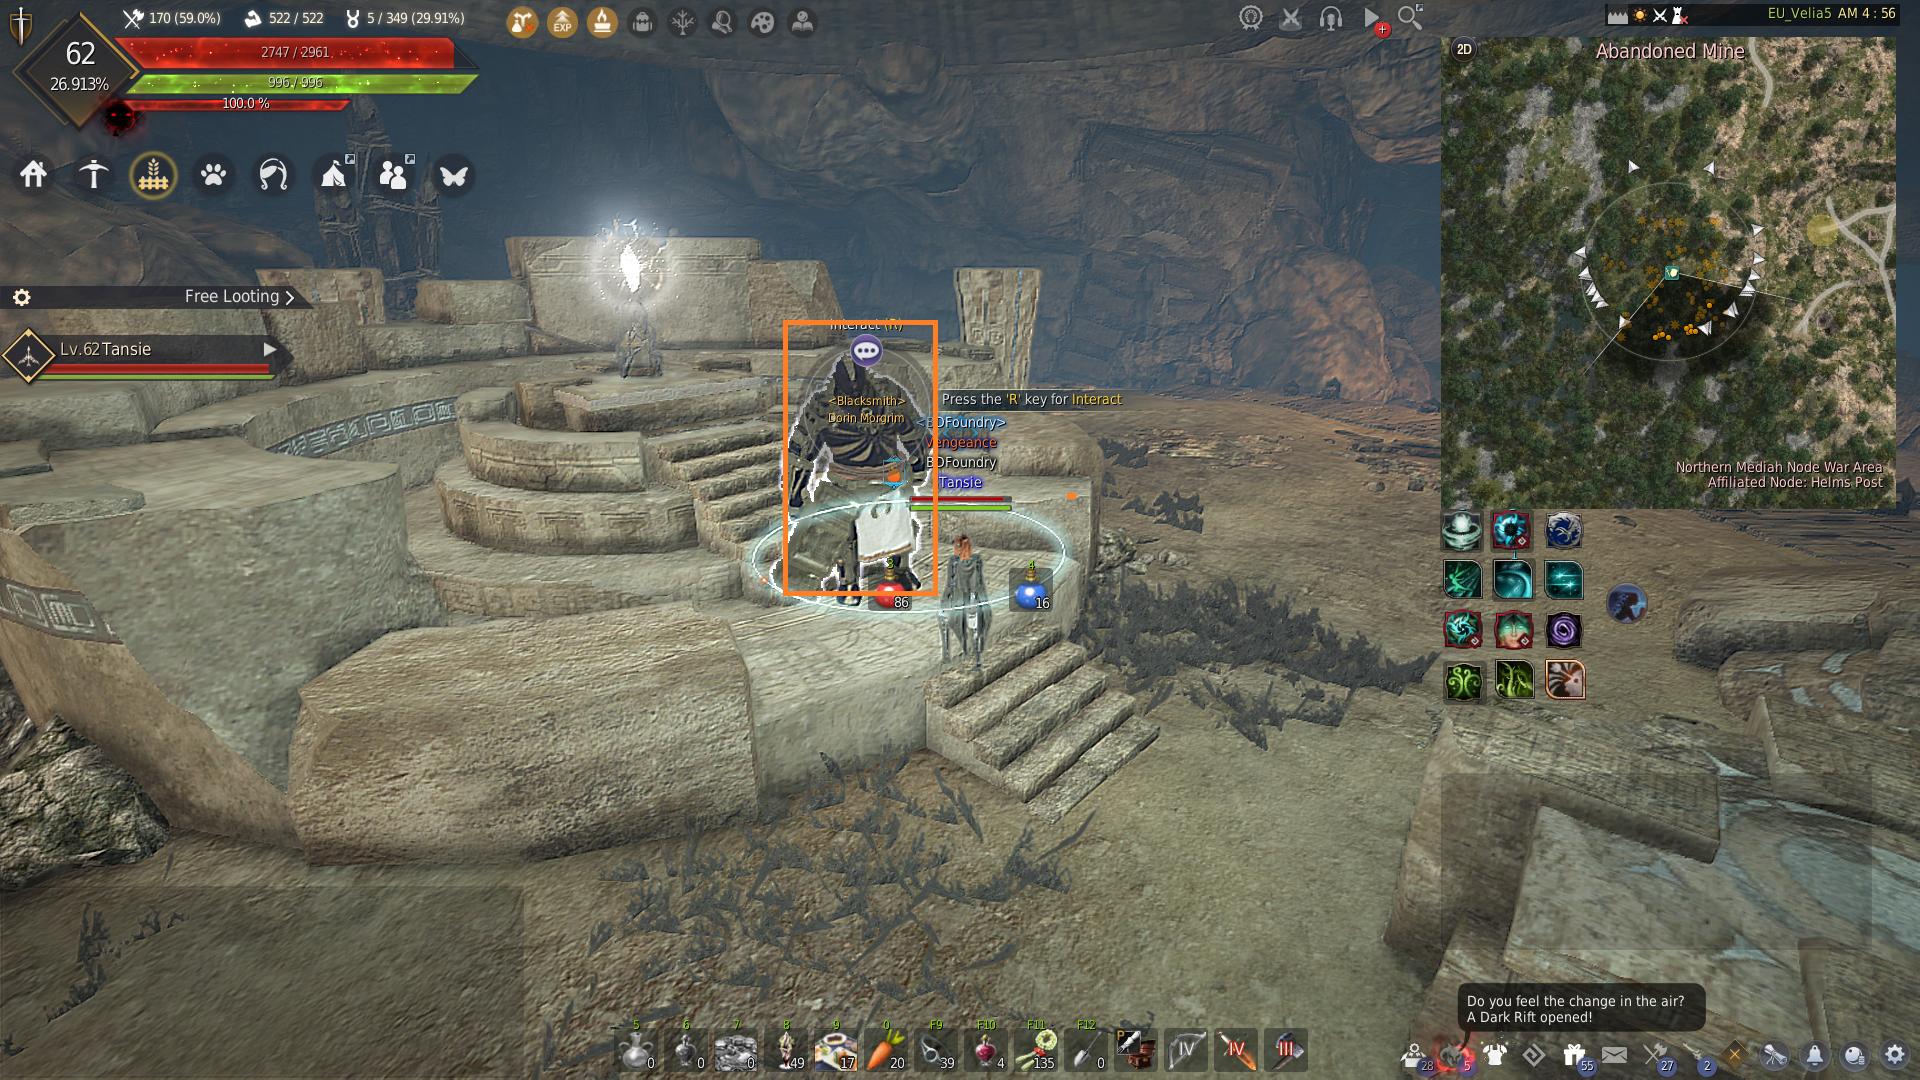

If you are doing the questline for any of the Blackstar Armor pieces or Blackstar Awakening/Offhand then you will now need to hand over the Specter’s Energy.
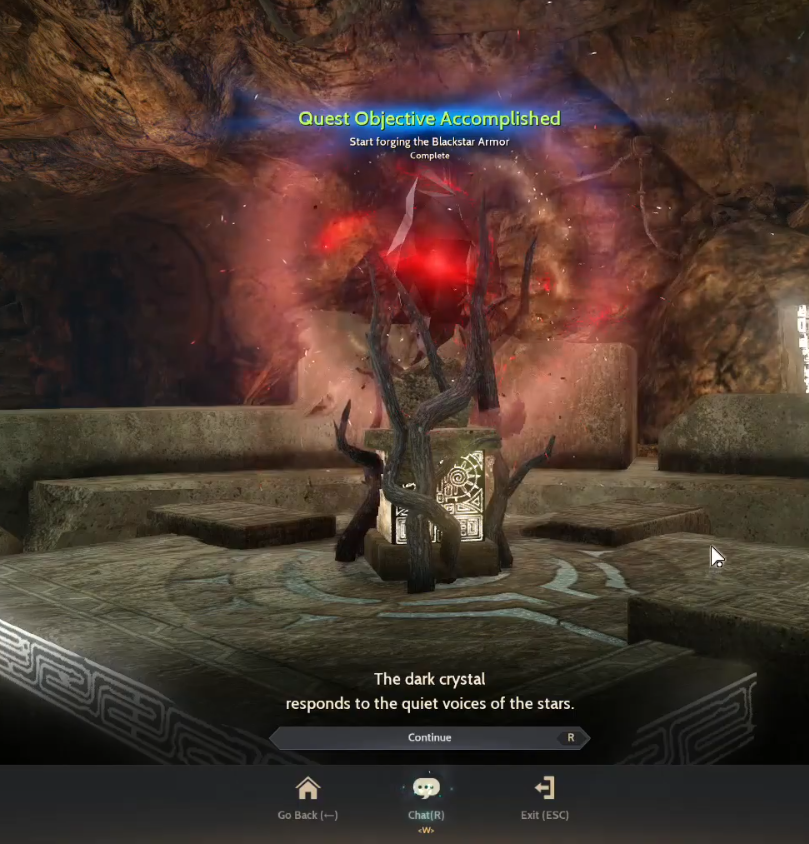
Finally, accept the last quest from Dorin Morgrim and use the chat option to hand over the Blackstar piece. Interact with the Crystal Ball again to craft the Blackstar gear then go back to Dorin to receive the forged Blackstar gear.
Enhancing Blackstar Gear
Blackstar gear is more difficult to enhance than regular gear or boss gear and does not use the same enhancing materials.
When enhancing between +1 to +15, you will need:
 Concentrated Magical Black Stone x1
- Obtained by heating Sharp Black Crystal Shard x1 and Black Stone x2
Each failed attempt will result in Max Durability -10 on the item.
When enhancing between PRI to PEN, you will need:
 Flawless Magical Black Stone x1
- Obtained by heating Sharp Black Crystal Shard x2, and Mass of Pure Magic x1
Each failed enhancement attempt will result in Max Durability -20 on the item.
Blackstar Recommended Failstacks
- Safe enhance to +7
- Use 10 or more fail stacks to get to +8
- Use 10 or more fail stacks to get to +9
- Use 15 or more fail stacks to get +10
- Use 25 or more fail stacks to get +11
- Use 30 or more fail stacks to get +12
- Use 40 or more fail stacks to get +13
- Use 50 or more fail stacks to get +14
- Use 50 or more fail stacks to get +15
- Use 30 or more fail stacks to get PRI
- Use 40 or more fail stacks to get DUO
- Use 60 or more fail stacks to get TRI
- Use 110 or more fail stacks to get TET
- Use 200 or more fail stacks to get PEN – recommended to use Cron Stones/J’s Hammer
Agris Essence Required
Agris Essence is gained every time you fail to enhance a piece of gear. All Blackstar Gear (weapons and armor) share Agris Essence, and once you reach a certain amount of Agris Essence you can enhance the Blackstar Gear with 100% success chance. The table below shows the amount of Agris Essence you need for each enhancement level.
- For example, to enhance a TET Blackstar Weapon/Armor to PEN, you would need 20 Agris Essence, which means you would need to fail to enhance TET > PEN 20 times.
| [All gear within this group share stored Agris Essences.] |
||
|---|---|---|
| Gear Category | Enhancement Level | Max Storable Agris Essences |
|
– Blackstar Weapons
– Blackstar Defense Gear |
7 | 3 |
| 8 | 7 | |
| 9 | 8 | |
| 10 | 9 | |
| 11 | 10 | |
| 12 | 13 | |
| 13 | 17 | |
| 14 | 20 | |
| 15 | 4 | |
| PRI (I) | 5 | |
| DUO (II) | 6 | |
| TRI (III) | 9 | |
| TET (IV) | 15 | |
How to obtain Mass of Pure Magic
![]() Mass of Pure Magic cannot be bought or sold on the marketplace. The easiest way to get the item is by grinding at spots in Serendia Elvia, Valencia, Drieghan, Kamaslyvia, and O’dyllita. If you are really struggling to obtain enough Mass of Pure Magic you can also send workers to the Mountain of Division Excavation node.
Mass of Pure Magic cannot be bought or sold on the marketplace. The easiest way to get the item is by grinding at spots in Serendia Elvia, Valencia, Drieghan, Kamaslyvia, and O’dyllita. If you are really struggling to obtain enough Mass of Pure Magic you can also send workers to the Mountain of Division Excavation node.
To connect the Mountain of Division Excavation node you will need 10 CP from O’draxxia. You can use our Node Calculator Map to plan your route in advance.

Mass of Pure Magic can also be obtained in other ways:
- Crypt of Resting Thoughts Excavation Node (O’dylita)
- Star’s End Excavation Node (Calpheon)
- Rare drop from processing (L) > Grinding, Black Stone
- Processing (L) > Manufacture, Remnants of the Rift x1 and Black Spirit’s Claw x1 will give you Mass of Pure Magic x5
- Rare drop when Gathering
- Rare drop when Harvesting Magical or Mysterious seeds on your farm
- Rare drop when Hunting Fugitive Khalk or Blue Whale
- Rare drop when defeating Field Bosses
- Exchange Destructive Illusion x15 (obtained from Calpheon Daily quests or a rare drop from Fadus Habitat)
Upgrading Blackstar Gear/Obsidian Blackstar
![]() Obsidian Specter’s Energy can be used to upgrade Blackstar Armor, Shoes, Gloves, or Helmet with 100% chance. The upgraded Blackstar Gear has higher DP and also additional effects.
Obsidian Specter’s Energy can be used to upgrade Blackstar Armor, Shoes, Gloves, or Helmet with 100% chance. The upgraded Blackstar Gear has higher DP and also additional effects.
When the Blackstar gear is enhanced using this item it becomes “Obsidian Blackstar” gear. Even if the gear is enhanced it still keeps the “Obsidian” effects and name.
Obsidian Specter’s Energy and almost all of the materials required to create the item cannot be sold on the market, meaning you will need to grind them yourself (which can take a long time).
| Enhancement | Obsidian Blackstar Gear Additional Effect |
|---|---|
| PRI (I) | No additional effect |
| DUO (II) |
Evasion 2(+2) Damage Reduction 1 Max HP +30 |
| TRI (III) |
Evasion 2(+2) Damage Reduction 1 Max HP +30 |
| TET (IV) |
Evasion 2(+2) Damage Reduction 2(+2) Max HP +40 |
| PEN (V) | No additional effect |
To craft an ![]() Obsidian Specter’s Energy you need to use Simple Alchemy with the following ingredients:
Obsidian Specter’s Energy you need to use Simple Alchemy with the following ingredients:
 Passion of Valtarra x1
- Crafted using Simple Alchemy: Valtarra’s Flame x100 and Gamorth Scale x100
 Reason of Okiara x1
- Crafted using Simple Alchemy: Okiara’s Tide x100 and Oil of Void x100
 Courage of Narc x1
- Crafted using Simple Alchemy: Narc’s Lightning x100, Fragment of All Creations x10, and Legacy of the Ancient x10
 Flower of Madness x1
- Crafted using Simple Alchemy: Seed of Void x100 and Condensed Boss Energy x10
- Specter’s Energy x1
- Obtained as loot from hunting grounds throughout Valencia, Kamasylvia, and
Dreighan, and with a higher probability in Odylita’s Thornwood Forest and Mediah’s Schultz Guard.
- Obtained as loot from hunting grounds throughout Valencia, Kamasylvia, and
| Item name | How to obtain |
|---|---|
|
Valtarra’s Flame |
Dropped from Serendia Elvia spots: Castle Ruins and Orc Camp |
|
Okiara’s Tide |
Dropped from Serendia Elvia spots: Altar Imps and Swamp Fogans |
|
Narc’s Lightning |
Dropped from Serendia Elvia spots: Biraghi Den, Swamp Nagas and Bloody Monastery |
|
Seed of Void |
Dropped from all Serendia Elvia grind spots (elite monsters only) |
|
Oil of Void |
Oil of Regeneration x10 Oil of Storms x10 Oil of Fortitude x10 Oil of Corruption x10 Oil of Tranquility x10
Simple Alchemy |
|
Fragment of All Creations |
Obtained by heating the following accessories
|
|
Legacy of the Ancient |
Obtained by heating the following crystals
|


Don’t seem to need Concentrated Boss Aura anymore.. don’t get that ahead of time!
Nevermind, you need them. Moved to end of quest chain. Sorry!
Cron PEN BS? Outdated.
You wrote that blackstar quests are once per family but it’s actually once per character.