Introduction
The Archer class uses a crossbow as their primary weapon and a Ra’ghon as their secondary weapon, which is an Arm Guard. Unlike other classes, Archer starts with their awakening weapon, which is a Greatbow, and can also unlock awakening skills before level 56. However, you will still need to complete the Awakening questline to unlock the use of the Dandelion awakening weapon. The Archer class has lots of movement and dexterity, allowing you to kite your target and deal damage at long-range distances. They have high attack damage but very low defenses and are considered a glass cannon class that must rely on kiting and keeping their distance until the right moment.
Succession
Unlike other classes, Archer does not have a set of succession skills. The official answer as to why can be found in the Thai Pearl Abyss Q&A in 2020 (translated below)
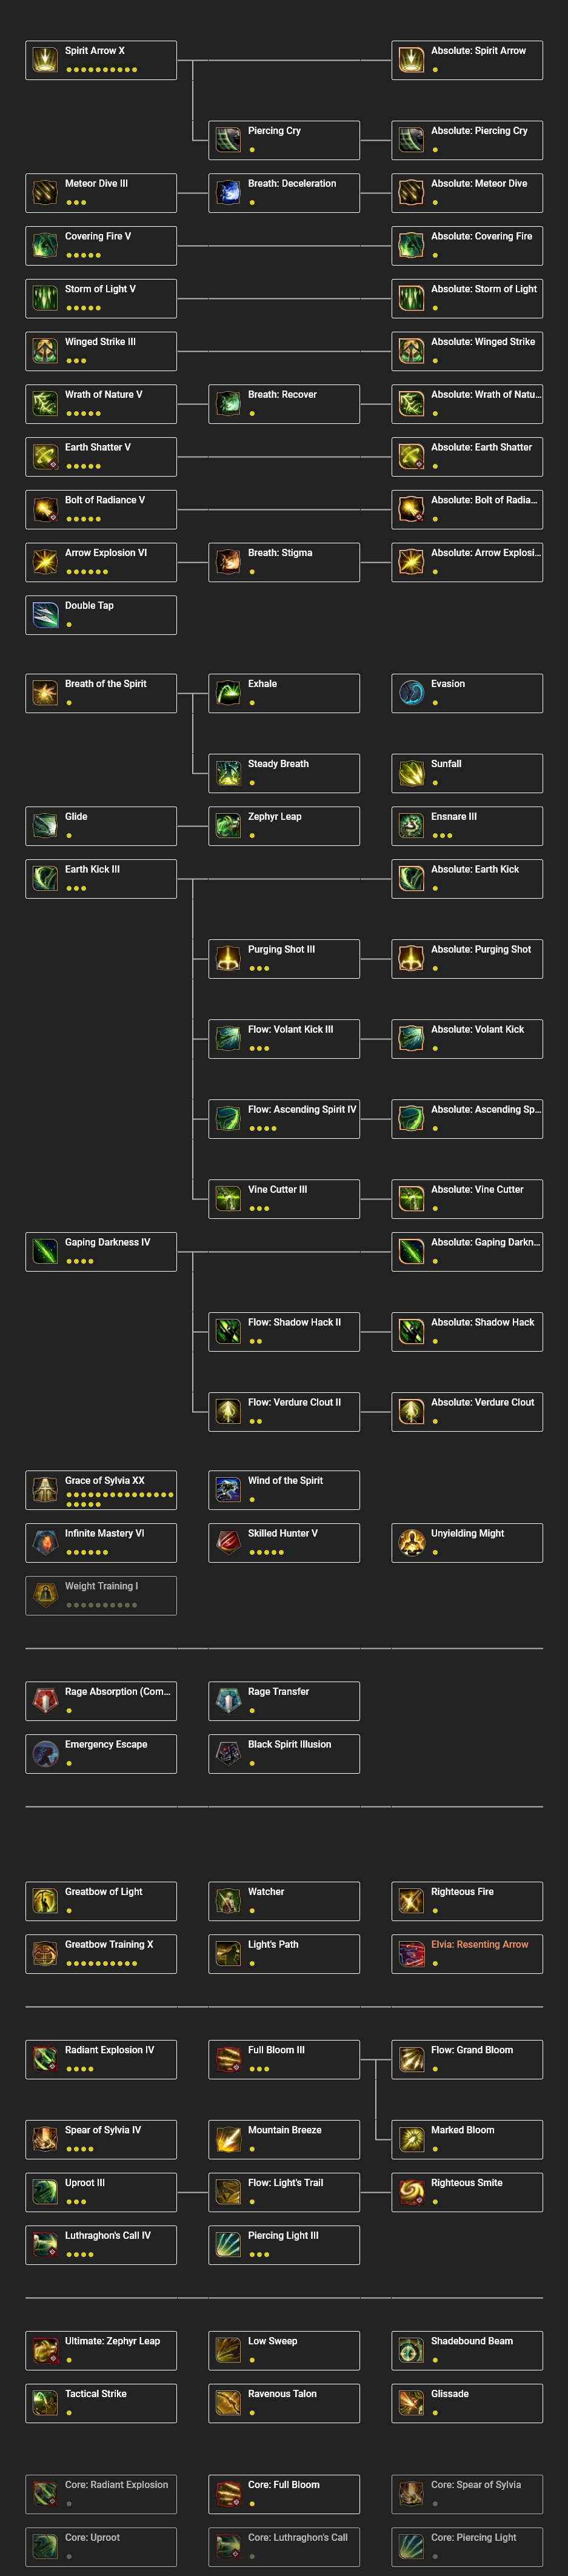
Skill Builds
Since the skill point update in late 2022, you can obtain all skills for approximately 1,000 skill points. Focus on your main skills first, then level the passives. The Weight Training skill should be leveled last, since it only gives you weight limit increase. You basically want to take all skills.
Protected Skills
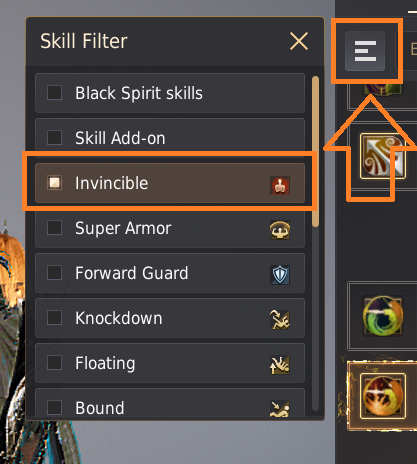
It is important to read through your skills to understand which skills have protection and crowd control effects. Read through your skills carefully to get familiar with what each skill does. You can also filter the different effects in the Skill Window (K).
 Super armor (SA)
- This means you cannot be crowd controlled while this effect is active (except grab/grapple), but you will still take damage from any attacks
 Forward guard (FG)
- This means you will block damage and crowd control effects coming from the front direction of your character. The block can be broken if you take enough damage and you will see a blue shield with a number, indicating the % left of the block.
- Some classes have an “S block”. This means you will automatically use Forward Guard when moving backward with “S”.
 Invincible (I-frame)
- This means that you will not take damage and cannot be crowd controlled from any direction for the duration of the effect
PVE Iframe
![]() Evasion and
Evasion and ![]() Glide are also “PVE Iframes”, which means these skills have a 1-second invincibility effect against monsters only, even if you spam the skill repeatedly.
Glide are also “PVE Iframes”, which means these skills have a 1-second invincibility effect against monsters only, even if you spam the skill repeatedly.
Locked Skills
To lock a skill, press the lock icon on the top of each skill icon in the skill window (K)
These are the skills I recommend locking to help prevent messing up combos during PVP.
 Evasion
 Earth Kick
 Purging Shot
 Volant Kick
 Ascending Spirit
 Vine Cutter
 Shadow Hack
 Watcher (use from hotbar)
 Radiant Explosion (use from hotbar)
 Gaping Darkness (optional – put on hotbar)
 Storm of Light (optional)
Hotbar Skills
These are the skills I recommend putting on your hotbar.
Nature Shattering Arrow, Righteous Smite, Spear of Sylvia, Ensnare, Watcher, Radiant Explosion, Bold of Radiance, Gaping Darkness
![]()
![]()
![]()
![]()
![]()
![]()
![]()
![]()
You may also want to put more skills on your hotbar and cooldown slots to keep track of them. For more information about how to do this, check out our Edit UI and Settings Guide.
Core Skills
Core skills are a way of upgrading 1 skill from your awakening skill kit.
Core skills are usually down to preference but most players choose Full Bloom because it is the best option for PVE. It is also good in large scale PVP. Other options are Uproot for smaller scale PVP and protected mobility with floating CC on hits, or Radiant Explosion for a protected bound CC.
- Core: Radiant Explosion: Bound on hits
 Core: Full Bloom: Forward Guard while using skill (nullified during cooldown).
 Core: Spear of Sylvia: Bound on hits
 Core: Uproot: Super Armor while using skill.
 Core: Luthraghon’s Call: Forward Guard while using skill.
 Core: Piercing Light: Super Armor while using skill.
Skill Enhancement (Rabam) Skills
Skill Enhancement skills can be obtained in the Skill Window (K) under the “Skill Enhancement” tab at the top. At level 56, 57, and 58, you will have 2 different options to choose between. These skills have no skill points cost, but you have to have other skills leveled up to be able to take them.
Level 56 – [SHIFT + X]
 Radiant Storm – Requires [Arrow Explosion VI] and [Storm of Light V]
- (Preferred Choice)
 Deadly Explosion – Requires [Arrow Explosion VI] and [Covering Fire V]
Both of the skills aren’t really that useful since they are both unprotected, slow to cast, and not got very good range. Radiant Storm has decent damage though and is the more popular choice of the two.
Level 57 – [SHIFT + Z]
 Ultimate: Verdure Clout – Requires [Flow: Verdure Clot II] and [Wrath of Nature V]
 Radiant Ensnare – Requires [Flow: Verdure Clot II] and [Ensnare III]
- (Preferred Choice)
Both of the skills are not considered to be very useful and generally not used. You can try both and pick whichever one you prefer. Most people go for Radiant Ensnare because it can be useful if you are at close range for a protected slow and your Ensnare is already on cooldown, but its use is very niche.
Level 58 – [Quickslot Only]
 Nature Shattering Arrow – Requires [Earth Shatter V] and [Wrath of Nature V]
- (Preferred Choice)
 Earth’s Judgment – Requires [Earth Shatter V] and [Winged Strike III]
Nature Shattering Arrow is the preferred choice and the only useful Rabam that Archer really has. It has good ranged damage.
Skill Add-ons
Below are some examples of PVE skill add-ons you can take.
If you would like example skill add-ons for other scenarios, please refer to the Class Discord and their resources.
I recommend experimenting with your add-ons and figuring out what is best for you, because it really depends on your personal preference and how you play your class. If you’re simply not sure what to take then you can blindly follow the examples below and they will still be effective.
You can also check our Skill Add-on guide for a complete list of Skill Add-ons.
| PVE Add-ons (Credit: ItsJellyApe) |
|
|---|---|
| Extra AP Against Monsters +30 for 7 sec | |
| PVP Add-ons using Radiant Explosion Core (Credit: Mesh) |
|
|---|---|
|
Attack/Casting Speed +7% for 7 sec
|
|
Weapons
Armor
For your armor, you will make a choice between Damage Reduction or Evasion gear. I recommend reading our guide about the two different DP stats if you want to learn what the two different stats do.
Generally, you are recommended to build Damage Reduction on Archer.
Accessories
There are various different accessories in the game. At first, just focus on using the accessories that give you the highest AP in each slot.
There are also “free” accessories that all new players should get:

Common Starter PVE accessories:
- TET Black Distortion Earrings
- TET Basilisk’s Belt (or PEN Capotia Belt)
- TET Ring of Crescent Guardian
- TET Ogre Ring/Laytenn’s Necklace (or PEN Capotia Necklace).
Crystals
Below is an example starter Crystal build for PVE. Some of the crystals are expensive. You can obtain the Rebelious Crystal by completing the main story questline. For more example crystal builds, including an end game PVE crystal build, and PVP Crystal builds, check our Crystal Preset Guide.
 Ah’krad Crystal x2
 Rebellious Spirit Crystal x2
 Red Battlefield Crystal: Adamantine x2
 Ancient Magic Crystal of Crimson Flame – Power x2
 Dark Red Fang Crystal – Valor x2
 Corrupted Magic Crystal x2
- Max HP +350
- All AP +34
- All Accuracy +6
- Extra Damage to Monsters +20
- Hidden Damage Reduction -4
- Knockdown/Bound Resistance +50%
- Stun/Stiffness/Freezing Resistance +10%
- Critical Hit Level +4
- Critical Hit Damage +22%
- Skill EXP +10%
This is an example PVP Build for Archers using Damage Reduction Armors and going full Human Damage (glass cannon). For more example crystal builds, check our Crystal Preset Guide or the Class Discord.
-
 Glorious Crystal of Gallantry – Olucas x2
 Red Spirit Crystal x2
 Crystal of Elkarr x2
- Corrupted Magic Crystal x2
 JIN: Magic Crystal – Viper x2
 Red Battlefield Crystal: Viper x2
 Red Battlefield Crystal: Carmae x2
 Ancient Spirit’s Crystal – Swiftness x1
- All accuracy +70
- Ignore All Resistance +20%
- Max HP +200
- All AP +14
- Extra Damage to Humans +56
- All Damage Reduction -4
- Critical Hit Damage +22%
- Attack, Casting Speed +2%
- Attack Speed +6
- Casting Speed +4
- Critical Hit +2
- Movement Speed +2
Artifacts and Lightstones
There are few different viable choices for both Artifacts and Lightstone combos. Archers are the “Ranged Damage” type so you want to go for Ranged Accuracy and Ranged Damage for offensive artifacts.
For PVE Lighstones there are a few different options to min-max. For certain spots, you may want to use Species damage combos (eg. The Wild: Demihumans, The Wild: Kamaslyvia, The Wild: Humans). Species damage combos perform better if you are reaching the monster AP caps at a certain zone.
A more generic PVE combo is listed below that is recommended for your class and will work at any spot.
You can also find more information about Artifacts and Lightstones, and how to obtain them, in our guide. We also have a list of Best in slot Artifacts and Lightstones.
Artifacts for PVE:
![]() Marsh’s Artifact – Extra AP Against Monsters
Marsh’s Artifact – Extra AP Against Monsters
- (Extra Damage to Monsters +6)
![]() Lesha’s Artifact – Monster Damage Reduction
Lesha’s Artifact – Monster Damage Reduction
- (Monster Damage Reduction +9)
Artifacts for PVP:
![]() Marsh’s Artifact – Ranged AP
Marsh’s Artifact – Ranged AP
- (Ranged AP +4)
![]() Marsh’s Artifact – Ranged Accuracy
Marsh’s Artifact – Ranged Accuracy
- (Ranged Accuracy +8)
| PVE Lightstone Combo | |
|---|---|
[Deathblow] Fire: PredationFire: PredationFire: Blade Fire: Blade Fire: PredationFire: PredationFire: Blade Fire: Blade |
Total Combo Effects: Monster AP +16 Critical Hit Chance +14% |
| PVP Lightstone Combo | |
|---|---|
[Target Openings]Fire: RageFire: Marked Wind: Lungs Fire: Strike Wind: Lungs Fire: Strike |
Total Combo Effects: All AP +10 All Accuracy +16 Maximum Stamina +100 Critical Damage +6% |
Useful Links/Credits
I highly recommend checking out the Archer Class Discord for resources about your class. The class discords always have the most up-to-date information and tons of experienced players that can help with questions or gearing advice. I would like to give a shoutout to the Mods and Helpful roles in the Archer discord for all their hard work gathering resources. You can find some of their own guides below. I honestly cannot recommend enough to join the discord.
Useful links to check out:
- Official Archer Forums
- Archer Guide by the Archer Discord
- Archer Beginner Guide by General Mors
- Archer Movement Guide by Ika
- Archer Movment Guide (for console) by Jupso
- Archer PVE Combo by Jake
PVP Montage Videos:
Credits Disclaimer: Since there are now 26 BDO classes, it is impossible for me to keep class guides fully maintained. My main class is Ranger and I don’t claim to be the best in any class. Therefore, I use resources and recommendations from the Class discords since (as all other players would agree) this is the best source. I also ask for advice from friends who are more experienced in the class. Where possible, I credit specific players for information such as Add-ons, and combos. However, sometimes there is no player mentioned as the original sharer. If there are any issues with credit or you would like certain information removed/changed, please reach out to me!