")
Introduction
Edania Weekly Bosses can be completed once per week and have various important rewards, such as ![]() Piece of Edana, which are used to craft and enhance Edana Armors
Piece of Edana, which are used to craft and enhance Edana Armors
You can challenge 1 boss each week, and the weekly quest resets every Thursday at 00:00 UTC
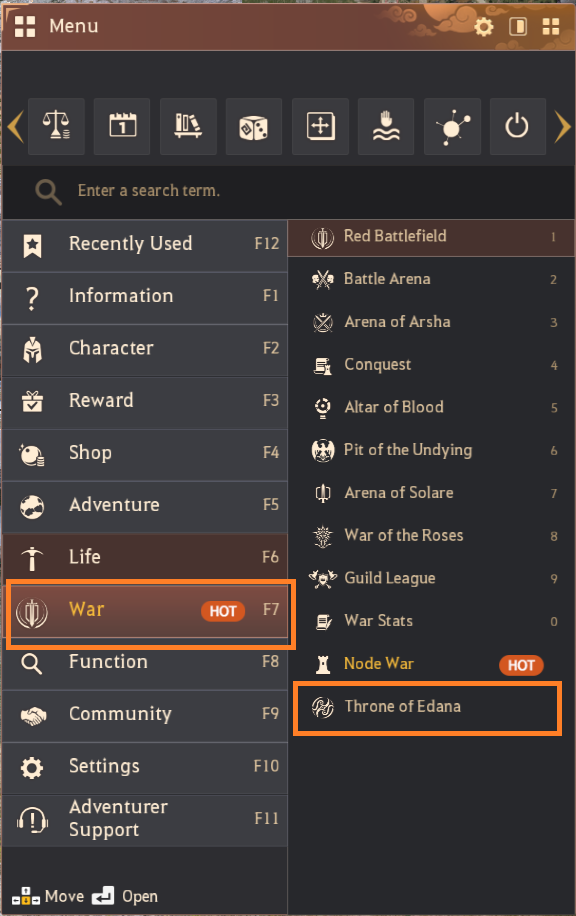
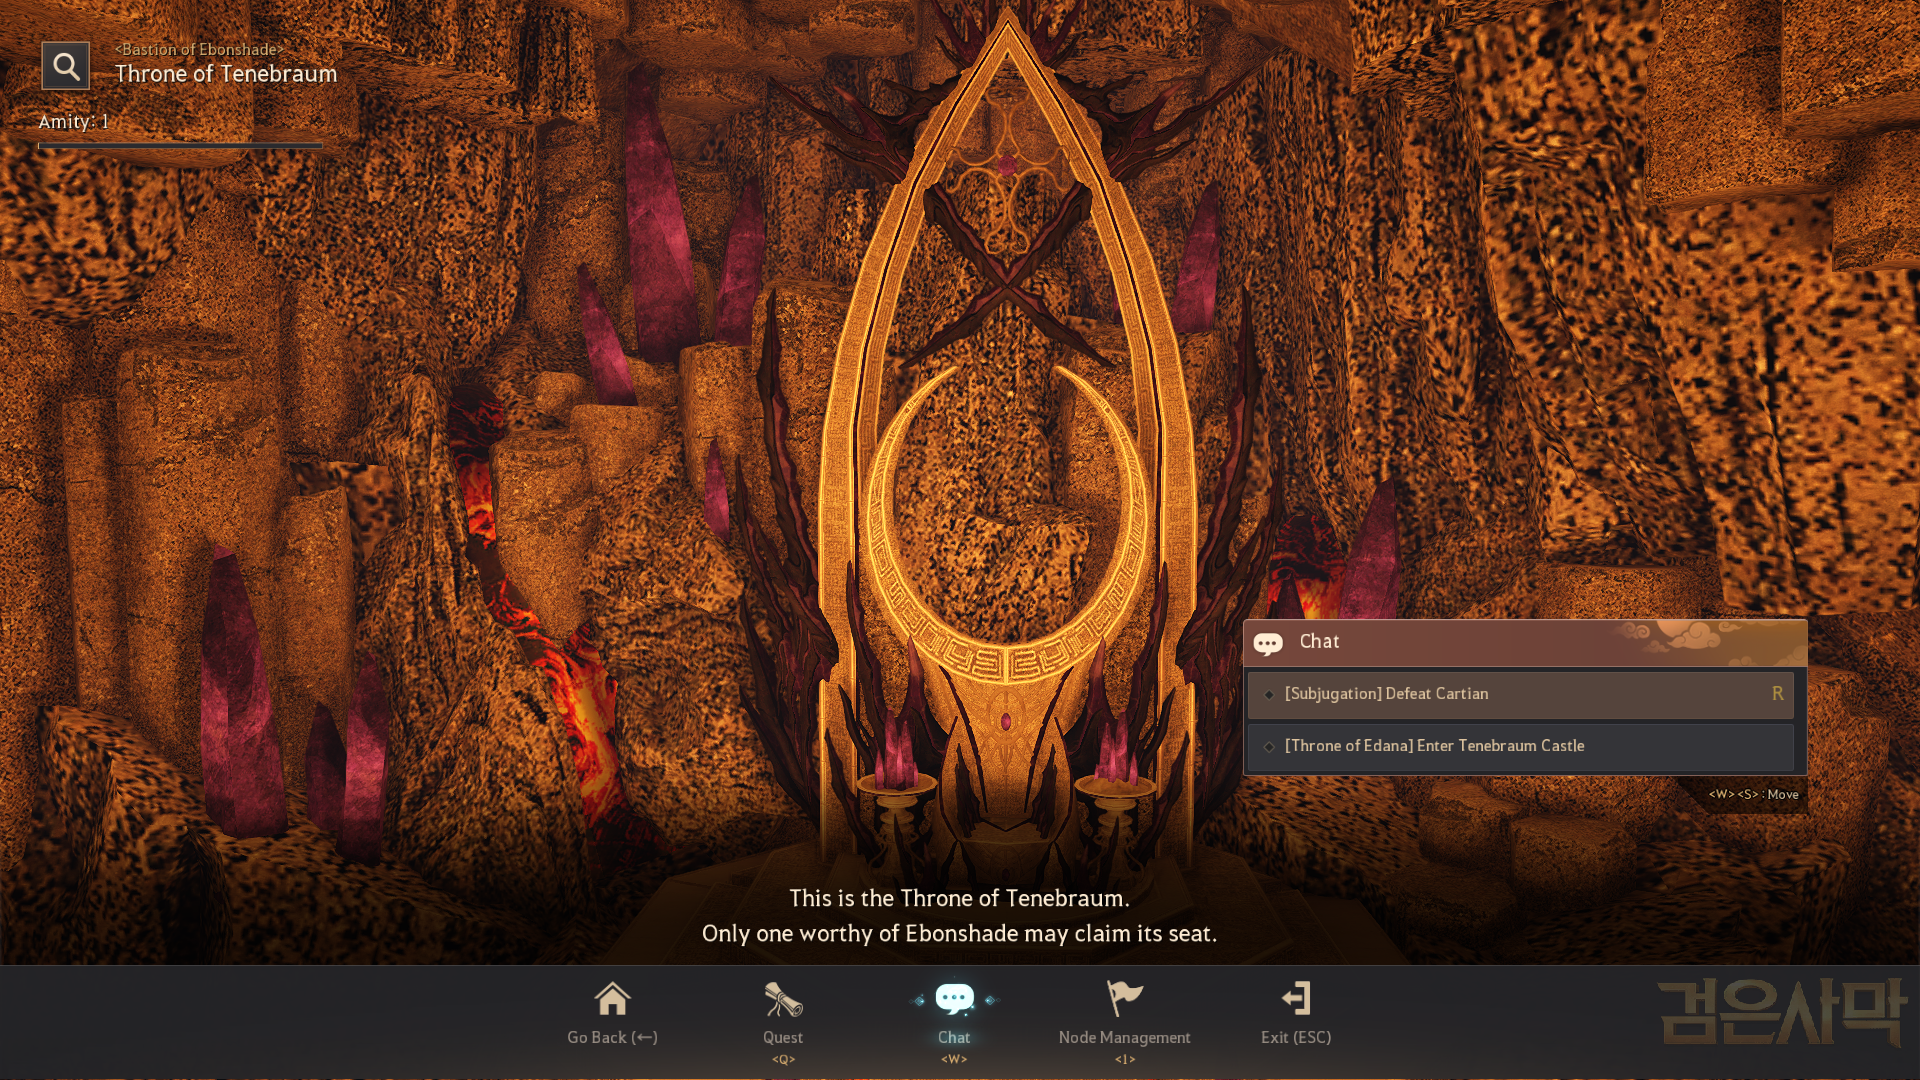
To challenge your weekly Edania boss, you need to go the boss location in Edania. You can find the location by going to ESC > War (F7) > Throne of Edana
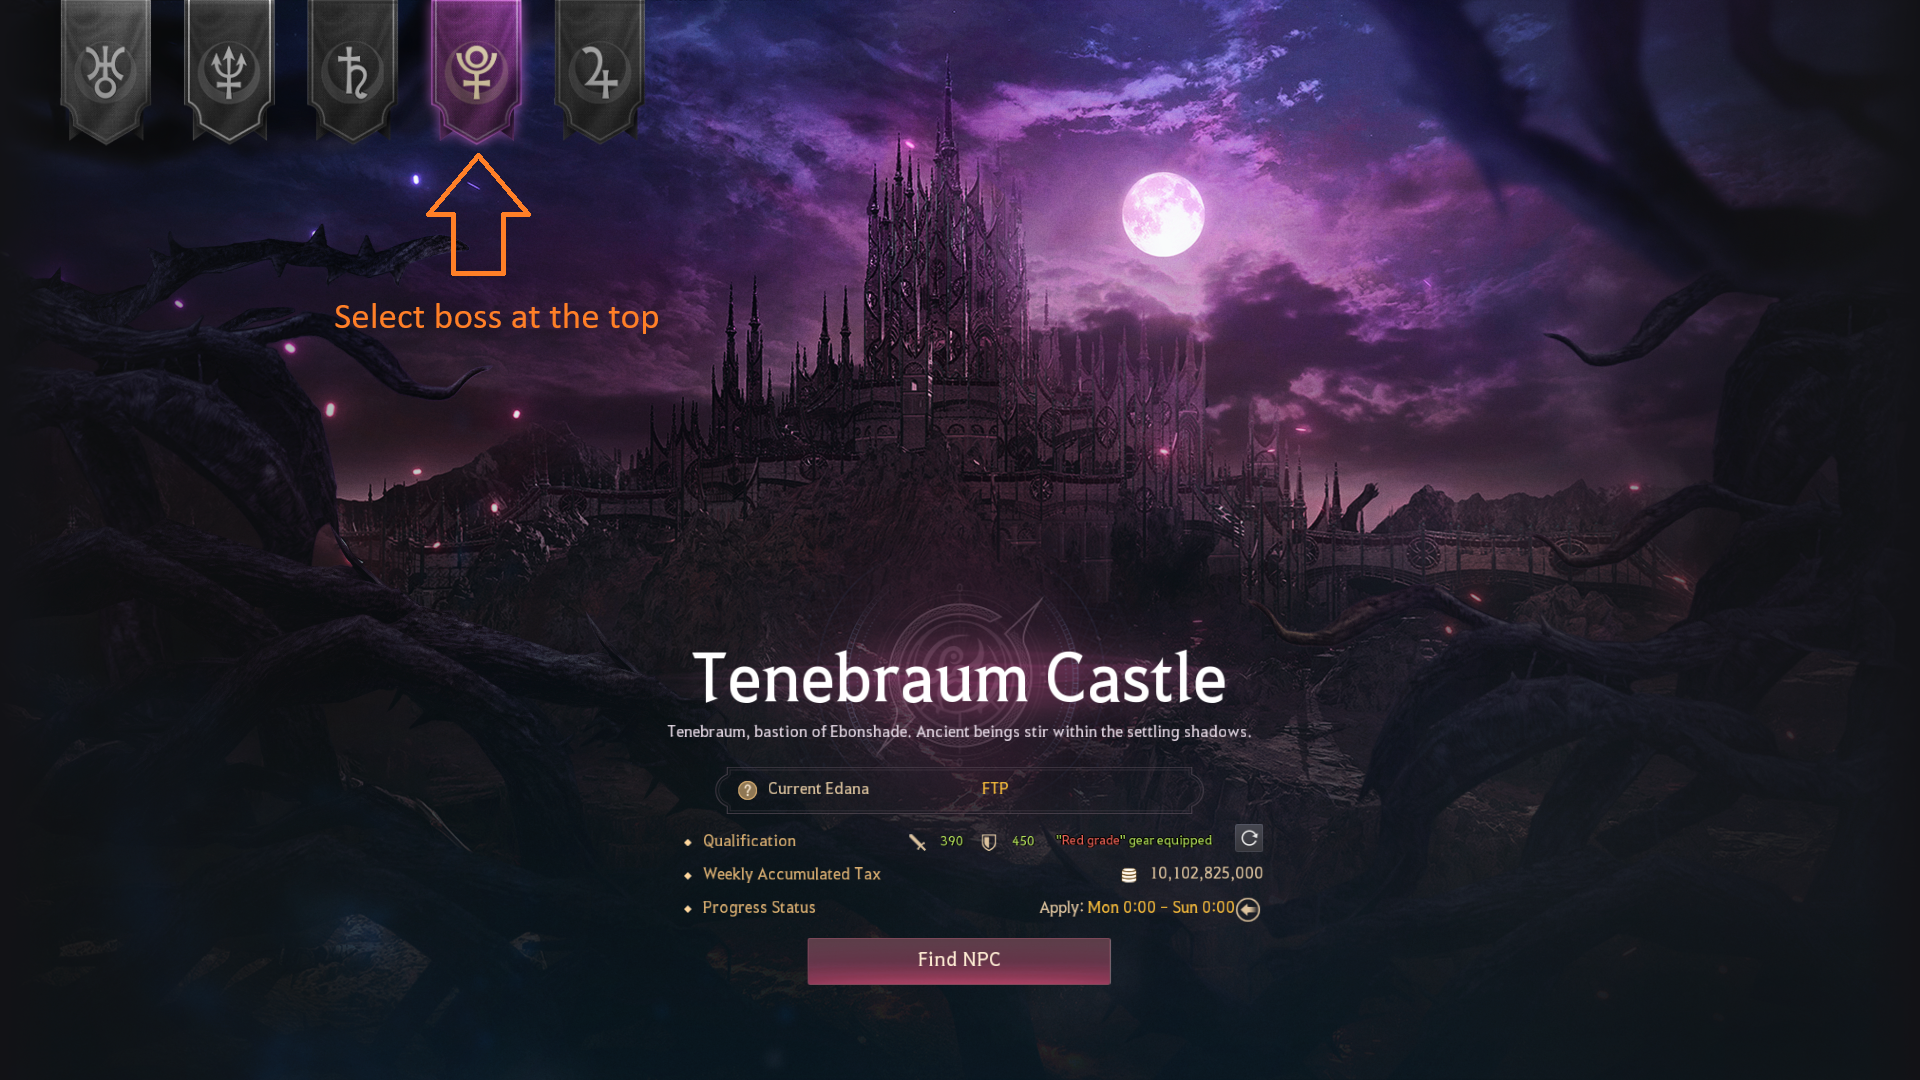
Here you can select the different bosses at the top and see their requirements. Click the “Find NPC” to go to the boss location.
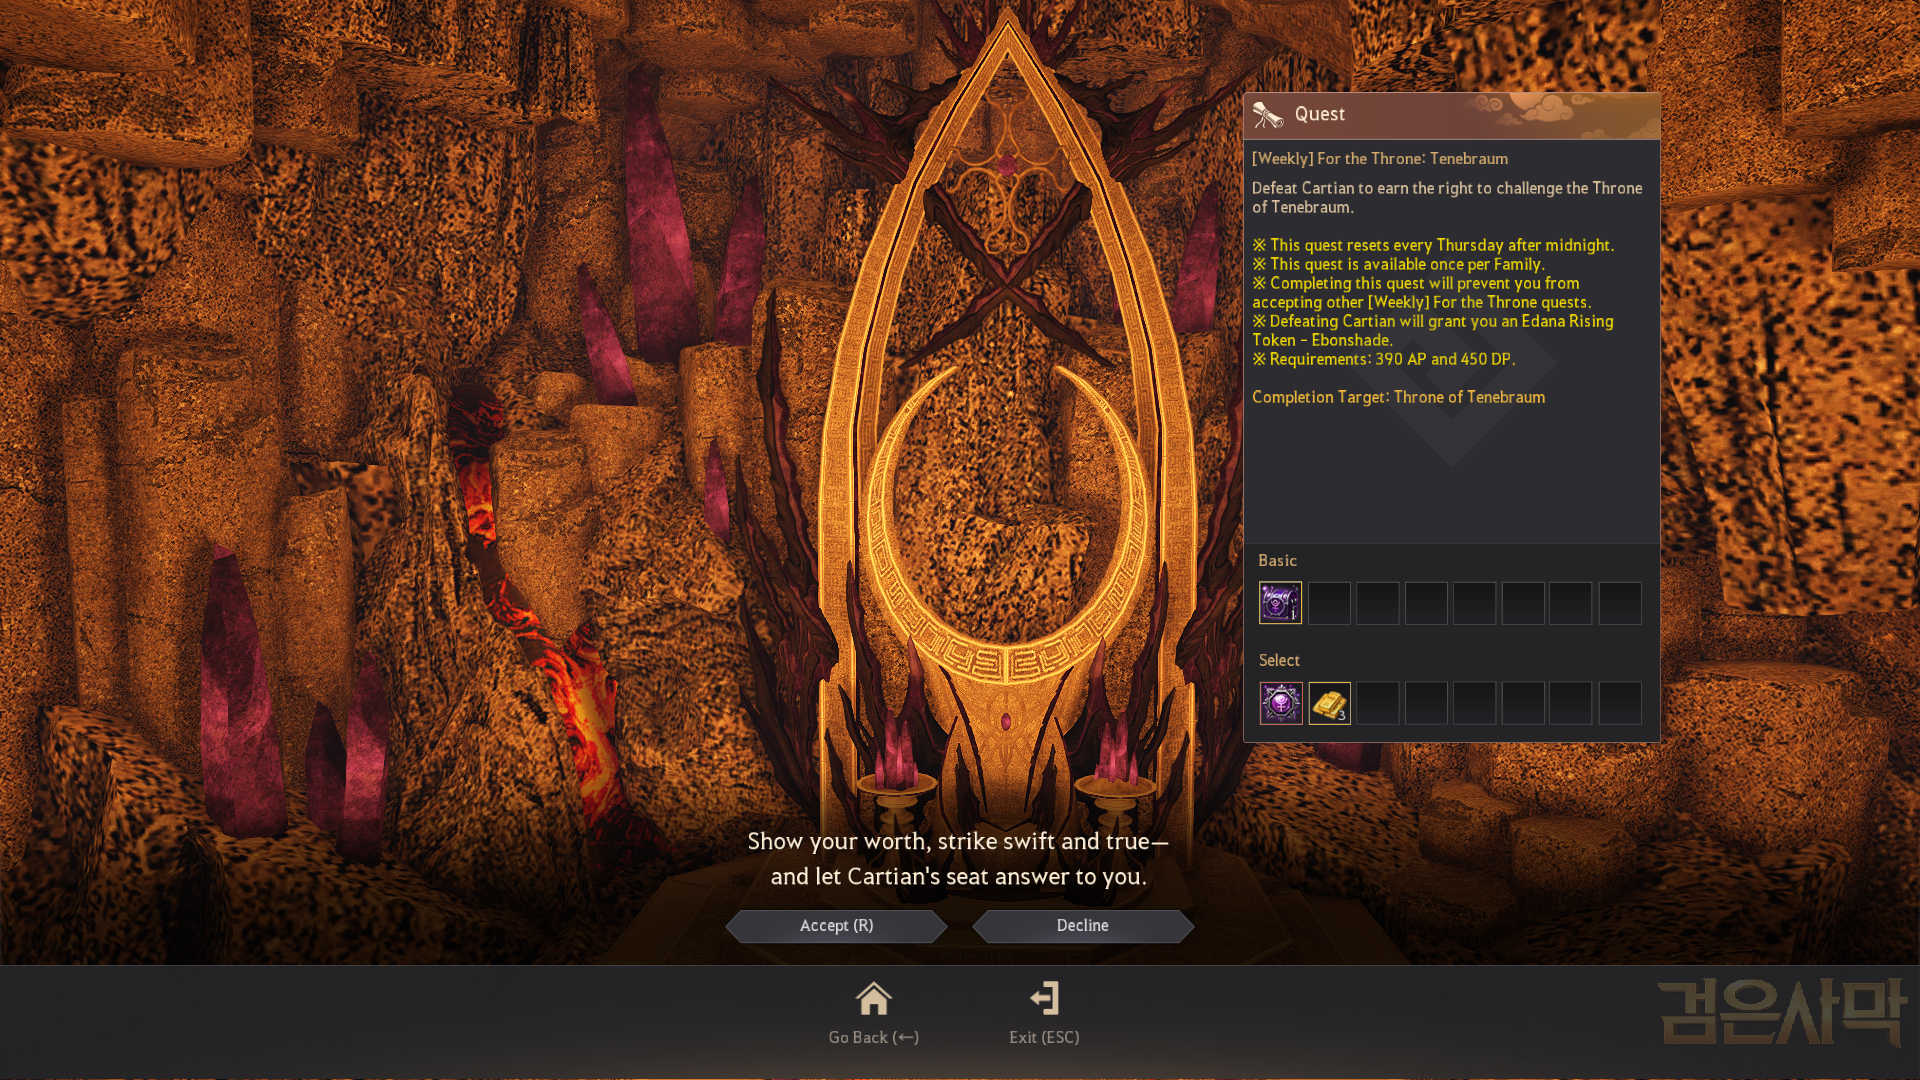
Once you arrive at the boss you need to pick up the weekly quest before you can challenge the boss. Then, start the fight by selecting the “[Subjugation] Defeat boss” option and click the “Enter” button.
Edania Boss Requirements
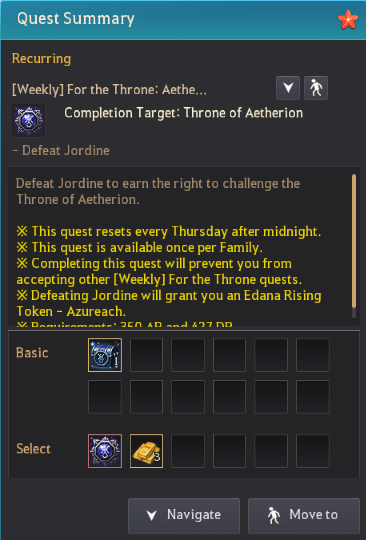
The weekly boss quests can be found in the “Recurring” quest tab in your quest log (O) and you must take the quest before you can challenge the boss.
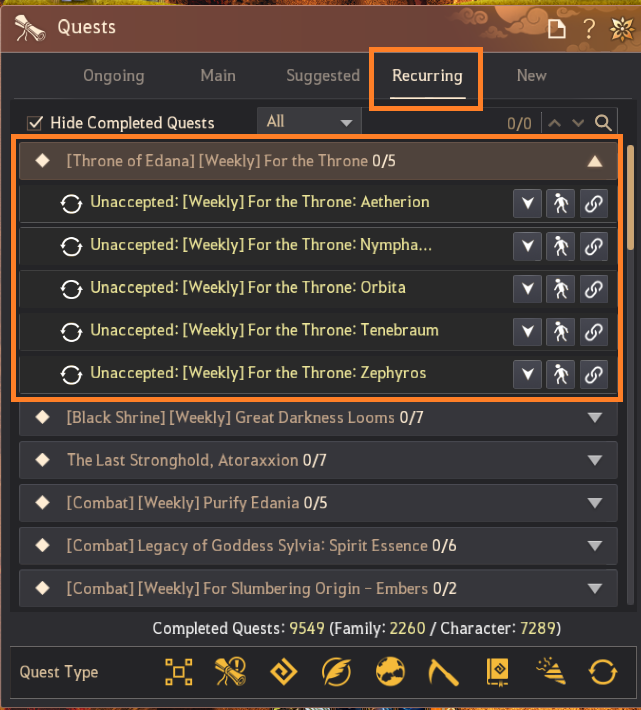
You must meet a certain displayed AP and DP to accept the quest and challenge the boss.
| Boss | Quest | Required AP | Required DP |
|---|---|---|---|
| Jordine | [Weekly] For the Throne: Aetherion | 350 | 427 |
| Rusalka | [Weekly] For the Throne: Nymphamaré | 375 | 440 |
| Enslar | [Weekly] For the Throne: Orbita | 385 | 445 |
| Cartian | [Weekly] For the Throne: Tenebraum | 390 | 450 |
| Caphras | [Weekly] For the Throne: Zephyros | 395 | 460 |
Edania Boss Quest Rewards
Completing the weekly quest will reward you with a chest containing various rewards. Some noteworthy rewards include:
 Piece of Edana – used to craft and enhance Edana Armors
 Primordial Fragment – used to craft Sovereign Offhand weapons
 Crystalized Energy of Endtimes – used to create Amplified Lightstones or HAN Dawn Crystals
Alongside the chest reward, you can also choose to obtain either the Edana Rising Token or Gold Bar 100G x3.
Edana Rising Token can be right-clicked to sign you up for the Throne of Edana fight.
| Edania Weekly Boss | Reward Chest | Chest Contents |
|---|---|---|
|
Aetherion – Jordine |
 Edania: Azureach Chest Edania: Azureach Chest |
Guaranteed |
| Probability |
||
|
Nymphamare – Rusalka |
 Edania: Emeraltides Chest Edania: Emeraltides Chest |
Guaranteed |
|
Probability
|
||
|
Orbita – Enslar |
 Edania: Amberwilds Chest Edania: Amberwilds Chest |
Guaranteed |
|
Probability
|
||
|
Tenebraum – Cartian |
 Edania: Ebonshade Chest Edania: Ebonshade Chest |
Guaranteed |
|
Probability
|
||
|
Zephyros – Caphras |
 Edania: Crimsonroot Chest Edania: Crimsonroot Chest |
Guaranteed |
|
Probability
|


Edania Boss Mechanics
For each boss, it is recommended to use your full grinding buffs and Edania monster species damage:
- Simple Cron Meal
- Harmony Draught – Edania
- Perfume of Courage/Deep Sea/Envy/Tenacity (as preferred)
- Alchemy Stone
- Church Buff
- Villa Buff
- Furniture Buff
- Krogdalo Horse buff is removed when you enter
Similarly to Black Shrine bosses, you cannot use items whilst in the boss fight and need to pop your buff before you enter. You will have a set HP regen, and there are black/red flames that spawn inside the boss room which give you HP and Black Spirit Rage when you hit them.
Jordine
Phase 1:
- The fight starts with Jordine summoning lots of monsters. There are “Black Spirit-consumed Mercenary” mobs that will transform into black spirits and damage the other monsters when they die.
- After a while, a blue orb will spawn. You need to kill the blue orb to obtain the buff and turn into a black spirit. When you turn into the black spirit you are in an iframe for the buff duration and can move around using W/A/D. As the black spirit you do a lot of damage to the monsters. You can keep killing the blue orbs while you are the black spirit to extend the buff duration.
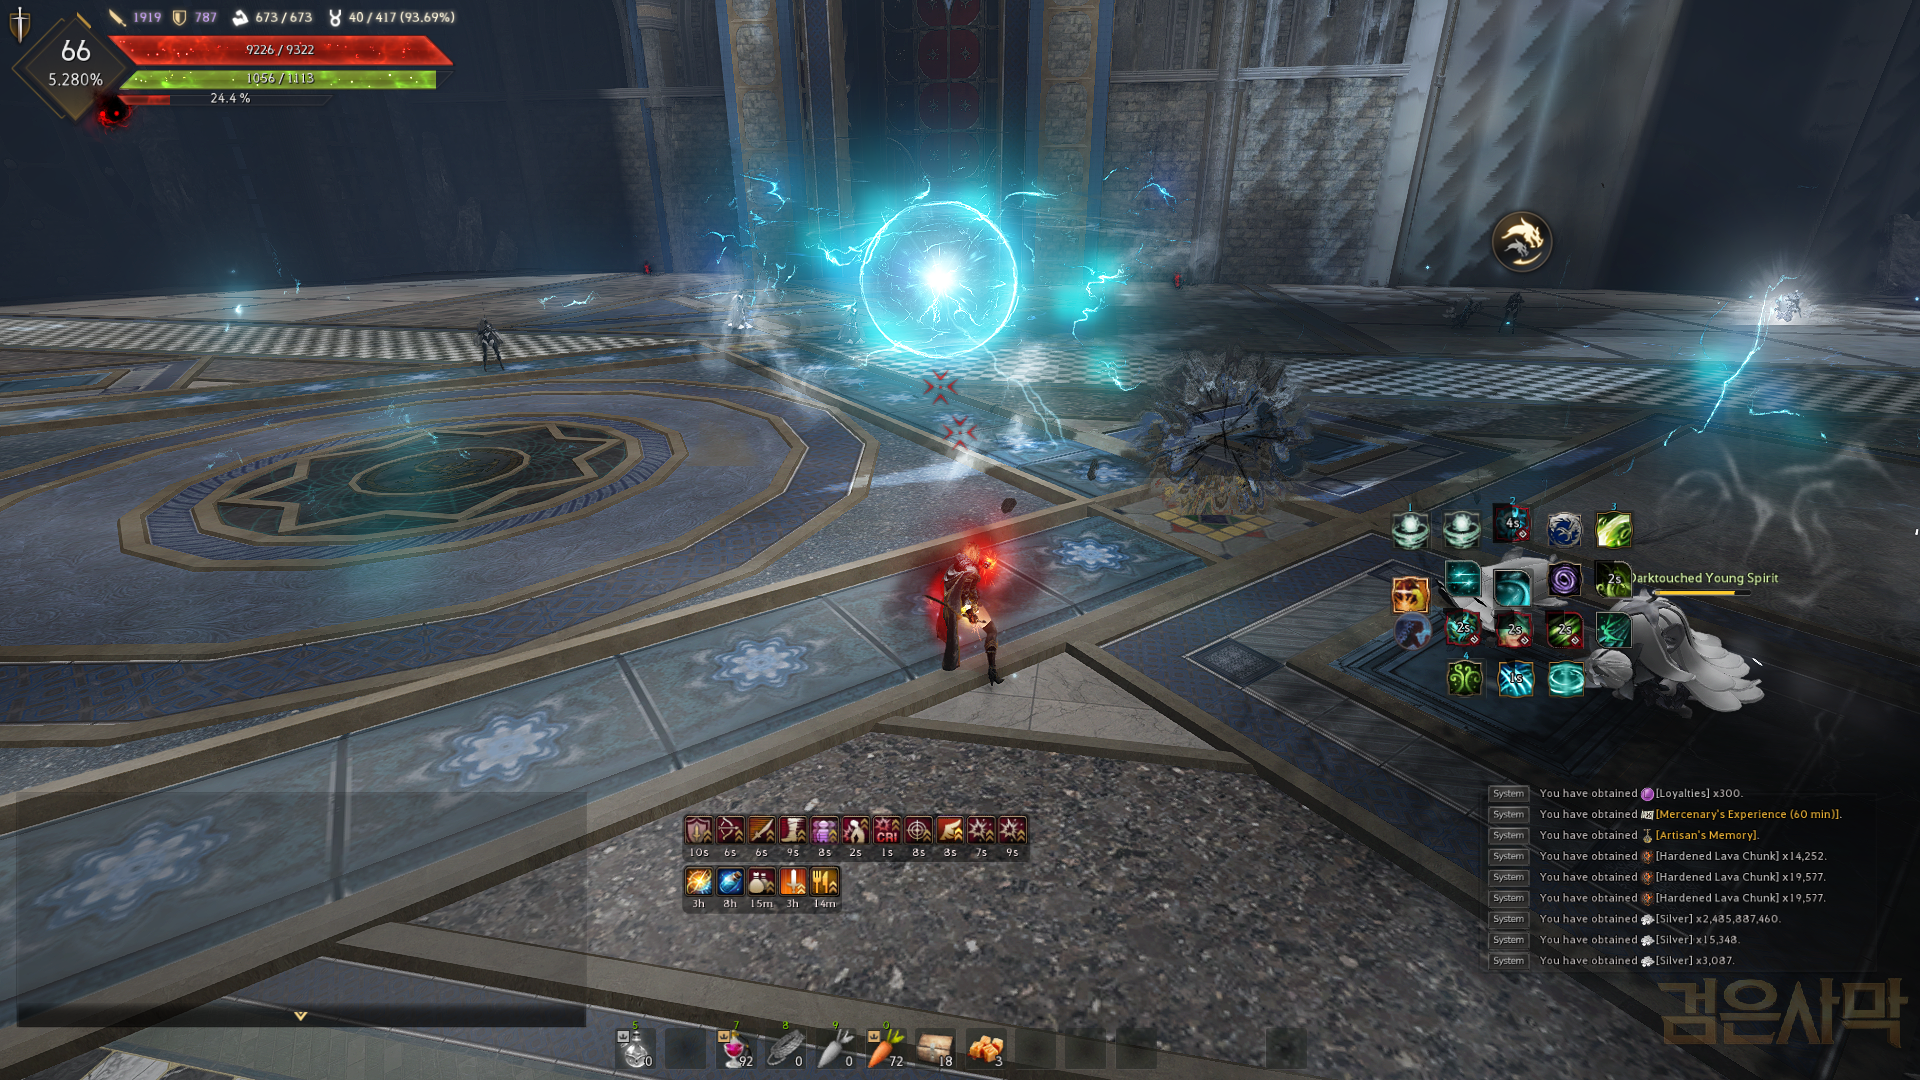
- After enough monsters are defeated, Jordine will arrive. Use the black spirit orb buff to damage him.
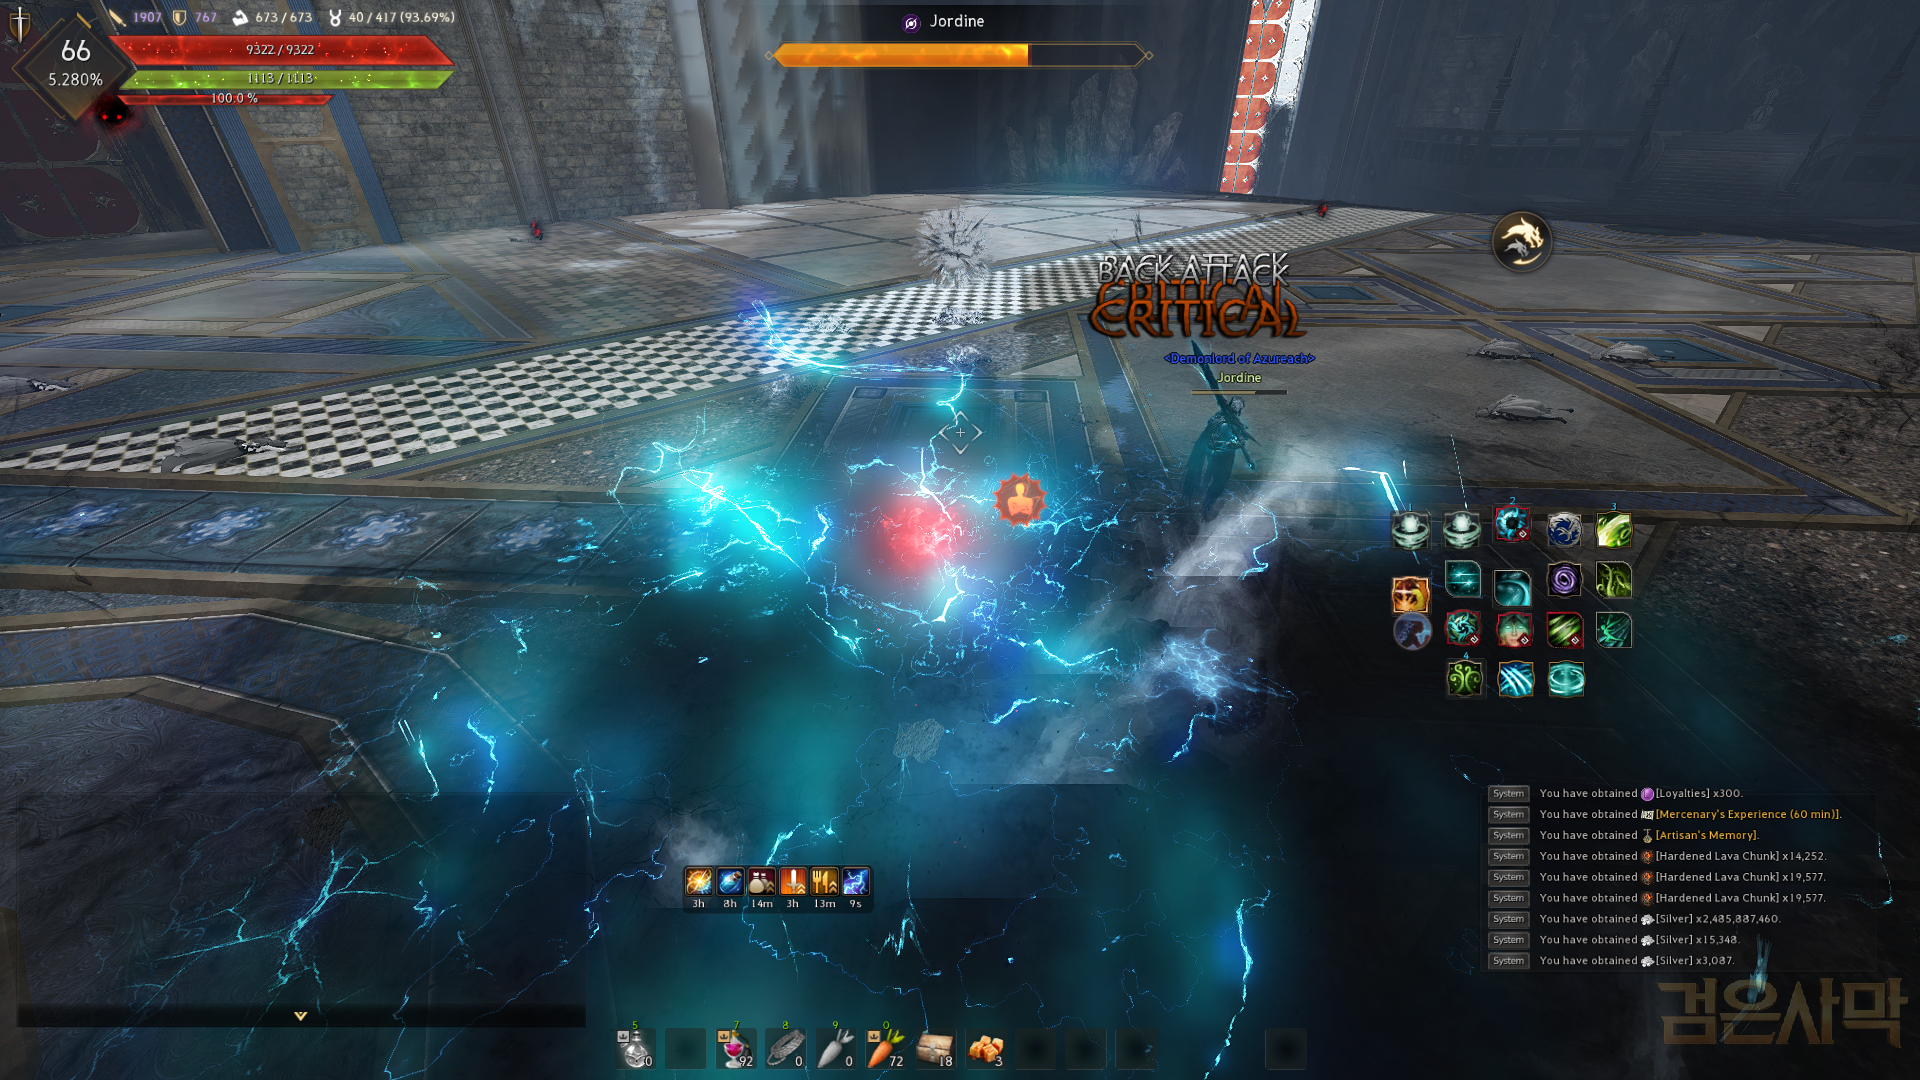
- The message “Interesting care for a game” will appear and Jordine will jump into the air
- A second message will then show on the screen containing the word“Morning”, “Noon”, or “Night”

- There will be 3 blue circles that appear. Jordine will drop into the blue circles one by one.
- The 1st circle he drops into is the “Morning” circle and will glow yellow.
- The 2nd circle he drops into is “Noon” and will glow orange
- Then the 3rd circle is the “Night” circle and will glow purple.
- You must stand in the correct circle depending on the message you see. Eg. If you get the “Night” message, stand in the 3rd circle Jordine drops into.
- Standing in the correct circle stops you from being one-shot by the attack at the end of the mechanic.
- After successfully completing this mechanic, Jordine will be stunned and have a debuff so you can easily DPS him.
- The 2nd phase starts when Jordine’s HP reaches 0%.
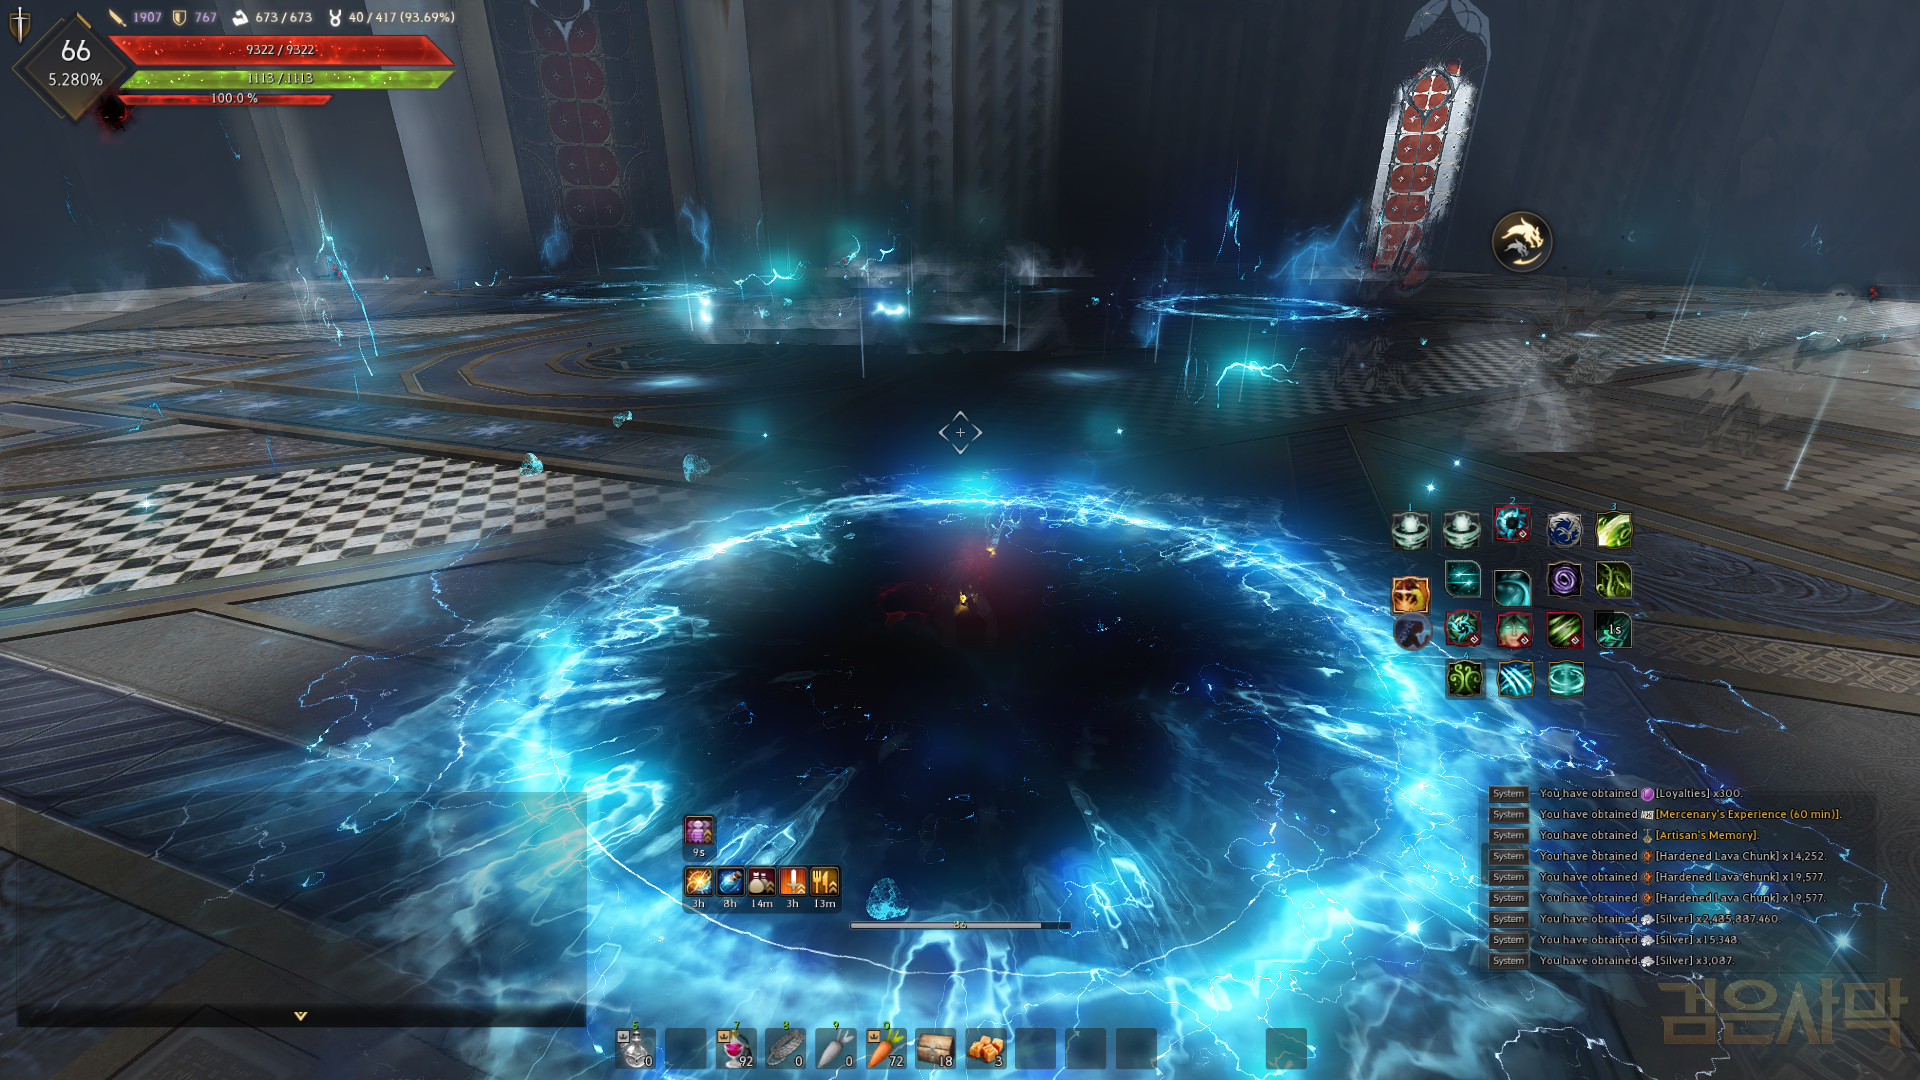
Phase 2:
- In the 2nd phase, Jordine’s dragon “Black Wing” appears, and Jordine gets a DP buff.
- You need to kill the dragon to remove the DP buff. Focus on iframing and avoid the attacks from Jordine while you DPS the dragon.
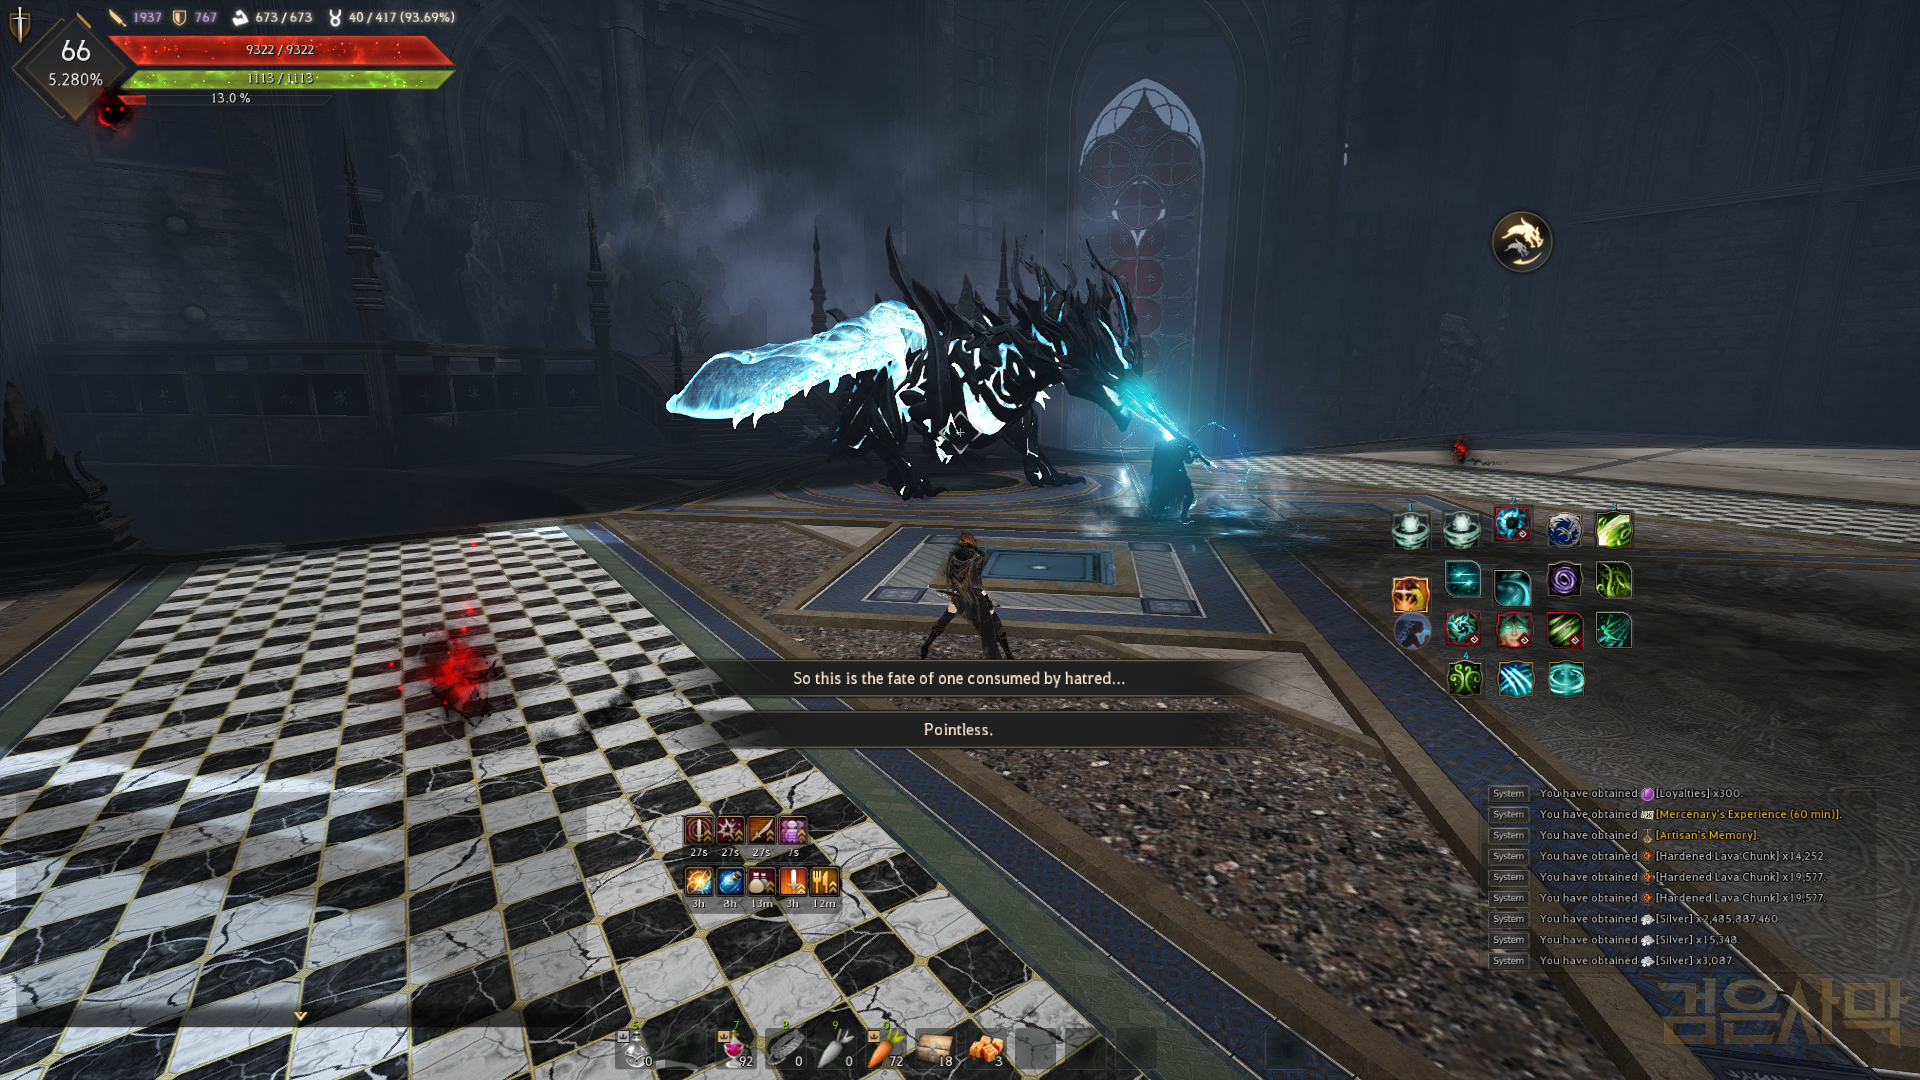
- When Black Wing dies Jordine will get a DP debuff.
- Watch out for the message “I’ll finish you in one blow”, as Jordine will appear next to you and do a slam attack in a line
- When the message “A cold gleam flashes from Jordine’s blade”, Jordine will disappear then appear again next to you and attack.
- He will do this 4 times in a row and you need to avoid each attack.
- After all 4 attacks, he will drop down and AOE damage circles will appear around him in a shockwave.
- Avoid the attack and then hit Jordine while he is stunned from the fall. This attack is repeated until Jordine dies.
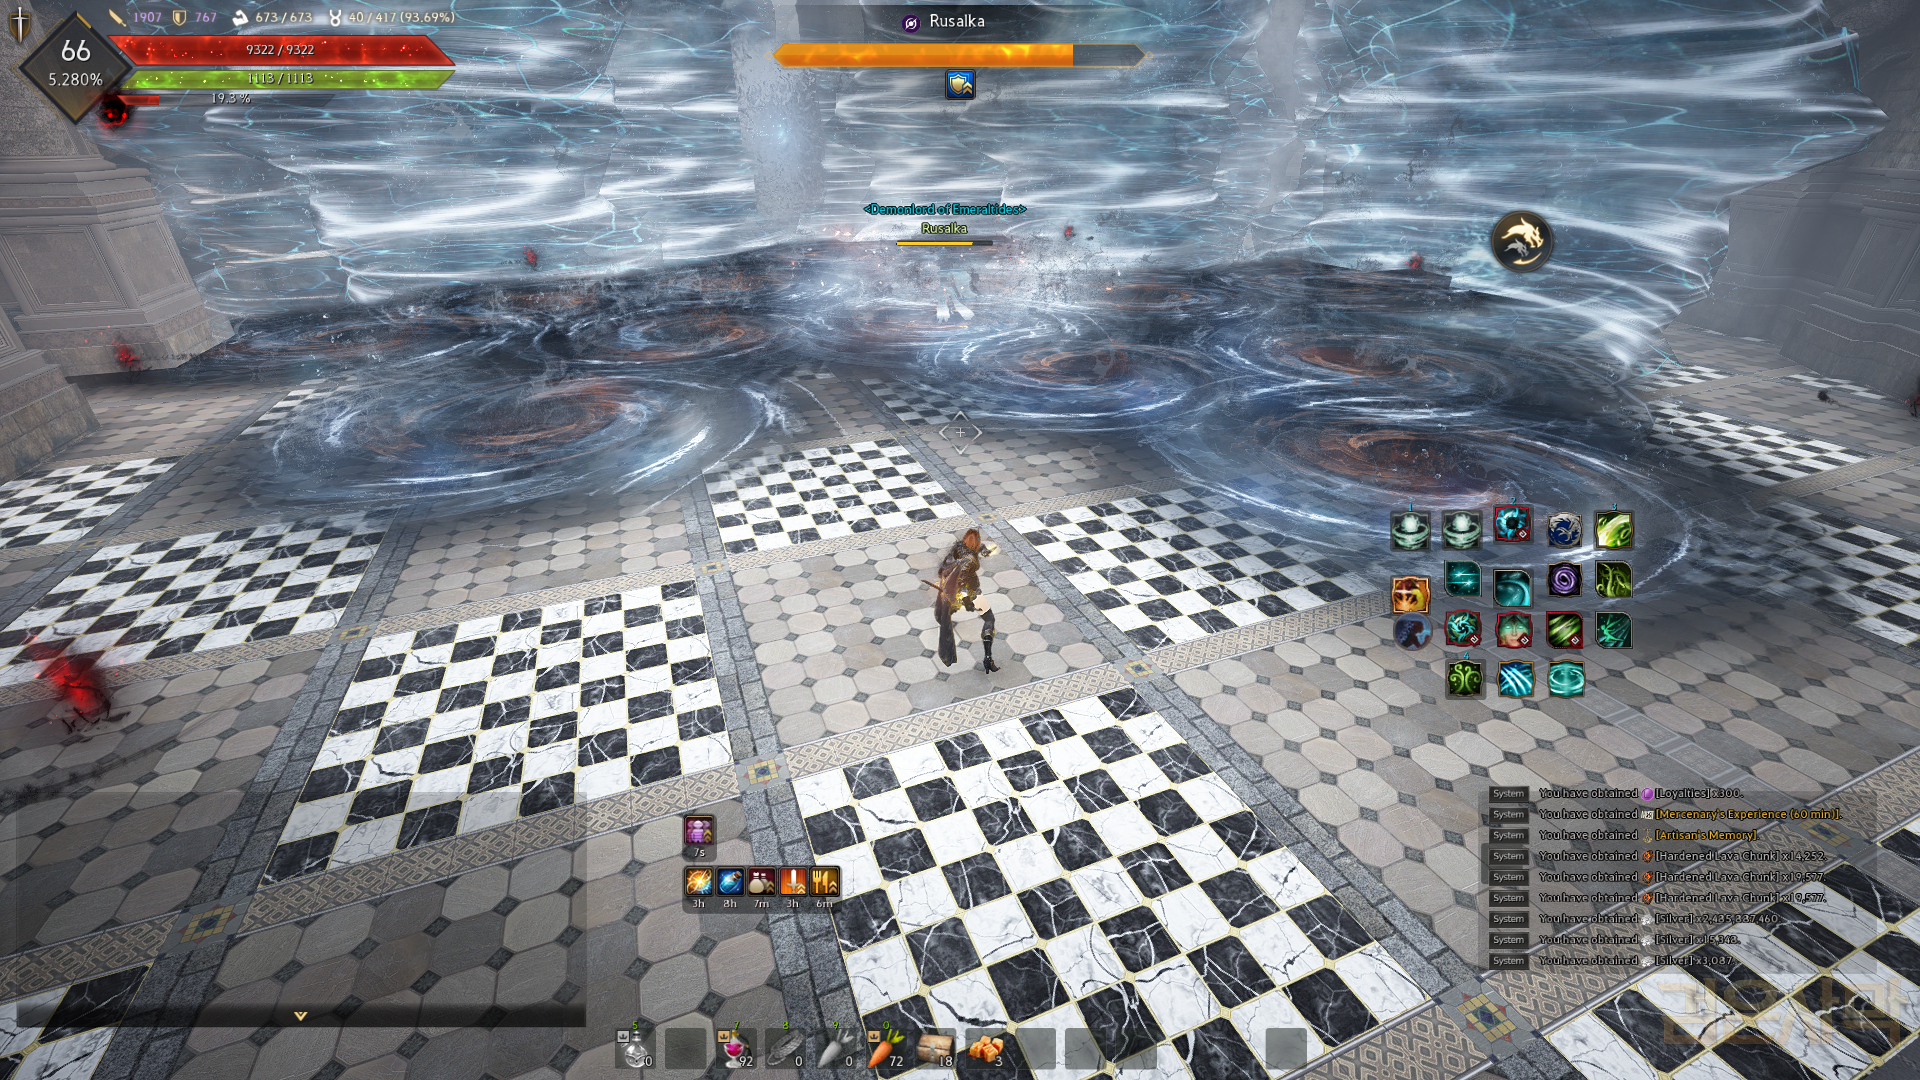
Rusalka

- At approx 80% HP, the message appears “The pain I carry… will never fade!”
- Rusalka will go to the middle of the arena and will have a DP buff during this mechanic.
- She will start to summon whirlpools on the floor. After a short period of time, the whirlpools will turn into tornadoes.
- Avoid the tornadoes or use a PVE iframe to dodge the attack.
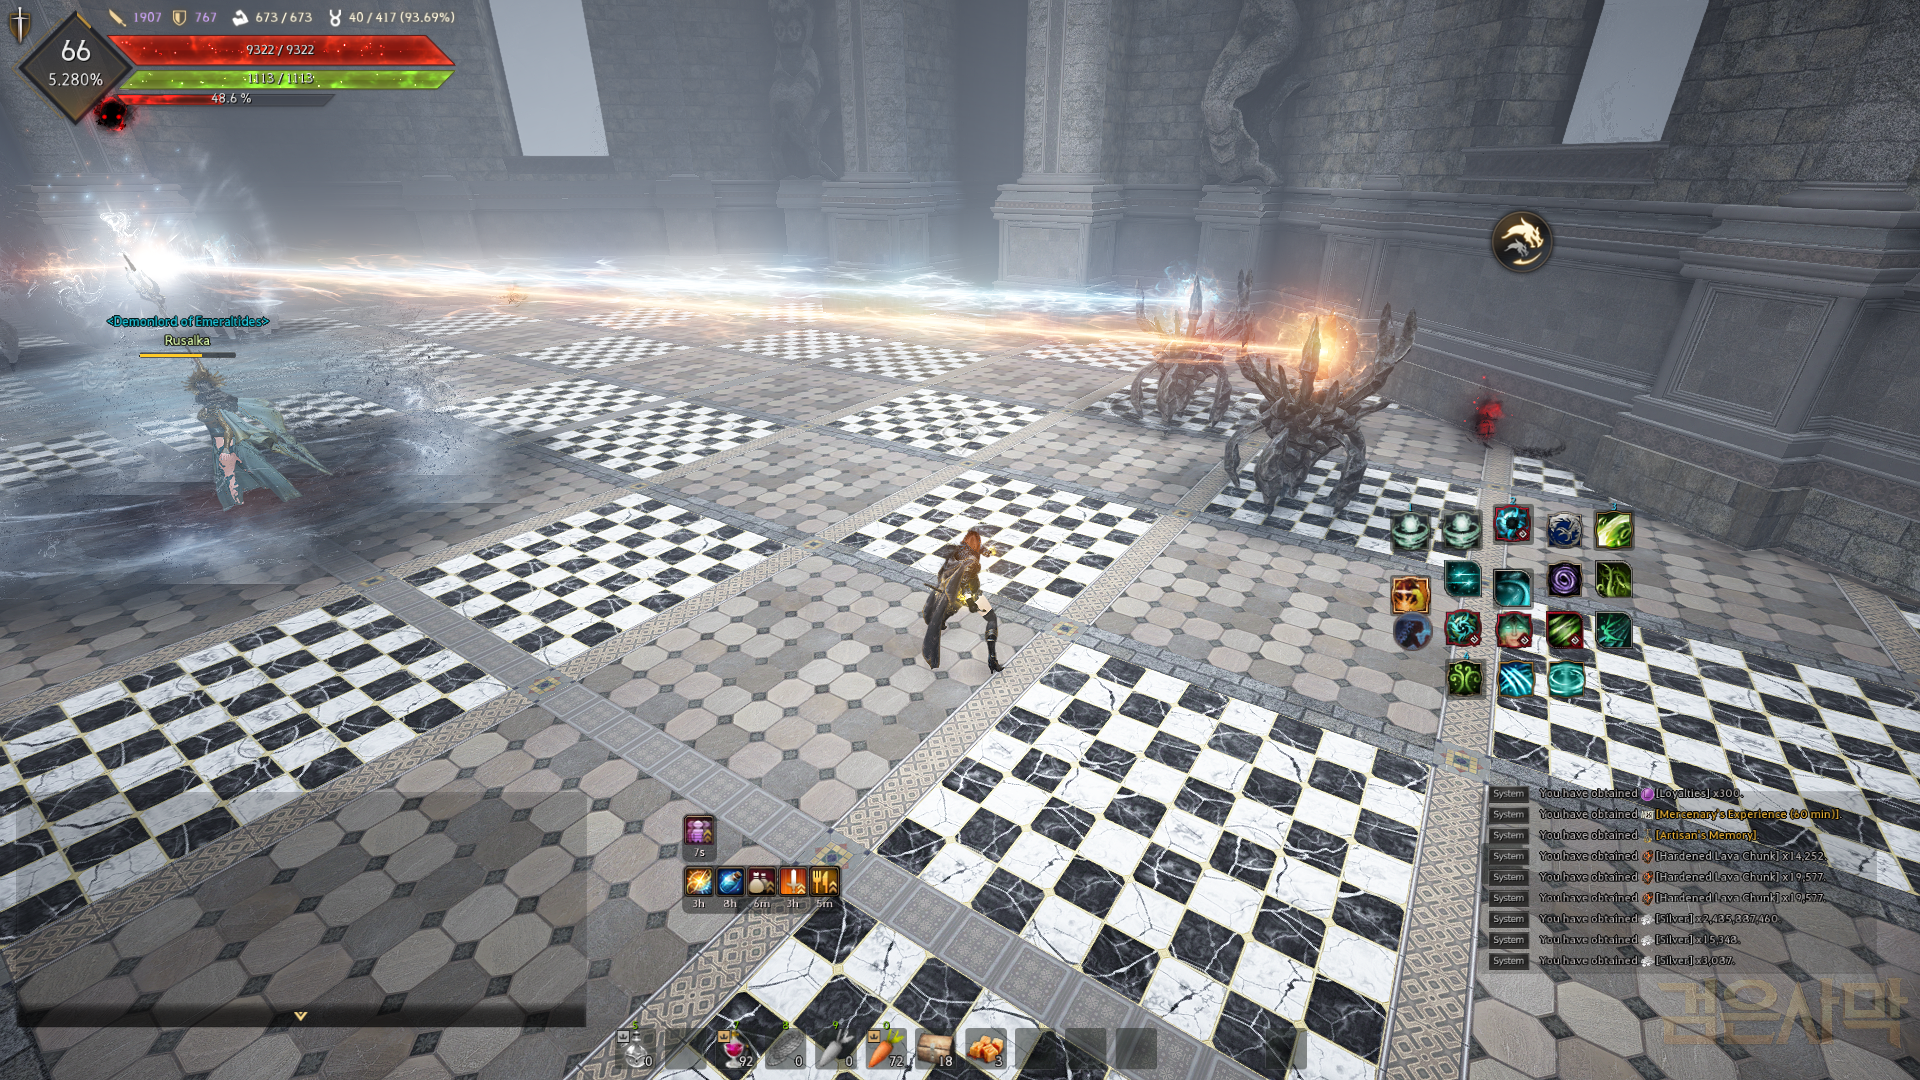
- When Rusalka is approximately 70% HP, the message “You will pay for trespassing the veil” appears.
- Rusalka will go to the middle of the room again and will summon “Rusalka’s Eyes” around the edge of the area.
- There are 5 of these objects in total, 3 of them will have a blue line going to the boss, while 2 of them will have an orange line going to the boss.
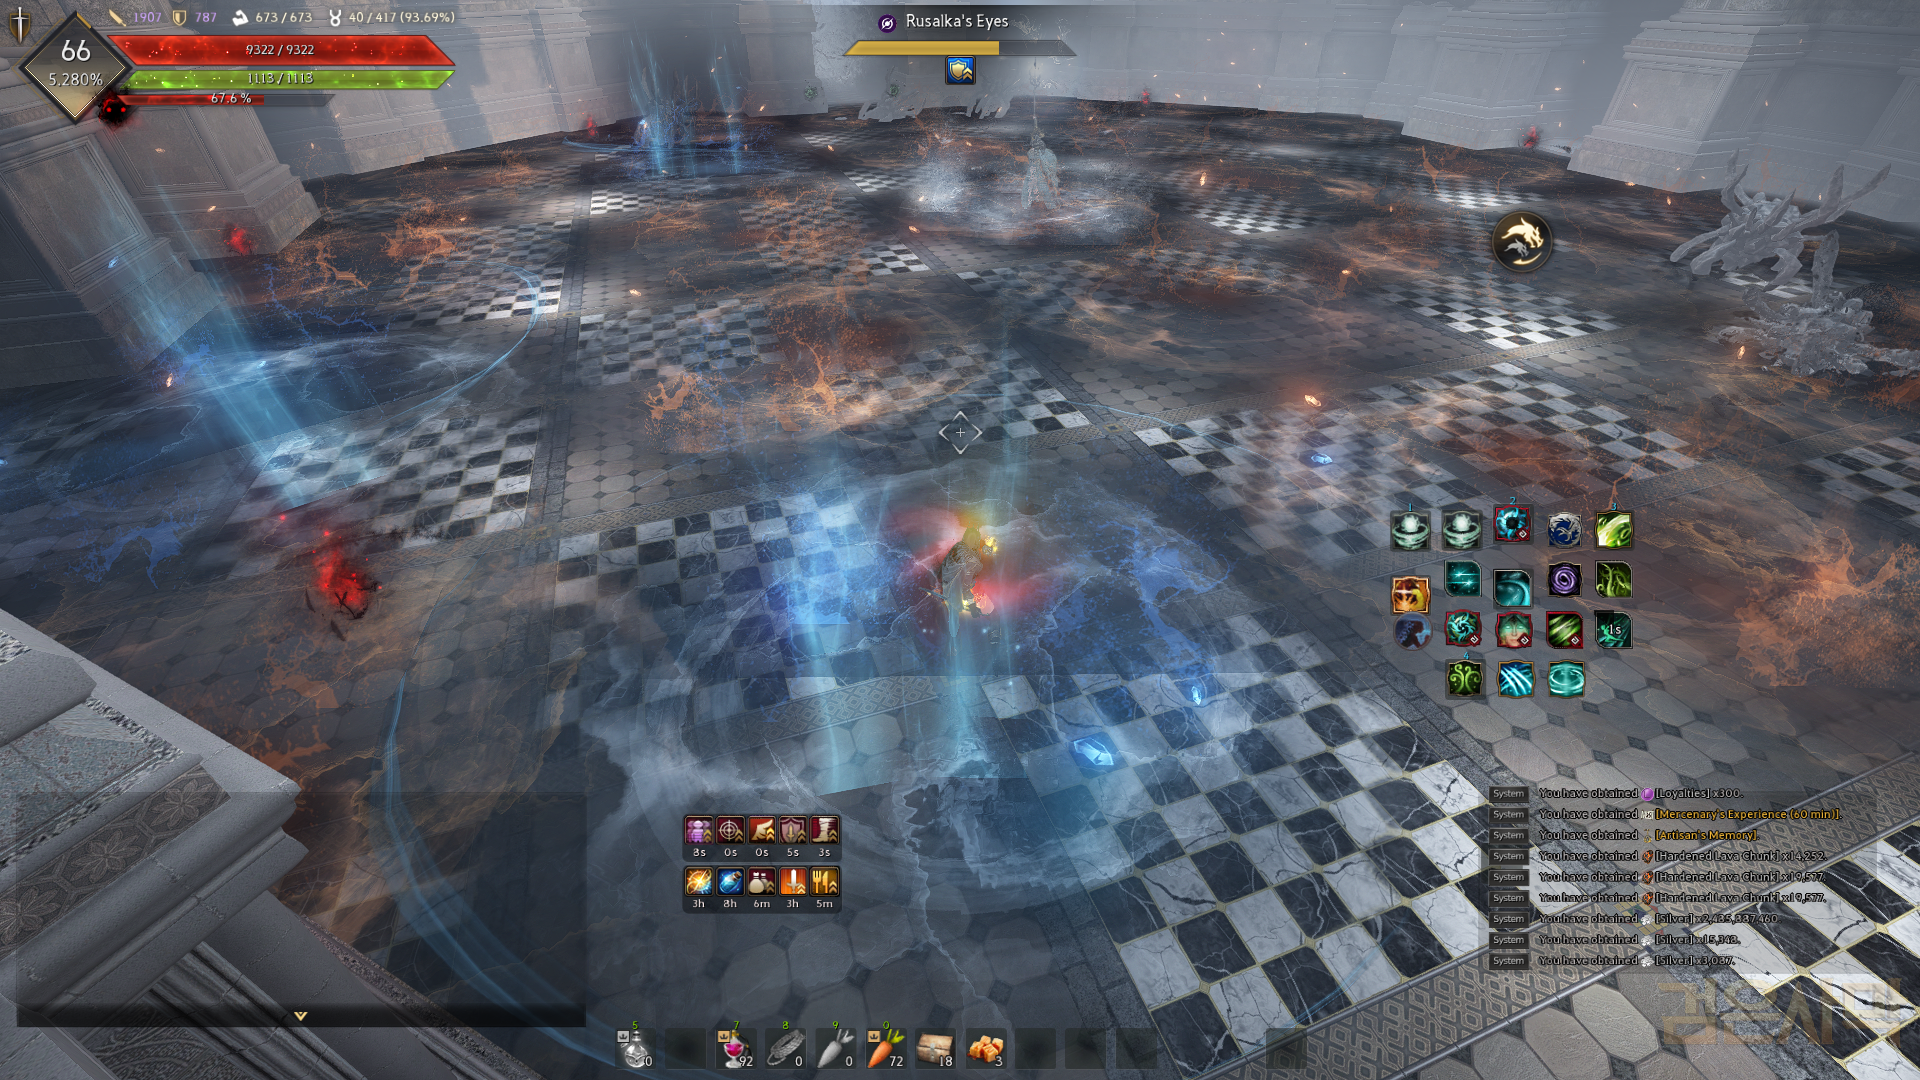
- You must defeat the 2 Rusalka’s Eyes with the orange line.
- When the objects are destroyed, Rusalka will summon lots of blue and orange circles on the floor.
- You must stand inside the blue circle to avoid the one-shot AOE attack.
- The boss will then be stunned if you do the mechanic correctly.
- Around 50% HP, Rusalka will summon a fire/water wall around the arena, making the room a bit smaller. There are no mechanics after this and you just need to focus on dodging the attacks.
Enslar
Flame Mechanic:
- When Enslar attacks, she will leave behind a yellow shard on the floor.
- The message “To skies we rise!” or “All of this… was for your sake” will appear and Enslar will do an AOE one-shot across the whole arena. Use a PVE i-frame to dodge this attack.
- After this attack, these shards are transformed into flames which you can hit.
- Destroying one of these flames will give you a “Fragment of Light” buff with AP +100, DP +100.
- If too many flames appear at once and are not destroyed, Enslar will do a one-shot attack which cannot be avoided, so make sure you clear the flames as they appear.

Phase 1:
- For most of the fight, you just need to dodge and avoid the attacks. DPS when you can in-between.
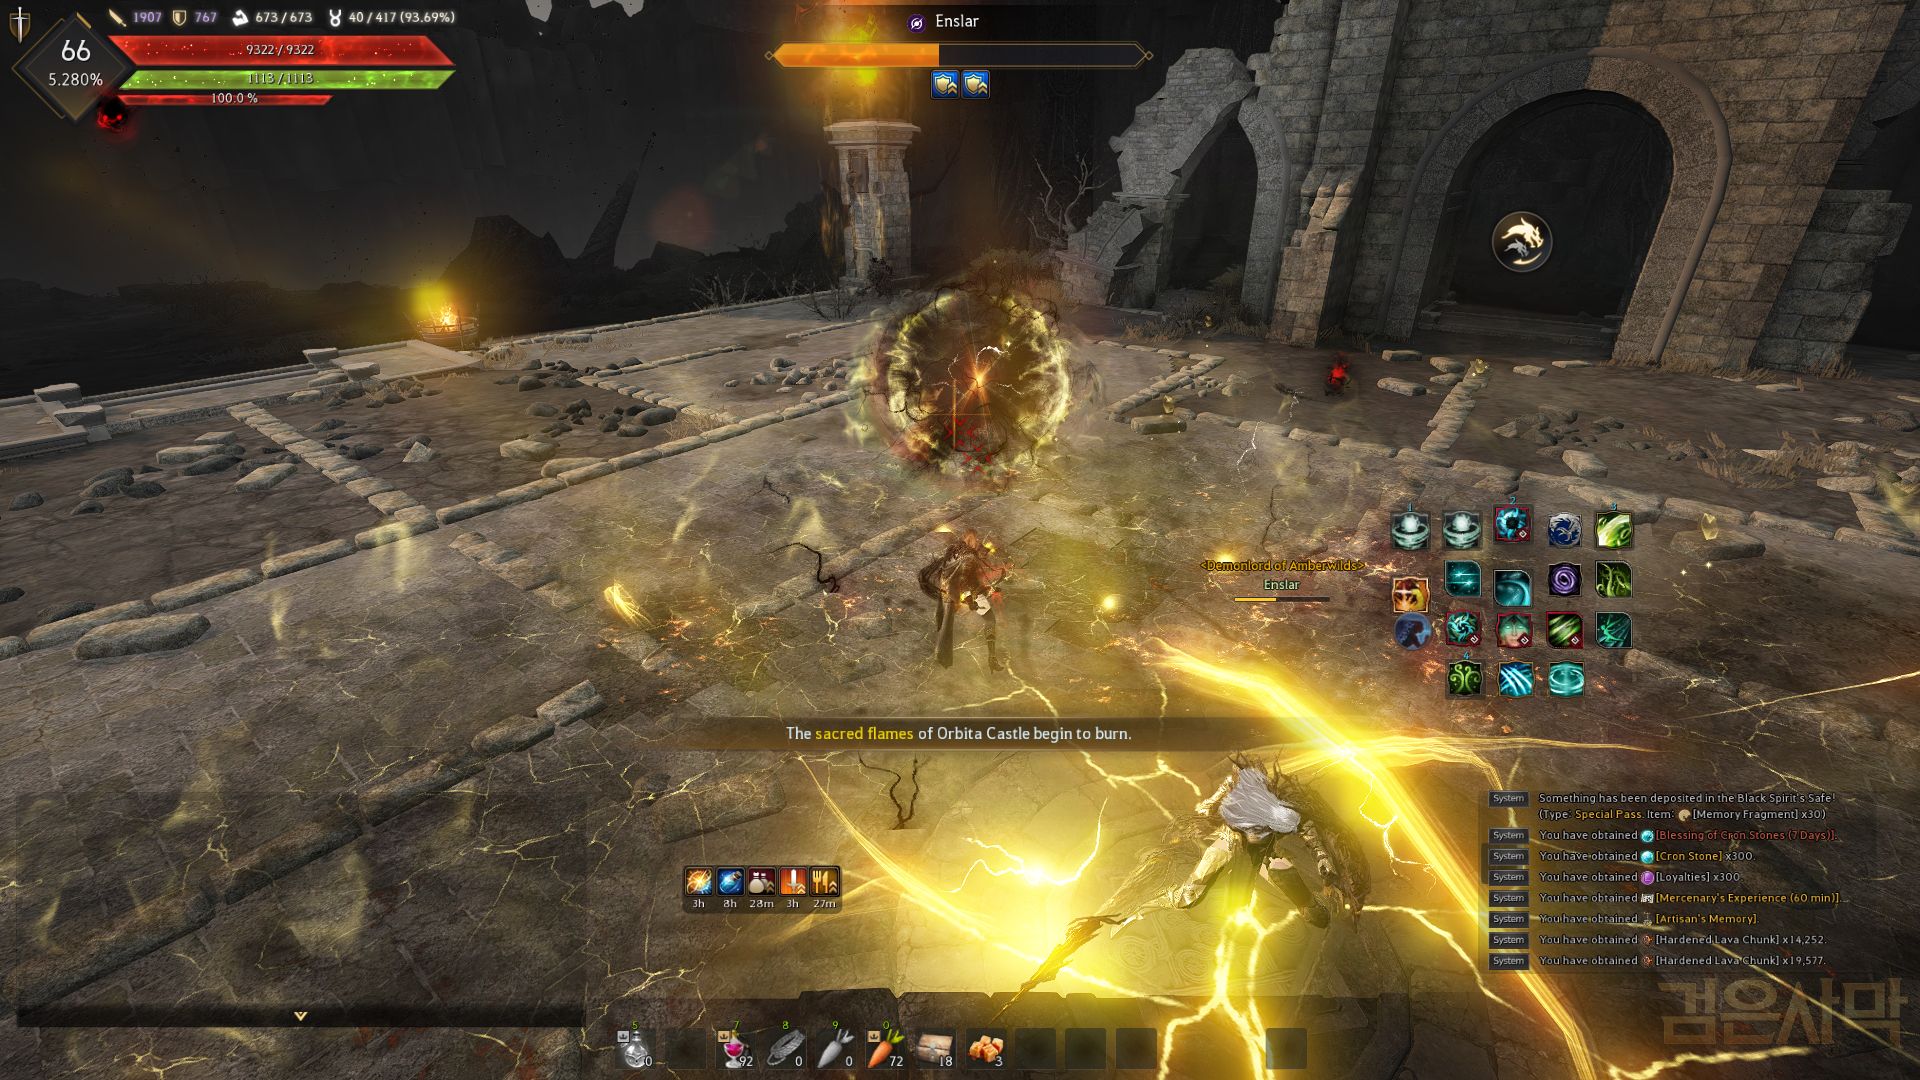
- At approx 50% HP, Enslar will go into the center of the arena and the message “The sacred flames of Orbita Castle begin to burn” will appear.
- In the 4 corners of the arena, there are pillars with a burning flame above them.
- Check all 4 of the pillars and look for the flame which temporarily turns red.
- Orbs will then come from the pillars and start moving towards Enslar
- You need to body-block the orb from the pillar that had the red flame, to stop it from reaching Enslar
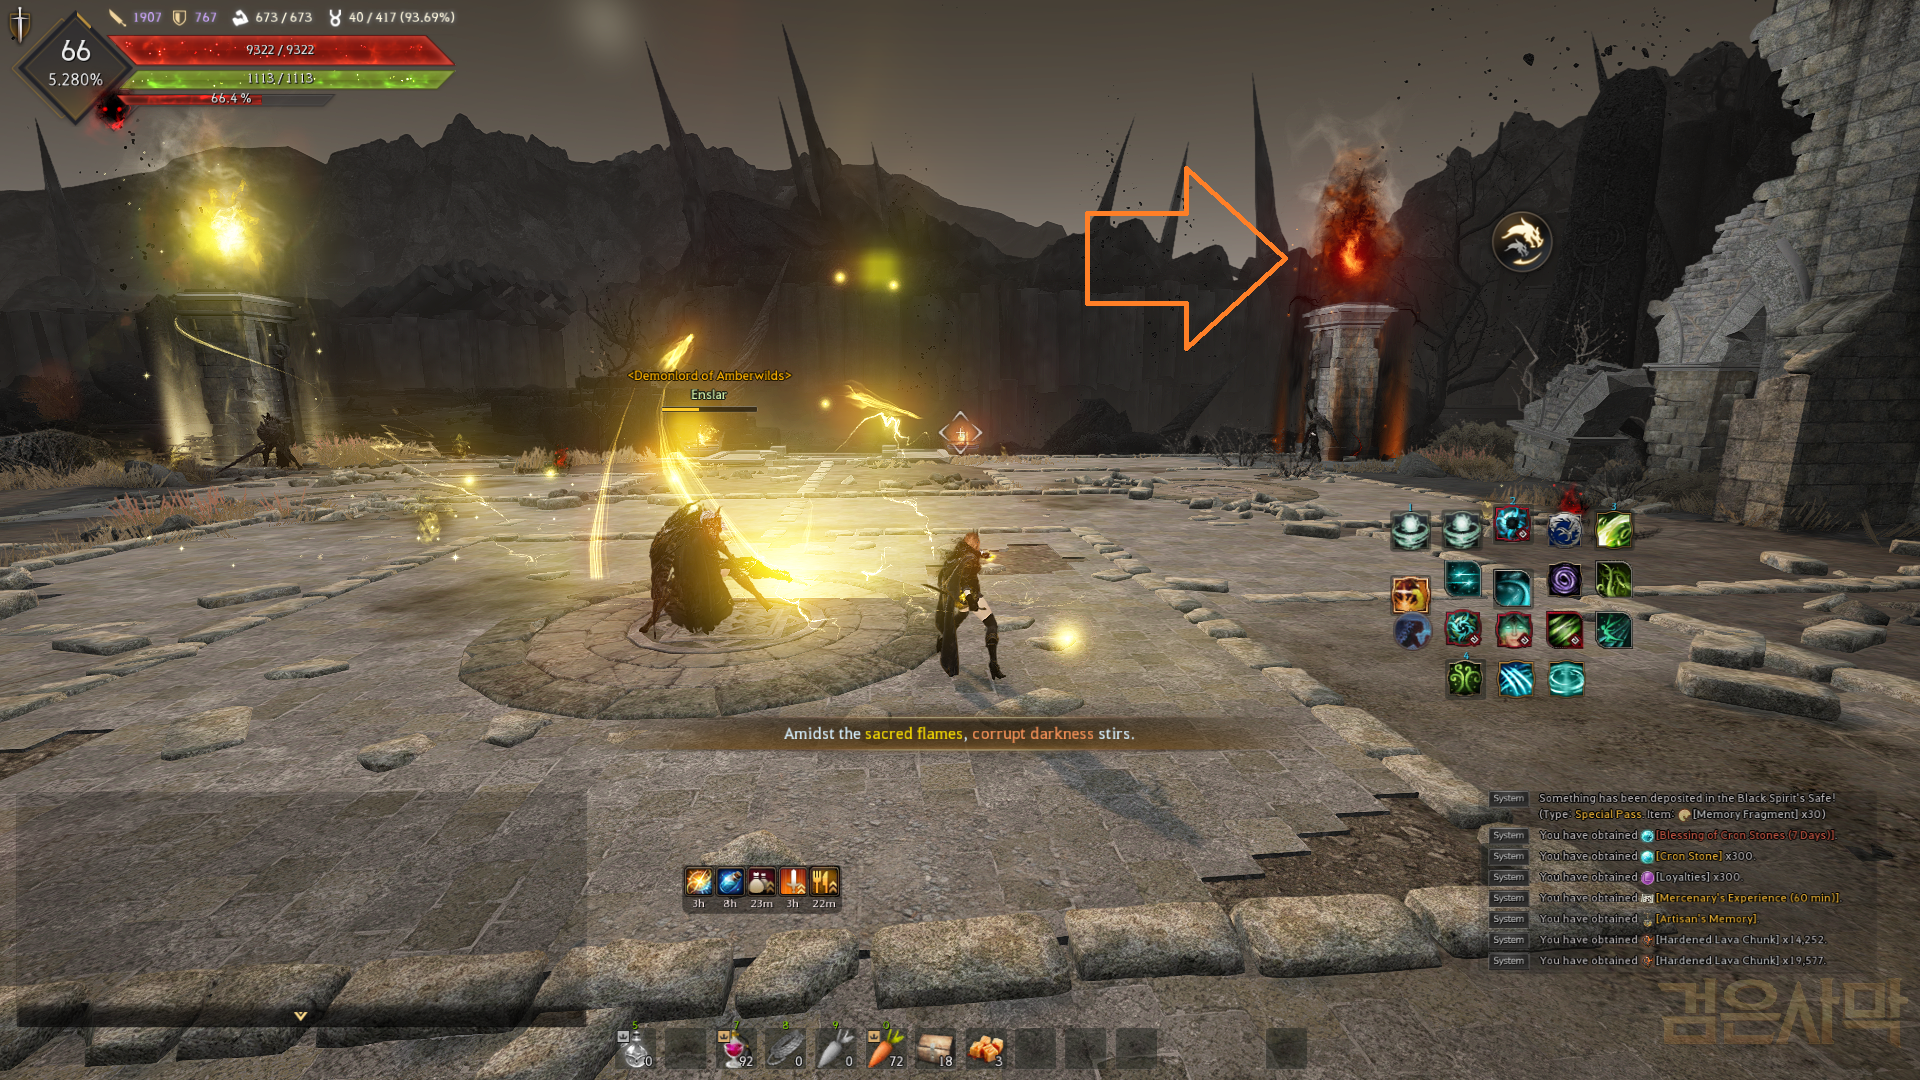
-
- If you miss which pillar had the red flame, you can try to block all 4 orbs
- This is then repeated and the red flame can move to a different pillar. You need to block the 2nd orb as well.
- If you do the mechanic correctly, Enslar will be stunned and will have a DP debuff
- If you fail the mechanic, you will be one-shot by the attack afterwards.
- The 2nd phase starts when Enslar reaches 0% HP.
Phase 2:
- In the 2nd phase, Enslar will do a lot of flying around again. Focus on dodging the attacks as Enslar is invincible for a lot of the fight.
- Enslar will land at certain times during the fight. She has an attack pattern with a black circle on the floor, which hits 3 times in a row and can CC you if you are hit.
- When the message “Do not defy Elion’s will” appears, a group of monsters will spawn. After killing the monsters Enslar will be stunned.
- Enslar can also spawn a portal and waves of monsters come out of it.
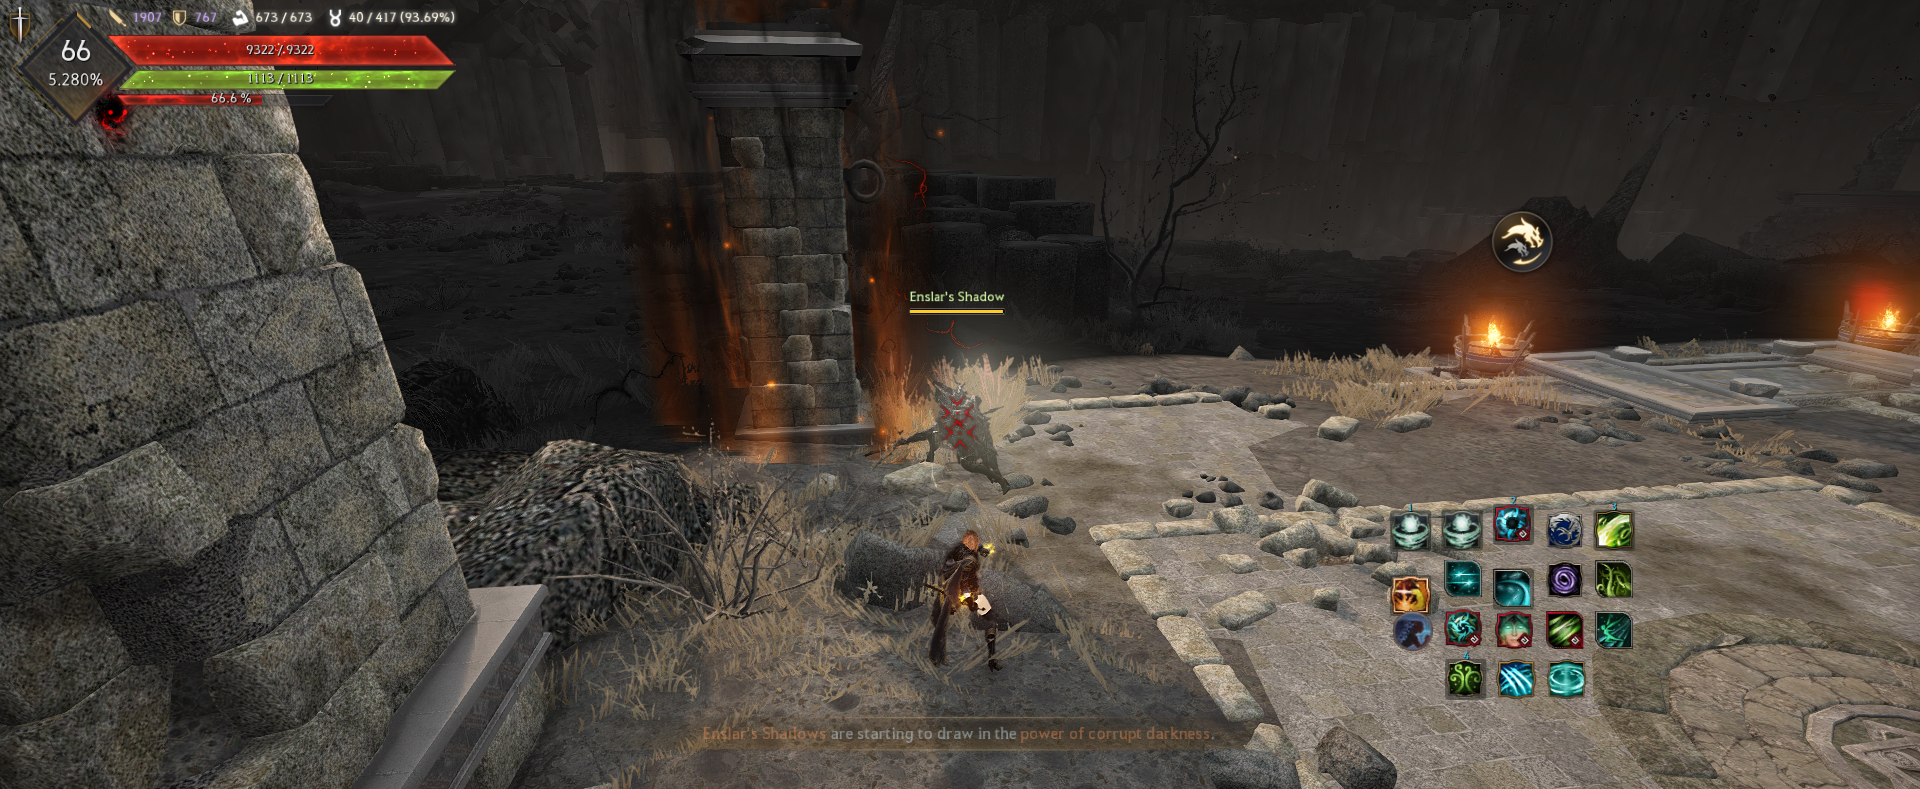
- There will be 4 “Enslar’s Shadow” monsters stood at the pillars on the corners of the arena
- Go to each of the pillars and kill the shadow monster at each one
- When all 4 monsters are killed, Enslar will be stunned and have a DP debuff.
Cartian
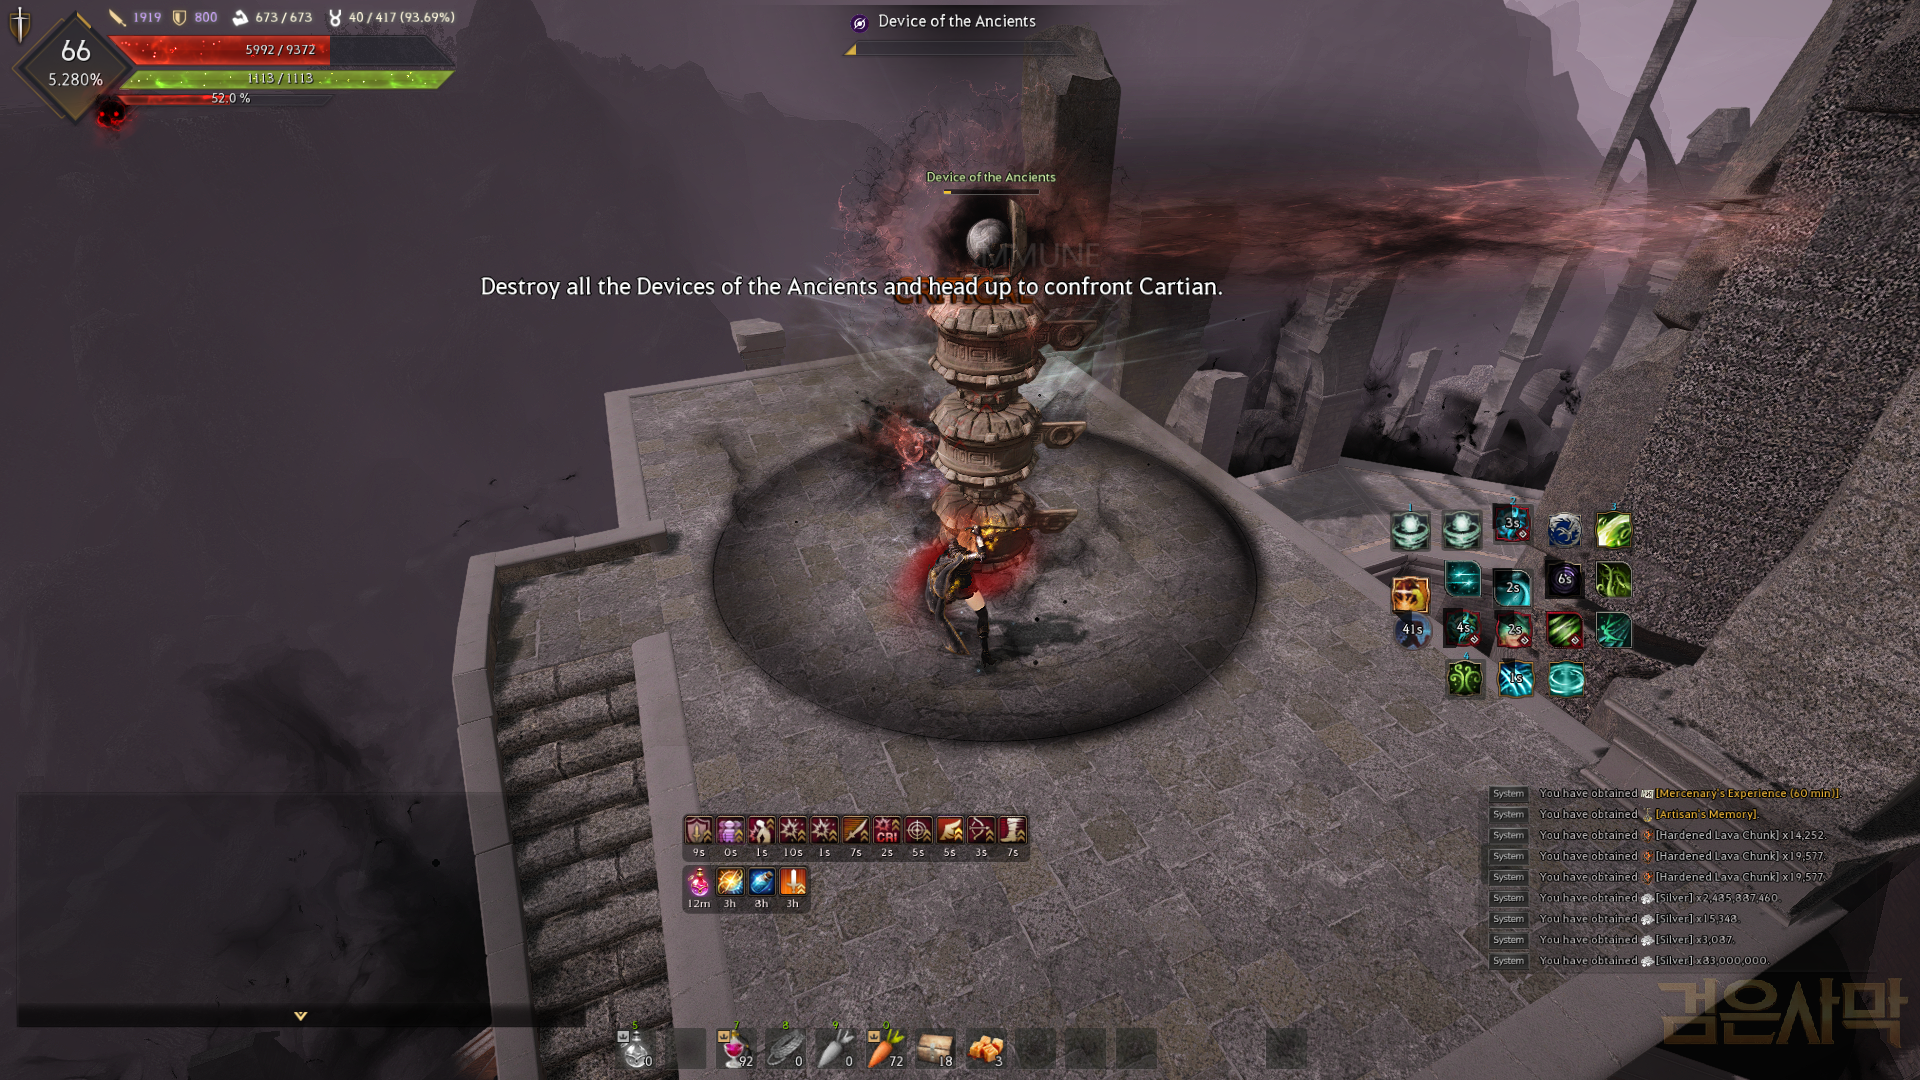
Phase 1:
- You will start the fight at the bottom of the arena. Go up the stairs directly in front of you and make your way to the “Device of the Ancients” tower.
- There are 3 towers in the same fixed locations. You need to destroy the towers at each location.
- The towers will do AOE attacks while you are hitting them.
- Once all 3 towers are destroyed, you are teleported to the top platform of the arena, and the 2nd phase begins
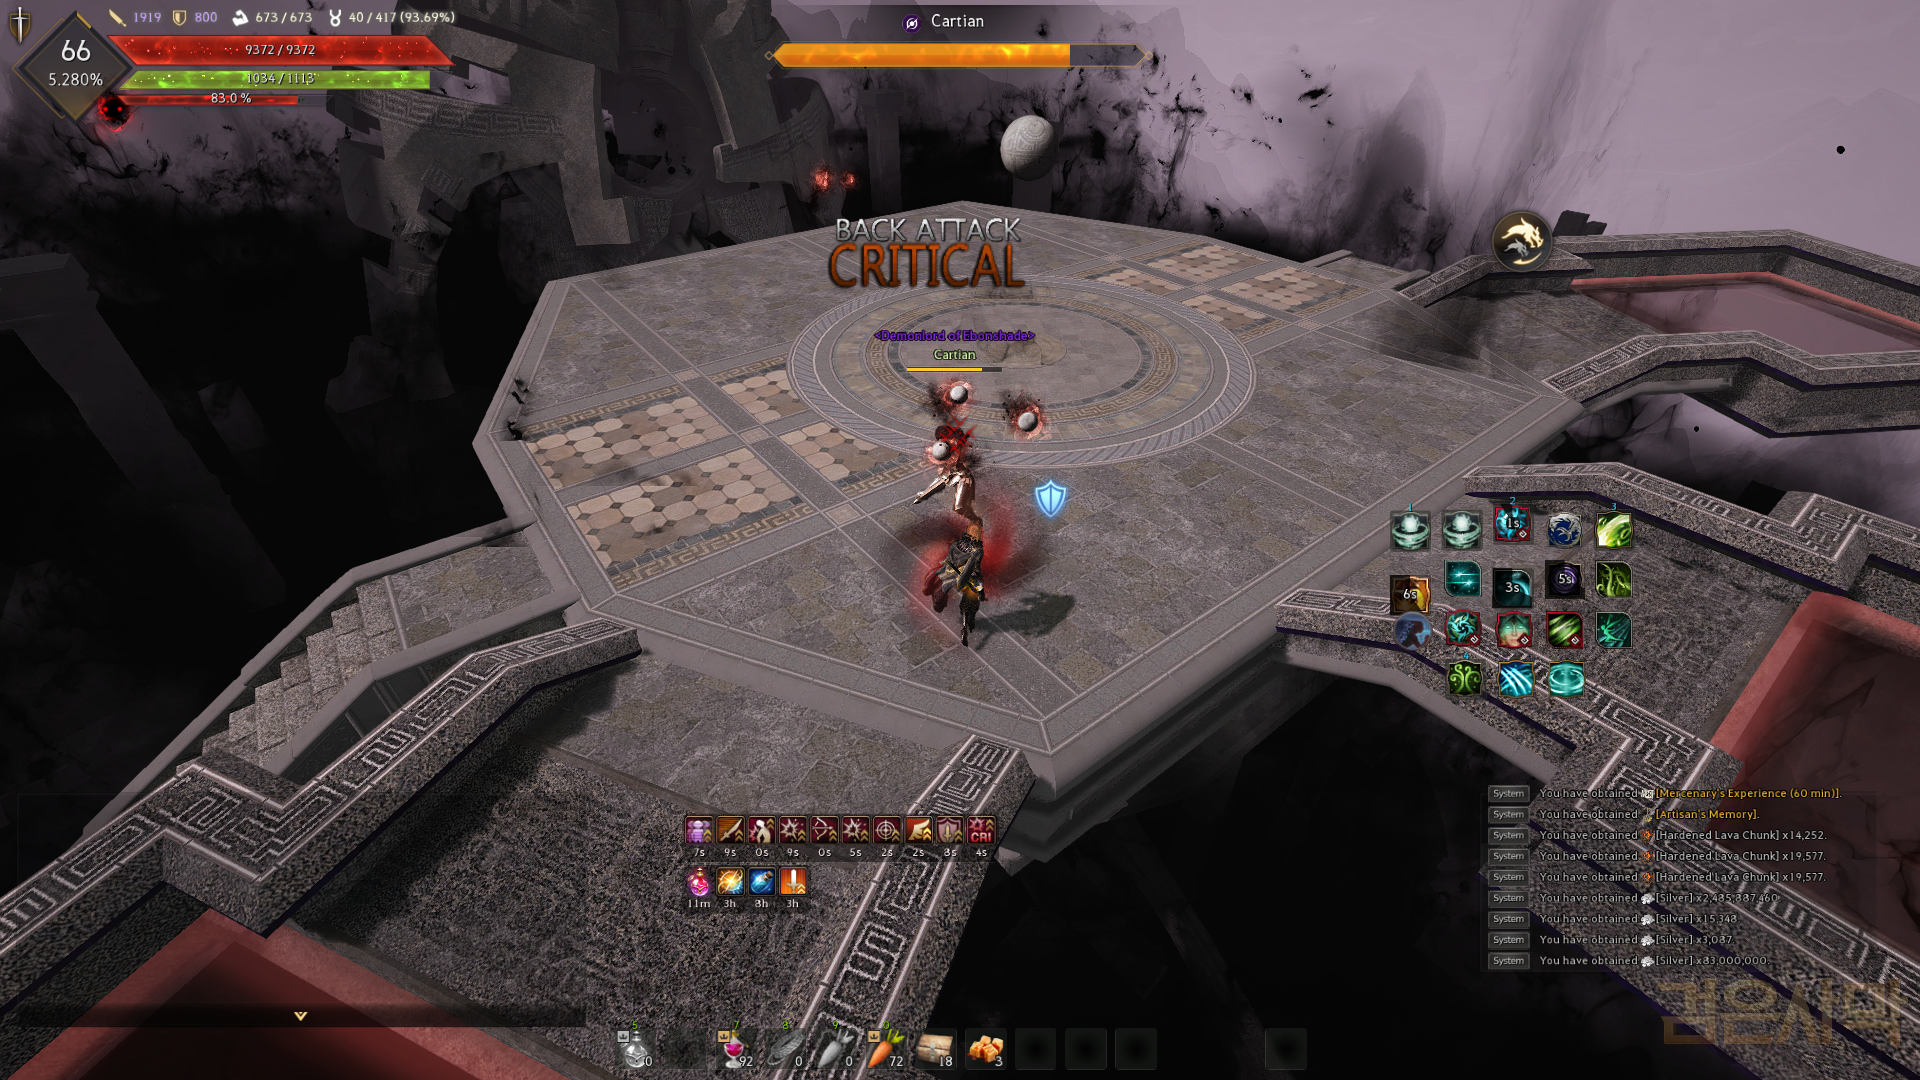
Phase 2:
- Cartian does not really have any mechanics and the fight is mostly about dodging the AOE and DPSing when you can
- Falling off the top of the arena is a guaranteed death so you need to be very careful with mobility skills. The most challenging part of the fight is actually not falling off the arena.
- There are also 3 red platforms you can stand on and these can be used to dodge some of the attacks, however, if you stand on them for too long they do break. You can also move down the stairs slightly to avoid some attacks.
- At approximately 30% HP, a large red orb will summon near the statue in front of the arena.
- The orb will move towards you slowly and if you lead the orb into Cartian it will explode.
- If you successfully lead the orb to her 2 times, she will be stunned and have a DP debuff.
- You don’t really need to do this mechanic as you can DPS her faster if you have enough AP, just be careful if the orbs hit you as they do explode.
Caphras
- The fight starts with Caphras in his transformed state in phase 1. There are 2 phases, but the boss only has 1 mechanic and most of the fight is just dodging red circles and the yellow lines.
- He will occasionally summon flame AOE. If you stand on these flames they will explode and deal a lot of damage.
- When Caphras reaches 50% HP (in both phase 1 and 2), the message “Face your fears” will appear.
- Caphras will move to the middle of the arena and the entire room will be covered in flames.
- You will also have a debuff which will drain your HP by 600 per second.
- During this mechanic, a yellow orb will spawn. Killing the orb will give you a buff that grants you immunity from the debuff for 30 seconds.
- When the buff from the orb runs out, you need to kill the yellow orb again to get it back.
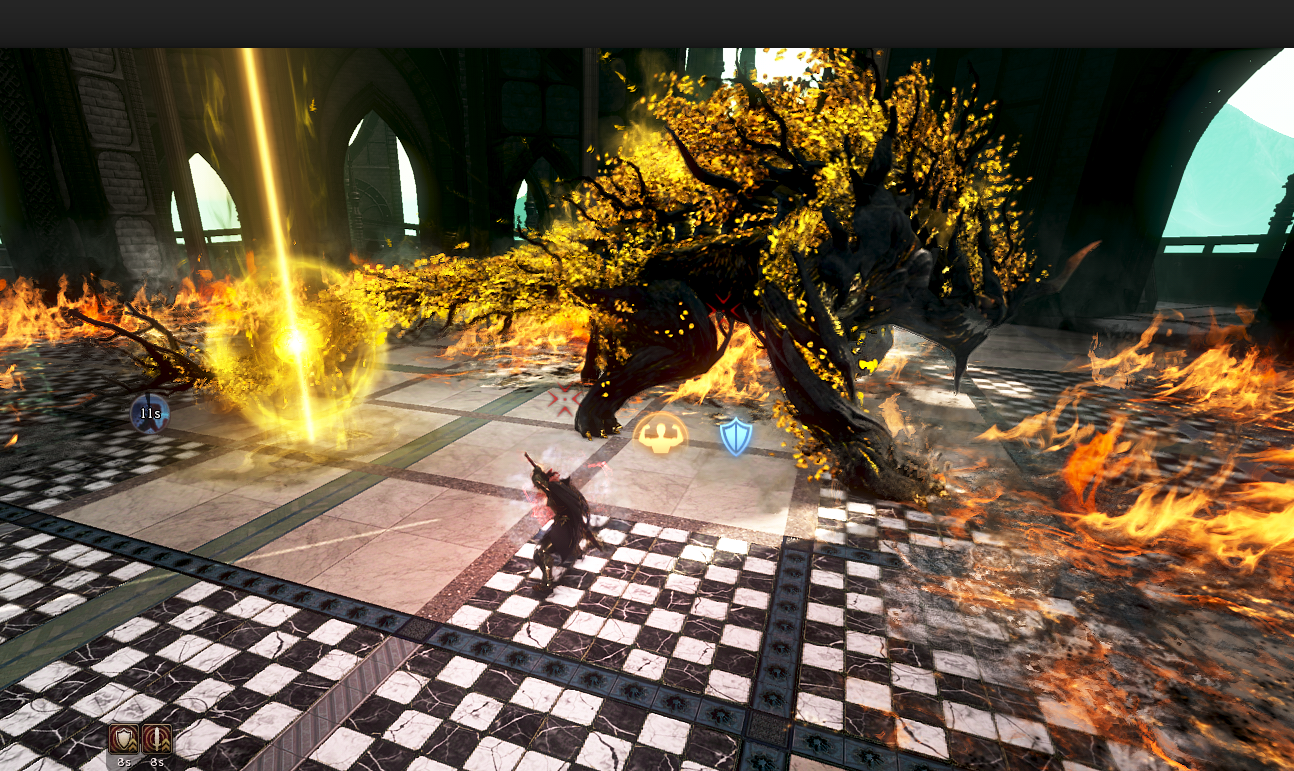
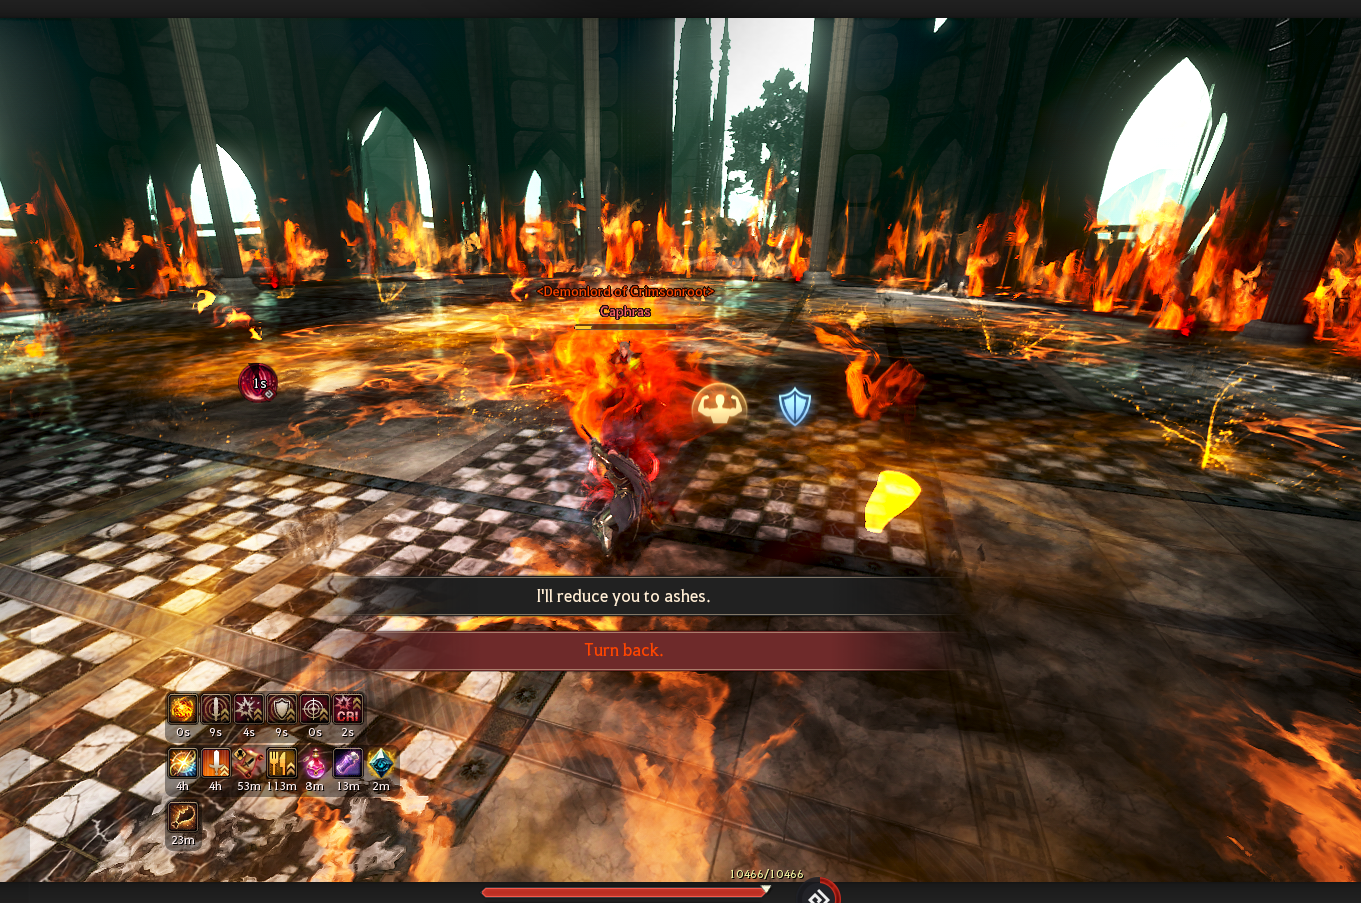
Thank you to my guildie Ddraig_Ddu for providing these Caphras screenshots <3