Introduction
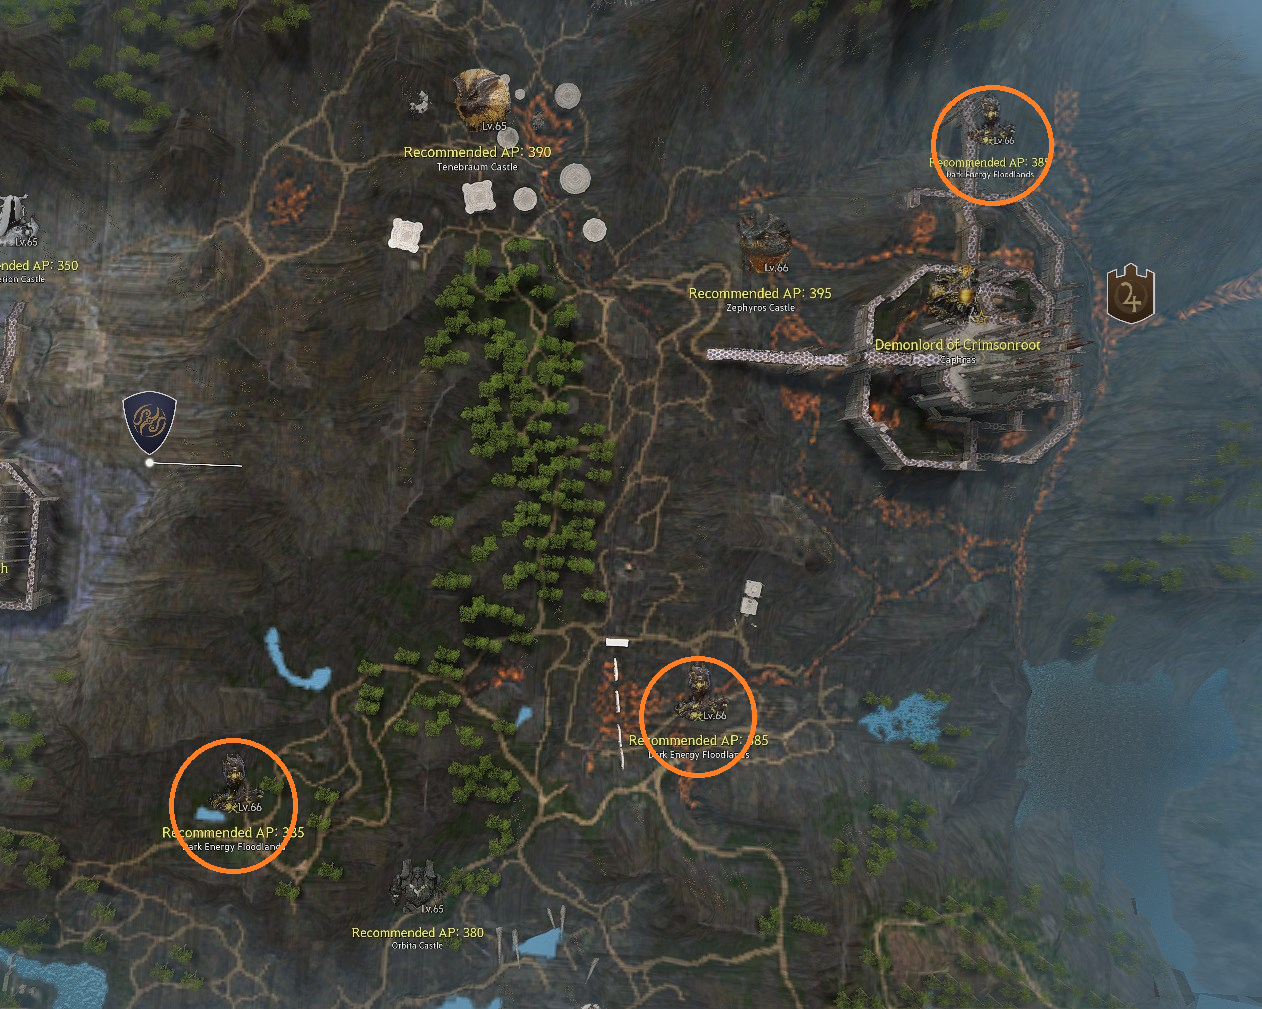
The Edania region has a total of 6 grind spots. There are 5 solo spots and 1 party spot designed for a party of 3 players. The 5 solo spots increase in difficulty, with the easiest and lowest difficulty being the Aetherion Castle monster zone, and hardest end-game monster zone being Zephyros Castle which has a recommended total AP stat of 1980.
All of the monsters in Edania are the “Edania” monster species, and there are new items that drop at each of the monster zones, including the Crystal of Dusky Ruins, which grants extra AP against Edanian monsters. You can also obtain Primordial Fragments, which are used to craft Sovereign Sub-weapons, Crystallized Energy of Endtimes which are used to create Amplified Lightstones or HAN Dawn Crystals, and many other items such as Deboreka Accessories.
Aetherion Castle

Mechanics
- CC Type: Stun/Stiffness/Freezing
- Hit the “Darktouched Root Spirit” tower in the middle to begin spawning monsters

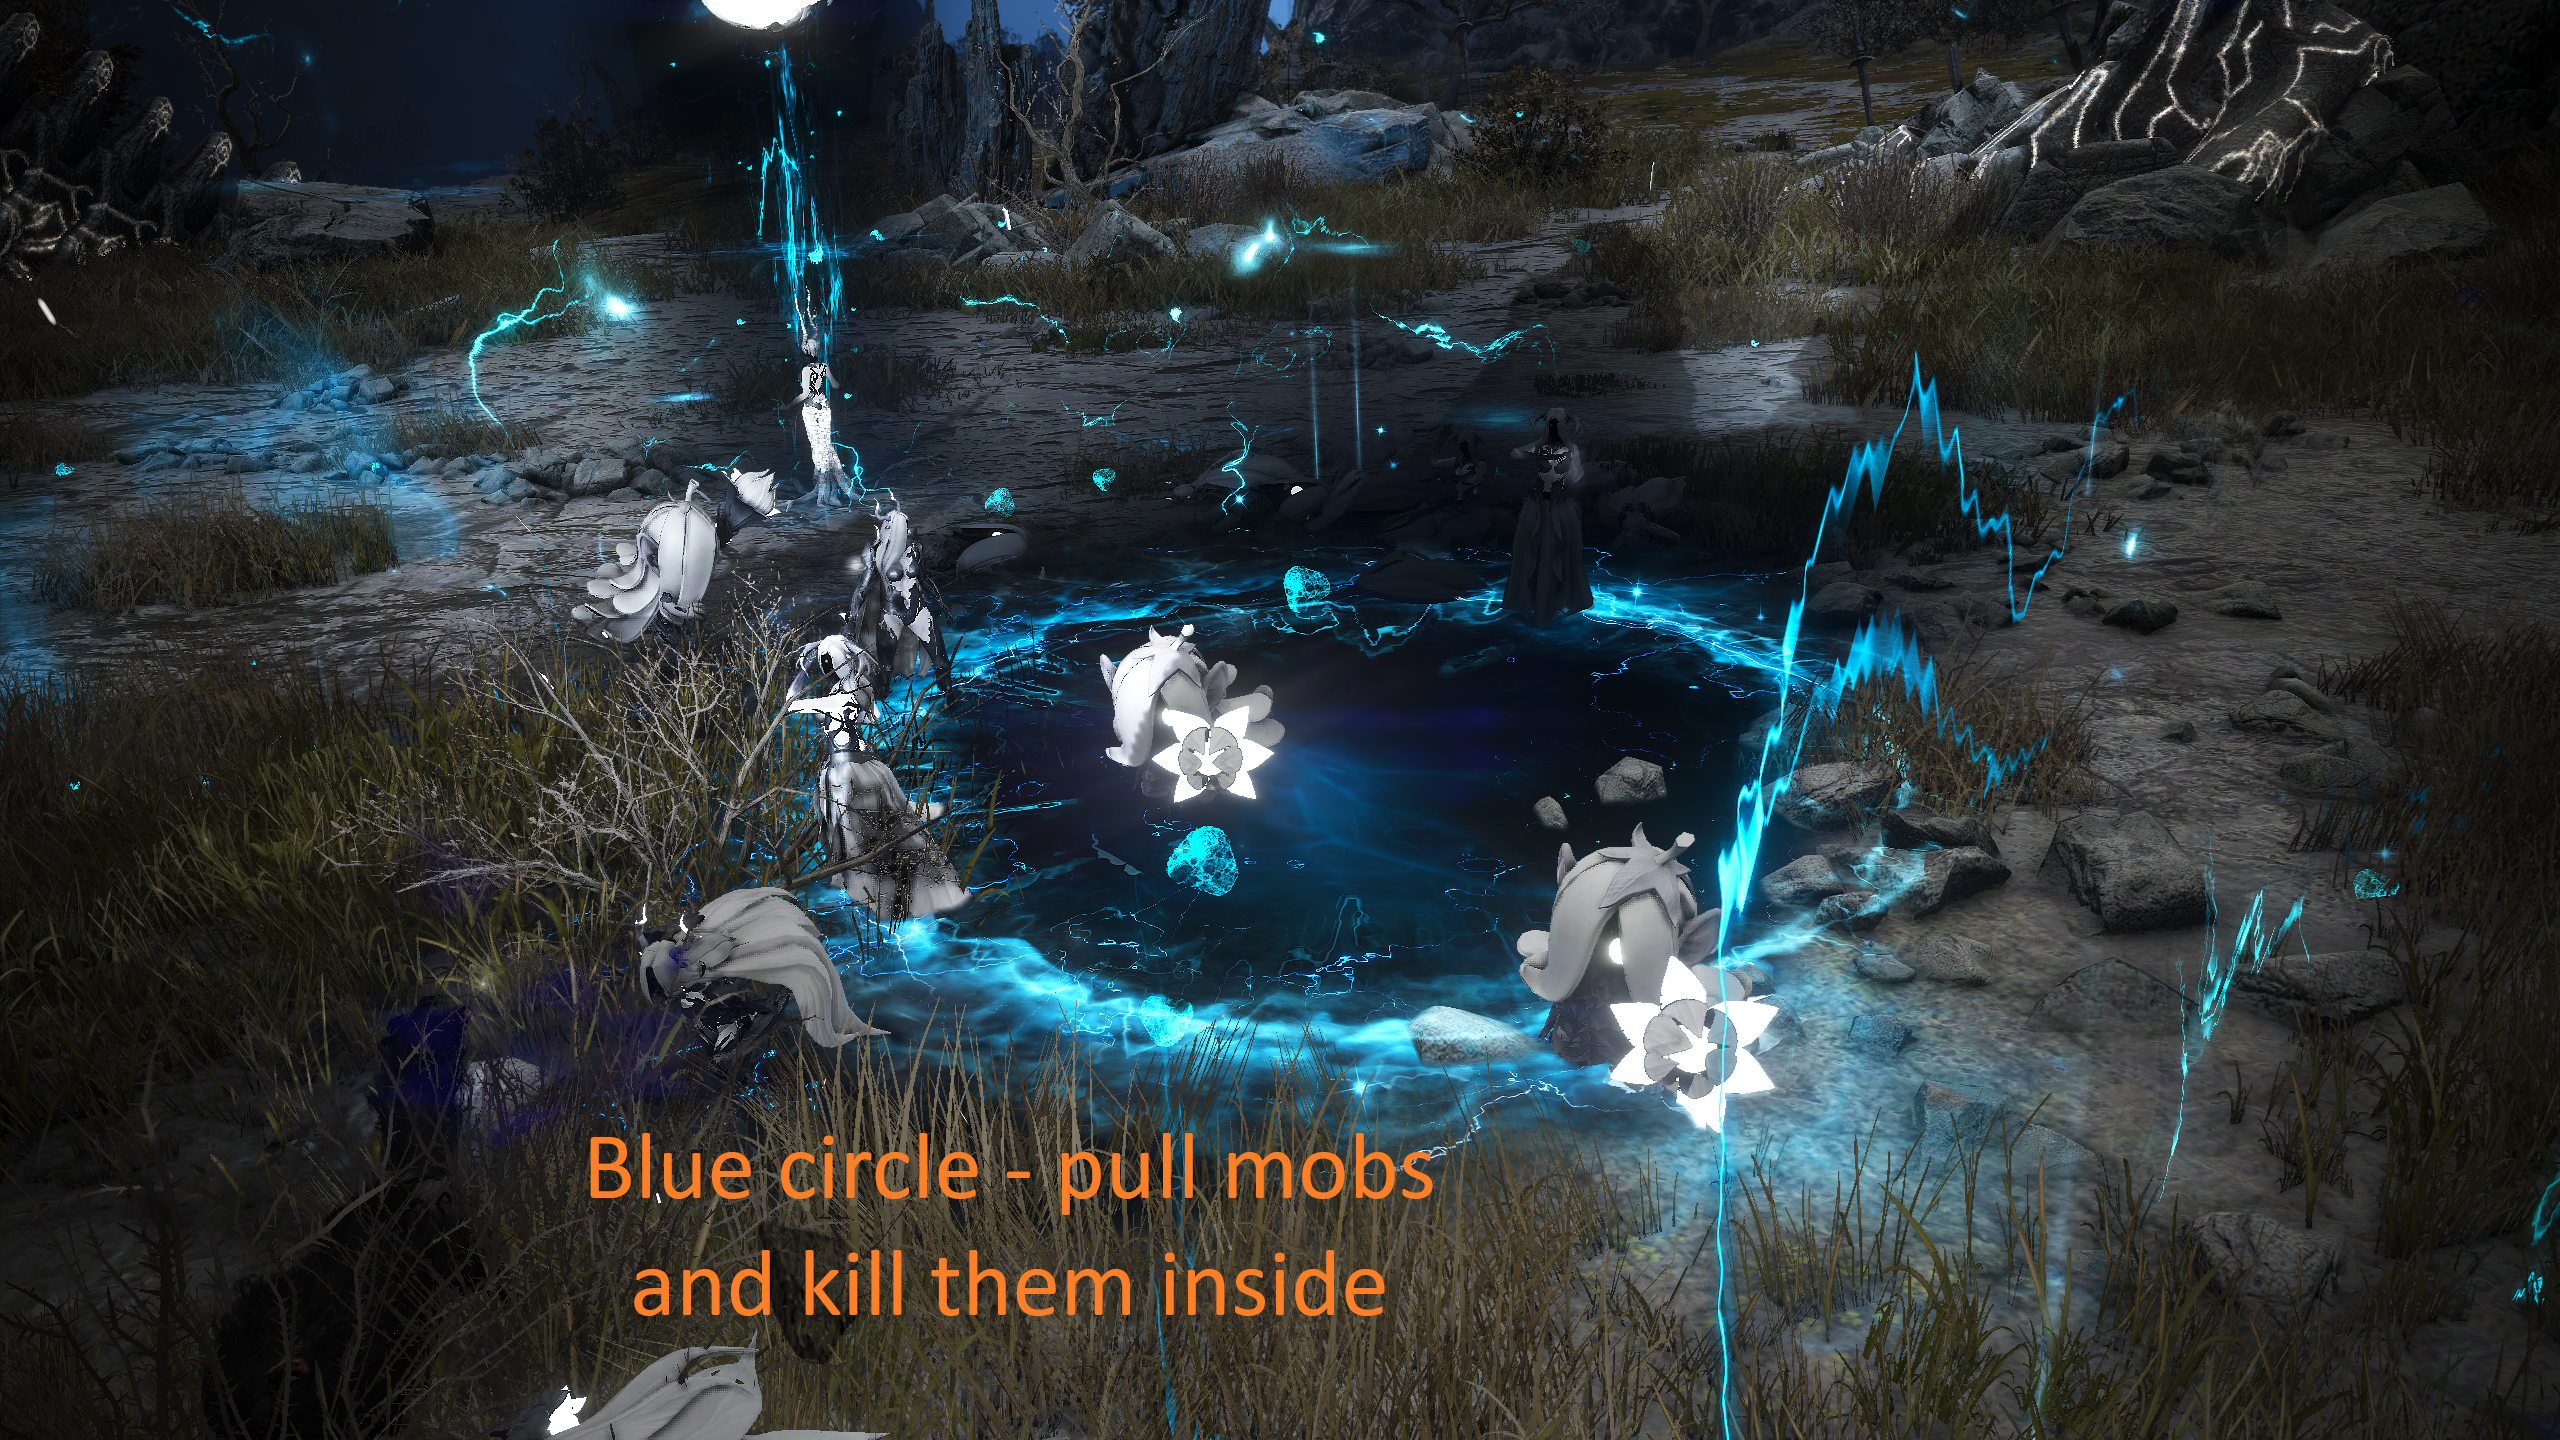
- After a while, a message “You sense the faint presence of unstable spirits nearby.” will appear with a blue circle
- Pull the monsters and kill them inside the blue circle
![]()
- When enough monsters die inside the blue circle, the message “Unstable spirits, tainted by darktouched spirits, begin to stir.”, it will spawn a large wave of squishy monsters
- After clearing several of the blue circles, Black Wings will appear, and you will gain a buff and transform into a blue lightning orb. Use W/A/S to move around as the orb and deal high damage to instantly kill the monsters.
- Once the buff ends, the Muraka boss will spawn with the message “Drawn by Azureach energies, Muraka reveals itself”. You can begin the rotation again by hitting the tower in the middle once Muraka and all monsters are defeated.
![]()
Loot
| Item Name | Description |
|---|---|
|
Chilled Soul Piece
|
The trash loot has a selling price of 105,640 silver. |
|
WON Crystal of Ruin |
Used to craft a WON Crystal of Dusky Ruin
|
|
WON Crystal of Dusky Ruin |
Crystal that can be equipped for the following effects:
|
|
Primordial Fragment |
Used to craft a Gem of the Primordial (Sovereign Sub-weapon Crafting Material) |
|
Silent Fragment of Origin |
Used to craft a Silent Crystal of Origin
|
|
Silent Crystal of Origin |
Used when enhancing Slumbering Origin Defense Gear from Silent to Wailing, prevents enhancement level drop |
|
Distorted Fragment of Origin |
Used to craft a Silent Crystal of Origin
|
|
Distorted Crystal of Origin |
Used when enhancing Slumbering Origin Defense Gear from Distorted to Silent, prevents enhancement level drop |
|
Deboreka Accessories |
Can drop Deboreka Accessories up to TRI |


- Other drops include Caphras Stones, Ancient Spirit Dust, and Black Stones
Titles
| Title | Requirement |
|---|---|
| Petal Collector | Defeat Darktouched Root Spirits x5,000 |
| Darkbloom | Defeat Darktouched Root Spirits x10,000 |
| After the Long Night | Defeat Darktouched Root Spirits x20,000 |
| Flitter Flutter | Defeat Darktouched Root Spirits x30,000 |
Nymphamaré Castle

Mechanics
- CC Type: Stun/Stiffness/Freezing
- Monsters spawn between the pillars, and you should prioritize killing the Shaman in each pack, then move to the next pack
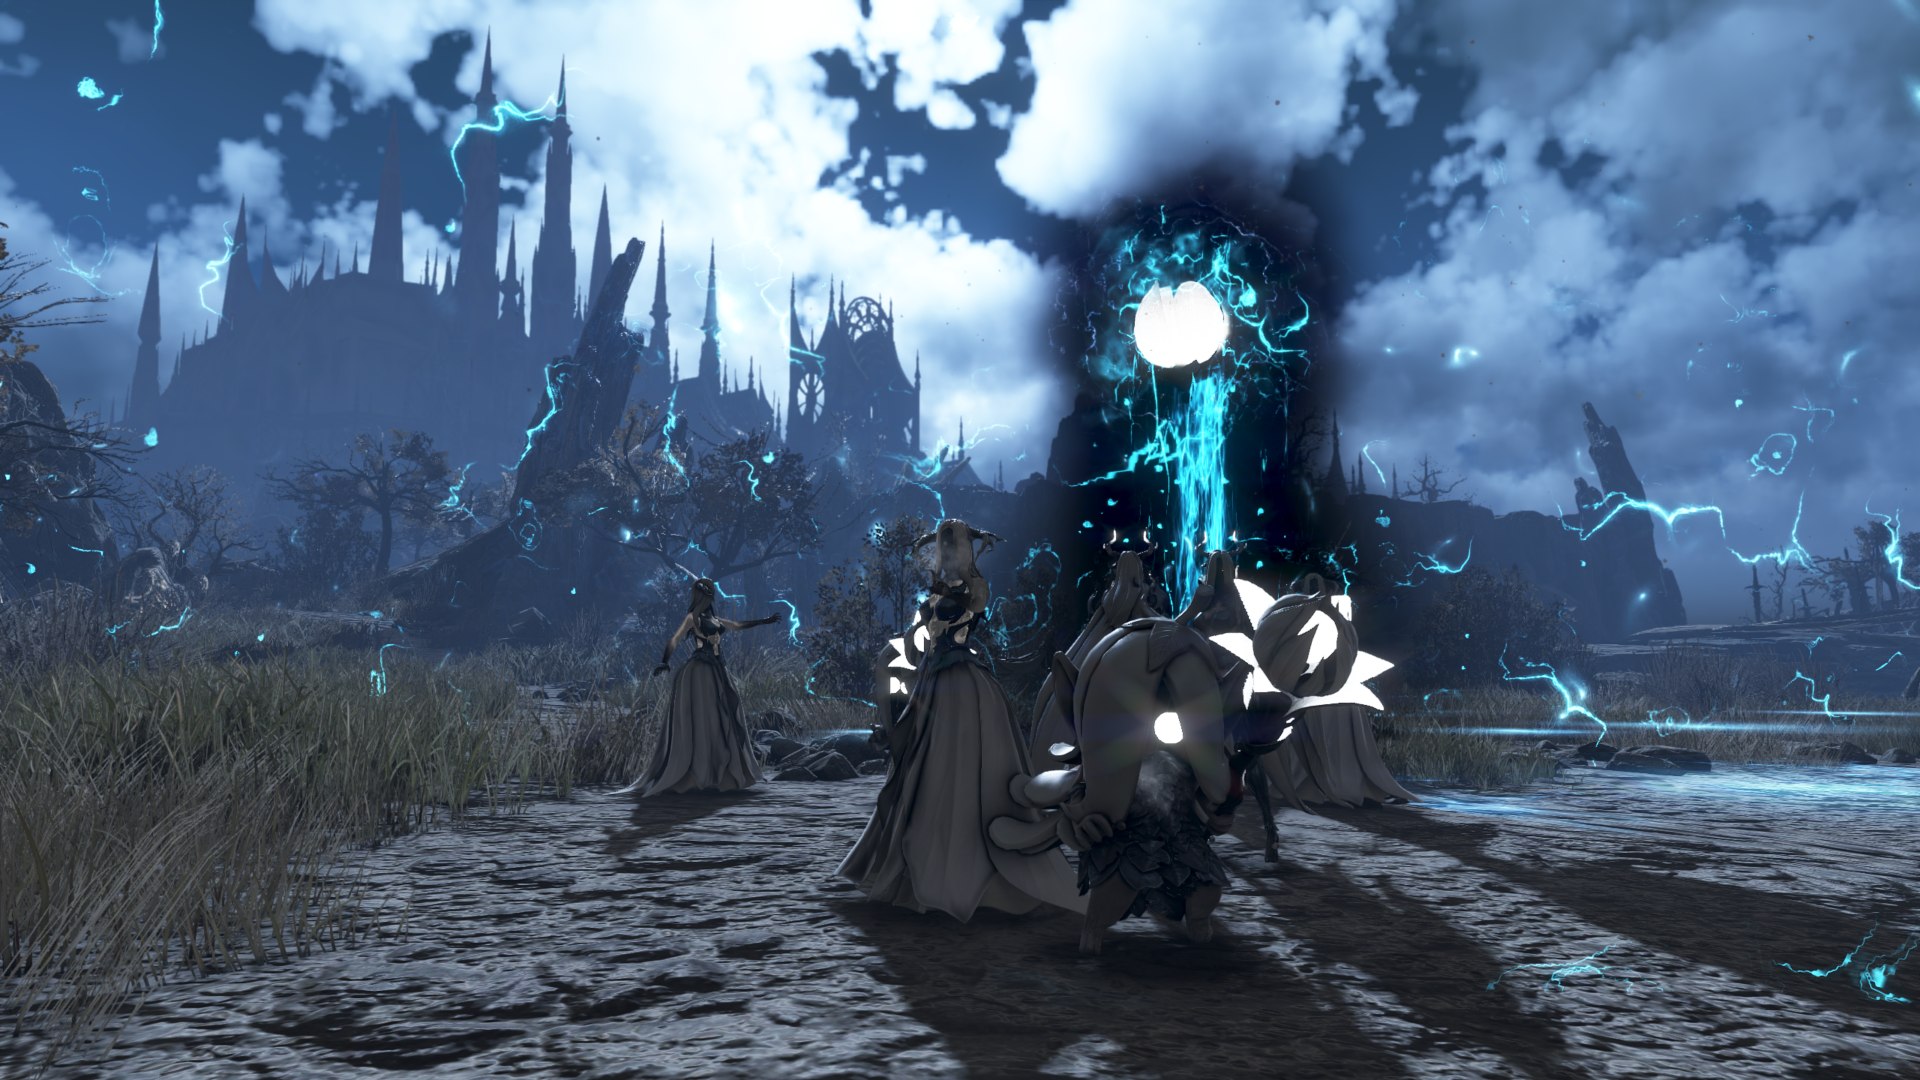
- While grinding the spot can become “contaminated”. A message will appear saying “Rusalka’s eyes pierce through the intruder.” and you need to kill the tower called “Rusalka’s Eyes”.
![]()
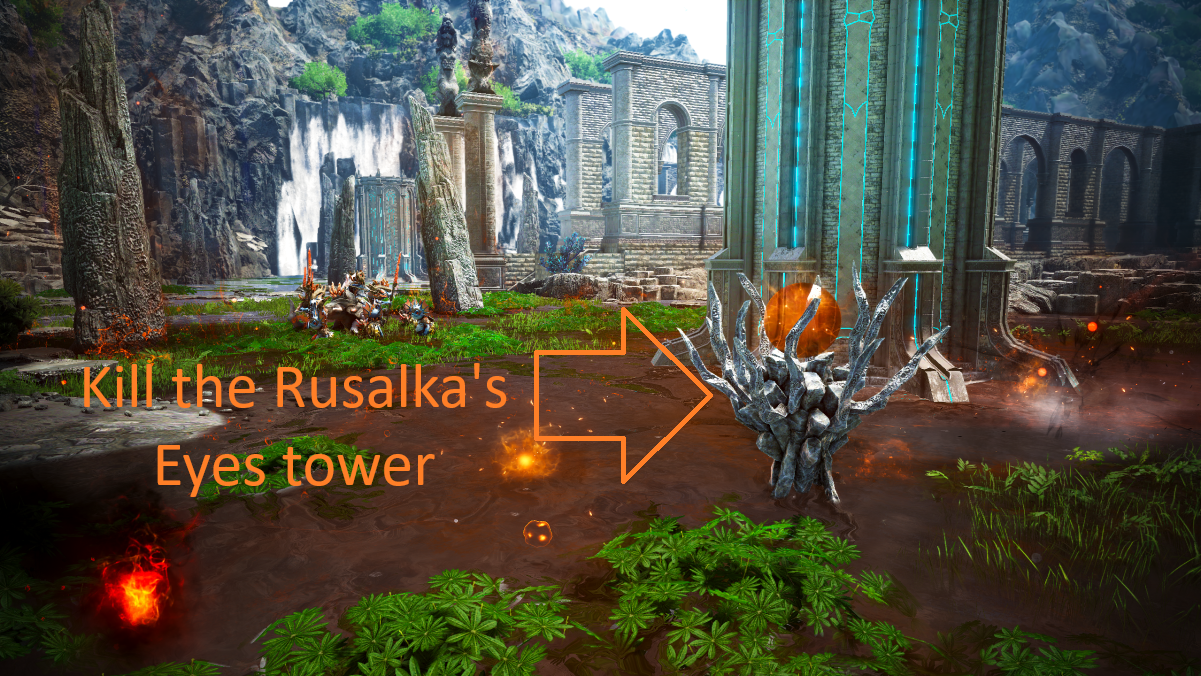
- If you don’t kill the tower, then the contamination level will increase and eventually flood the entire grind spot. A higher contamination level will cause more damage to you over time as a poison.
![]()
- Repeat until the boss spawns. On boss spawn, ensure you back-attack it (heavy frontal damage) and avoid its AoEs
- Upon killing the boss, stand in a blue circle near the middle tower to launch upwards and land on top. Kill the bubble and go down and kill the squishy fishes. There’s no pollution during this stage
Loot
| Item Name | Description |
|---|---|
 Contaminated Coral Piece
|
The trash loot has a selling price of 116,200 silver. |
|
BON Crystal of Ruin |
Used to craft a BON Crystal of Dusky Ruin
|
|
BON Crystal of Dusky Ruin |
Crystal that can be equipped for the following effects:
|
|
Silent Fragment of Origin |
Used to craft a Silent Crystal of Origin
|
|
Silent Crystal of Origin |
Used when enhancing Slumbering Origin Defense Gear from Silent to Wailing, prevents enhancement level drop |
|
Distorted Fragment of Origin |
Used to craft a Silent Crystal of Origin
|
|
Distorted Crystal of Origin |
Used when enhancing Slumbering Origin Defense Gear from Distorted to Silent, prevents enhancement level drop |
|
Crystallized Energy of Endtimes |
Used to create Amplified Lightstones or HAN Dawn Crystals |
|
Deboreka Accessories |
Can drop Deboreka Accessories up to TRI |


- Other drops include Caphras Stones, Ancient Spirit Dust, and Black Stones
Titles
| Title | Requirement |
|---|---|
| Seafoodie | Defeat Coral Nagas x5,000 |
| Contaminated | Defeat Coral Nagas x10,000 |
| Making Waves | Defeat Coral Nagas x20,000 |
| Splish Splash | Defeat Coral Nagas x30,000 |
Orbita Castle

Mechanics
- CC Type: Knockdown/Bound
- Hit the “Orbita Grave of Light” tower in the middle to begin spawning monsters
- There are 6 yellow glowing “Grave of Faith” pillars in total in a circle at the grind spot. Start by destroying each of the smaller/thinner pillars whilst monsters continuously spawn.
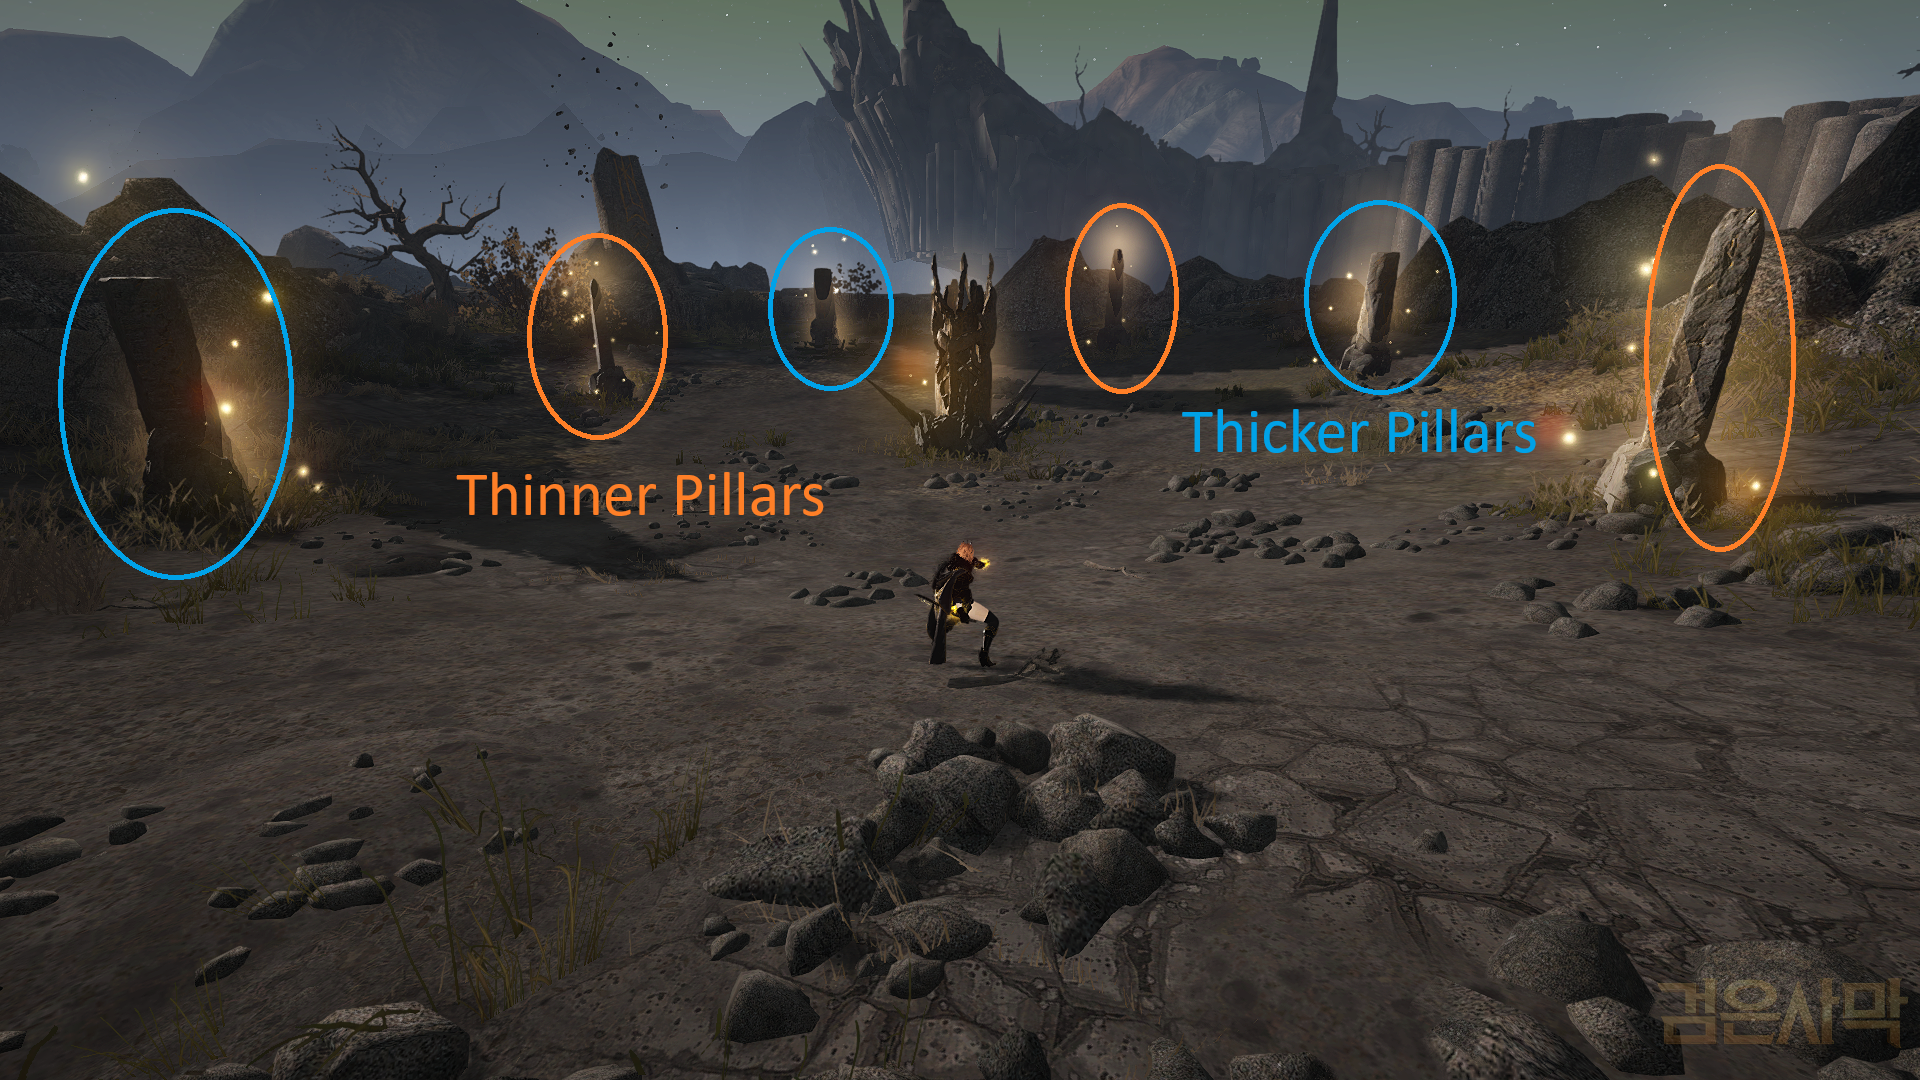
- Each time a pillar is destroyed, a large golem will spawn shortly afterwards and deal a high damage AOE attack. When destroying the pillar, move straight to the next pillar so that the golem spawns next to it. This allows you to attack both the pillar and the golem at the same time. You should try to kill the golem and pillar around the same time. If the pillar is destroyed before the golem dies you can end up with 2 golems at once which is difficult the deal with.

- It is important to move to the next pillar otherwise the golem can spawn in the wrong place and will do a ranged attack when you move away, which can deal a lot of damage.
- The golems also have a very powerful melee red circle AOE attack that they will charge. You need to i-frame or forward guard the attack as it deals a lot of damage.
- While destroying the pillars, white and yellow/orange circles can also appear occasionally. These give an AP buff when you stand inside them and are perfectly safe to stand in.
- After you have destroyed all 3 of the smaller/thinner pillars, multiple waves of monsters will spawn again, and after clearing those, the larger/thicker orange glowing pillars become attackable.
- Go to each of the thicker pillars and repeat the process until all of the pillars are destroyed.
- Waves of monsters will spawn again, and then the central tower will become vulnerable. Damage the central tower to spawn the final waves of enemies, and then Titan will appear.
- Titan has very high damage red circle attacks that you must i-frame or forward guard. Also be careful when the double waves of monsters spawn as they do a lot of damage and you will die if they all hit you at once.
- After killing Titan, a 3-minute “AFK phase” begins, where waves of monsters will spawn and instantly die. When the AFK phase ends, you can start the rotation again by hitting the central tower.
Loot
| Item Name | Description |
|---|---|
|
Lightlost Core |
The trash loot has a selling price of 140,600 silver. |
|
JIN Crystal of Ruin |
Used to craft a JIN Crystal of Dusky Ruin
|
|
JIN Crystal of Dusky Ruin |
Crystal that can be equipped for the following effects:
|
|
Silent Fragment of Origin |
Used to craft a Silent Crystal of Origin
|
|
Silent Crystal of Origin |
Used when enhancing Slumbering Origin Defense Gear from Silent to Wailing, prevents enhancement level drop |
|
Distorted Fragment of Origin |
Used to craft a Silent Crystal of Origin
|
|
Distorted Crystal of Origin |
Used when enhancing Slumbering Origin Defense Gear from Distorted to Silent, prevents enhancement level drop |
|
Crystallized Energy of Endtimes |
Used to create Amplified Lightstones or HAN Dawn Crystals |
|
Deboreka Accessories |
Can drop Deboreka Accessories up to TRI |

- Other drops include Caphras Stones, Ancient Spirit Dust, and Black Stones
Titles
| Title | Requirement |
|---|---|
| Stone Stacker | Defeat Golem x5,000 |
| Blinded by Light | Defeat Golem x10,000 |
| Wish Upon a Stone | Defeat Golem x20,000 |
| Rock ‘n’ Roll | Defeat Golem x30,000 |
Tenebraum Castle
Mechanics
- CC Type: Knockback/Floating
- Hit one of the outer towers around the grind spot to begin spawning monsters
- 3 waves of monsters will spawn at the outer tower. In the 3rd wave of enemies, there is a “Seer” monster which you should focus because once it dies it will stun the other monsters
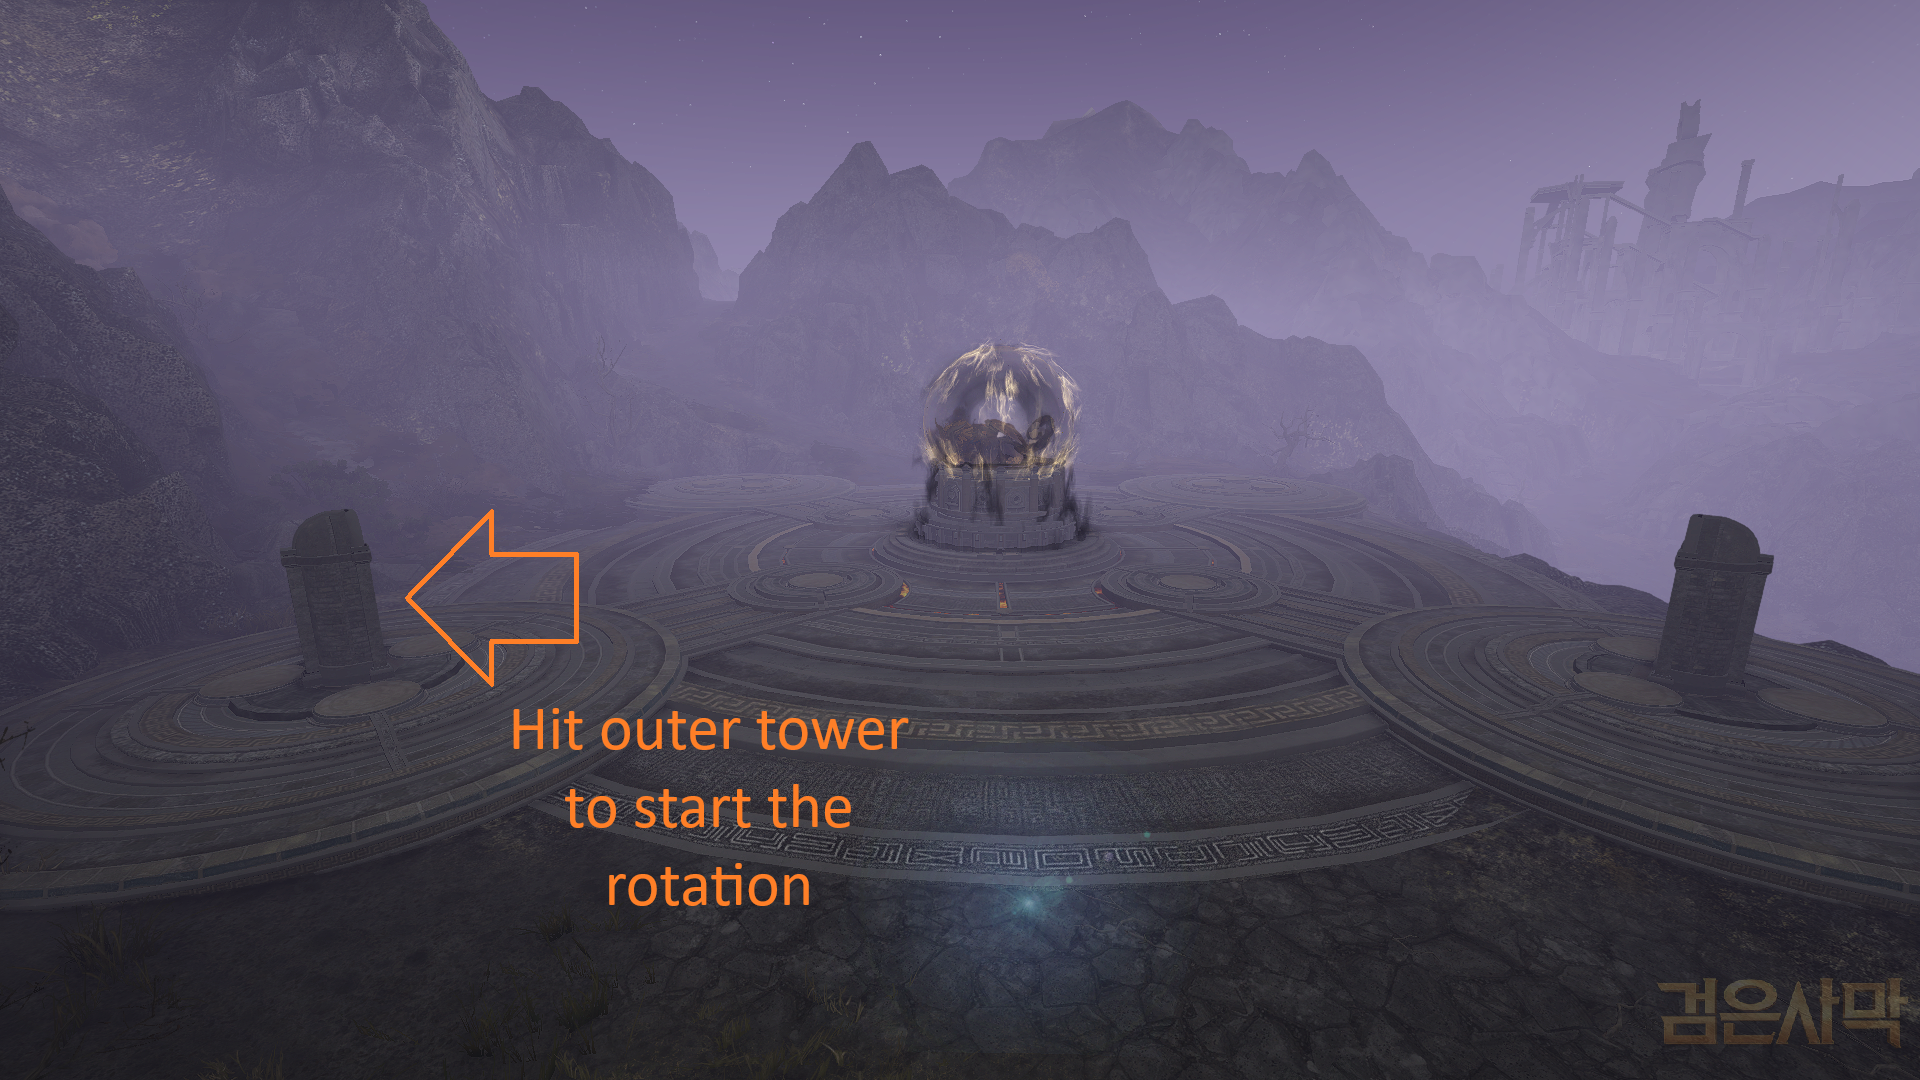
- Once you’ve defeated all 3 waves of monsters, move to the next outer tower and repeat until all 4 of the towers have been cleared.
- After this, waves of monsters will continuously spawn, and in between the Manticore will appear to attack you.
- When the Manticore reaches 66% HP it will leave, grant you a powerful buff, then more waves of monsters will continue to spawn. It will then appear again until it reaches 33% HP, then flies away and returns again until you defeat it.
- When the Manticore is defeated, an “AFK phase” will start and last approximately 1 minute. During this time, waves of monsters will spawn and die instantly.
- After the AFK phase is complete, hit one of the outer towers again to restart the rotation.
Loot
| Item Name | Description |
|---|---|
 Ancient Soldier Fragment
|
The trash loot has a selling price of 147,630 silver. |
|
HAN Crystal of Ruin |
Used to craft a HAN Crystal of Dusky Ruin
|
|
HAN Crystal of Dusky Ruin |
Crystal that can be equipped for the following effects:
|
|
Silent Fragment of Origin |
Used to craft a Silent Crystal of Origin
|
|
Silent Crystal of Origin |
Used when enhancing Slumbering Origin Defense Gear from Silent to Wailing, prevents enhancement level drop |
|
Distorted Fragment of Origin |
Used to craft a Silent Crystal of Origin
|
|
Distorted Crystal of Origin |
Used when enhancing Slumbering Origin Defense Gear from Distorted to Silent, prevents enhancement level drop |
|
Crystallized Energy of Endtimes |
Used to create Amplified Lightstones or HAN Dawn Crystals |
|
Herald’s Crystal |
Used to craft a Flawless Herald’s Crystal Heating (L) with the following materials:
|
|
Flawless Herald’s Crystal |
Can be used to reform the following artifacts:
|
|
Deboreka Accessories |
Can drop Deboreka Accessories up to TRI |


- Other drops include Caphras Stones, Ancient Spirit Dust, and Black Stones
Titles
| Title | Requirement |
|---|---|
| Delver of Knowledge | Defeat 5,000 Ancient Ator Remnants |
| Goldlit Guardian | Defeat 10,000 Ancient Ator Remnants |
| Crackle | Defeat 20,000 Ancient Ator Remnants |
| Flash | Defeat 30,000 Ancient Ator Remnants |
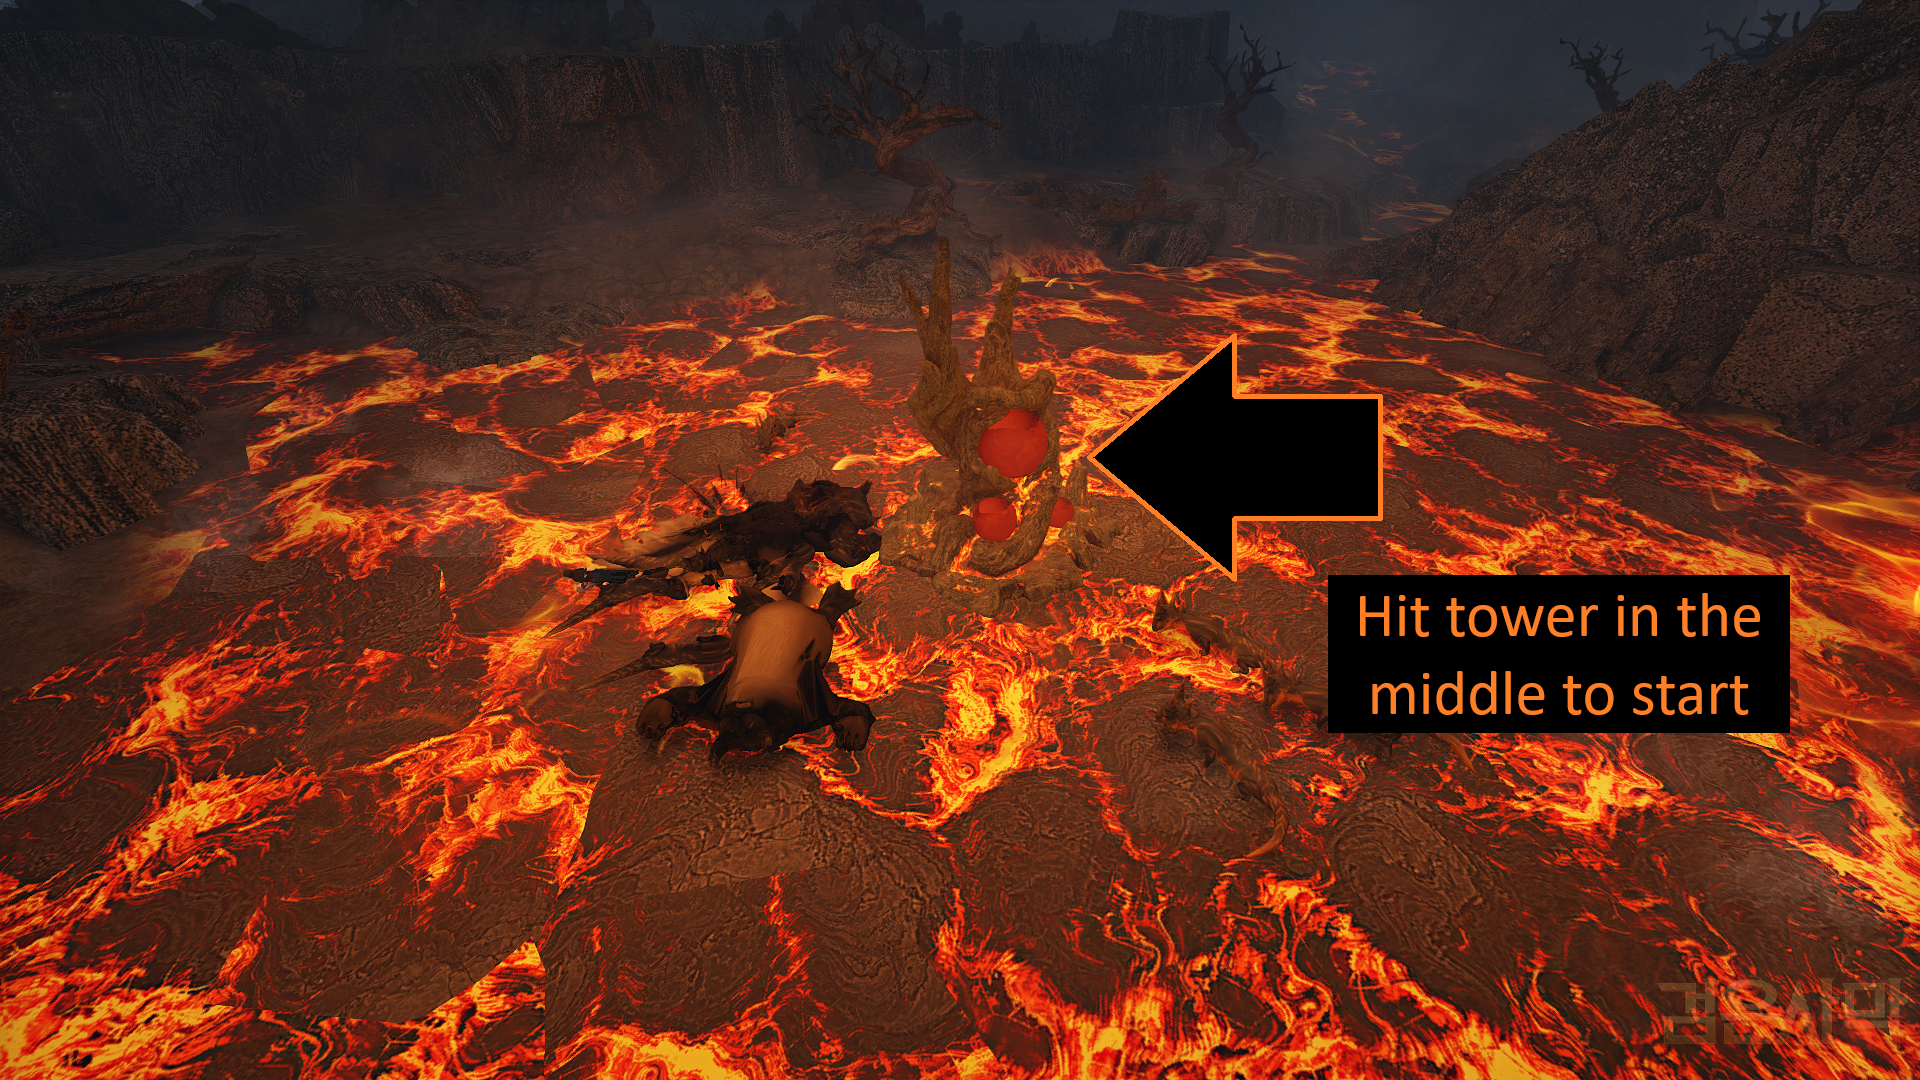
Zephyros Castle


Mechanics
- CC Type: Knockdown/Bound
- Hit the tower in the middle to begin spawning monsters
- Kill waves of monsters that appear for approximately 2 minutes until the 3 “Shadow Knight” monsters appear around the edge of the grind spot.
- Move between each Shadow Knight monster and focus them whilst also attacking the waves of regular monsters that spawn.
- When a Shadow Knight dies, a wave of weaker Cultist monsters will spawn afterwards.
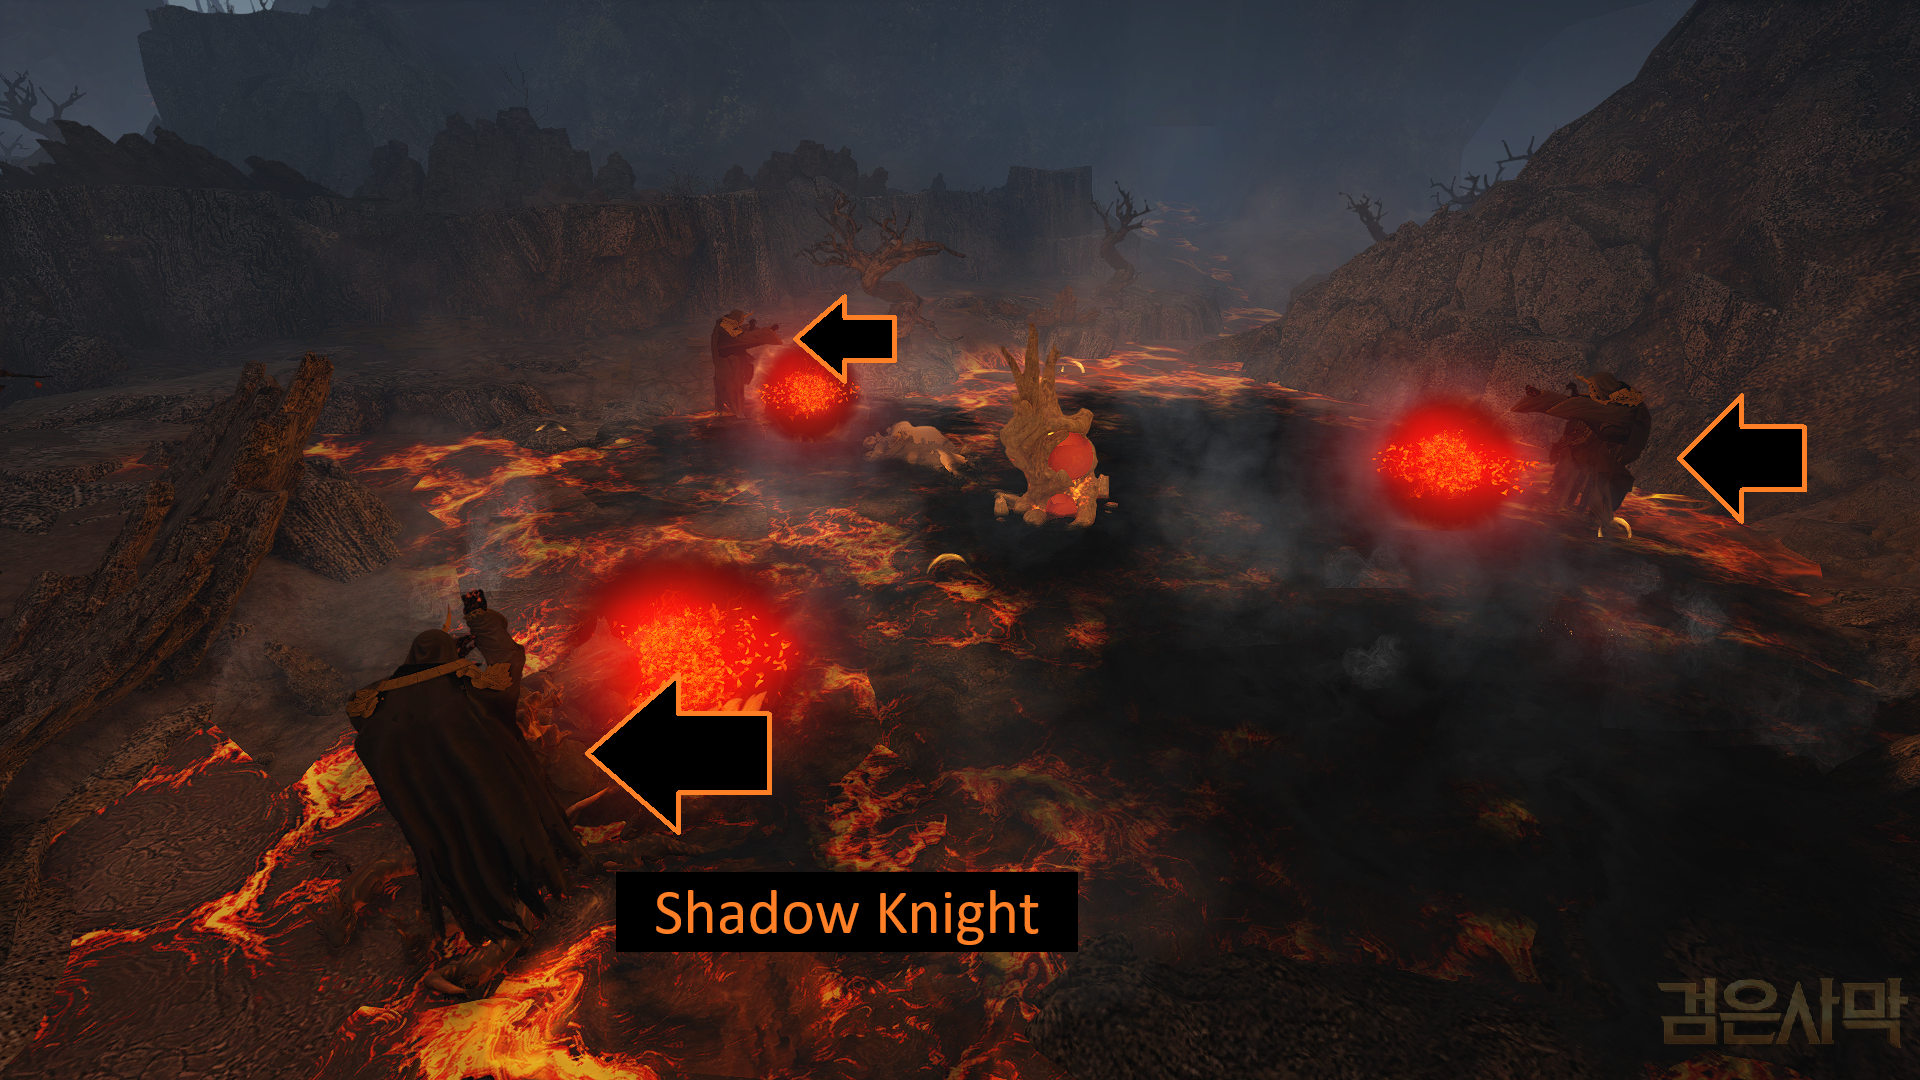
- Repeat until the Beelzebub boss spawns. He has tongue attacks and a high damage red circle attack that you will need to i-frame or forward guard.
- Once Beelzebub is defeated, an “AFK phase” will start for approximately 2 minutes. During this time waves of monsters will spawn and instantly die.
- After the AFK phase is complete, hit the tower in the middle again to restart the rotation.
Loot
| Item Name | Description |
|---|---|
 Hardened Lava Chunk
|
The trash loot has a selling price of 126,980 silver. |
|
HAN Crystal of Ruin |
Used to craft a HAN Crystal of Dusky Ruin
|
|
HAN Crystal of Dusky Ruin |
Crystal that can be equipped for the following effects:
|
|
Silent Fragment of Origin |
Used to craft a Silent Crystal of Origin
|
|
Silent Crystal of Origin |
Used when enhancing Slumbering Origin Defense Gear from Silent to Wailing, prevents enhancement level drop |
|
Distorted Fragment of Origin |
Used to craft a Silent Crystal of Origin
|
|
Distorted Crystal of Origin |
Used when enhancing Slumbering Origin Defense Gear from Distorted to Silent, prevents enhancement level drop |
|
Crystallized Energy of Endtimes |
Used to create Amplified Lightstones or HAN Dawn Crystals |
|
Herald’s Crystal |
Used to craft a Flawless Herald’s Crystal Heating (L) with the following materials:
|
|
Flawless Herald’s Crystal |
Can be used to reform the following artifacts:
|
|
Deboreka Accessories |
Can drop Deboreka Accessories up to TET |
|
Violet Primordial Luster – Edana |
Used to craft a Violet Primordial Pigment – Edana using Processing (L) > Simple Alchemy:
|
|
Violet Primordial Pigment – Edana |
Used to change the effect color of your Edana gear to purple |
|
Violet Primordial Luster – Sovereign |
Used to craft a Violet Primordial Pigment – Sovereign using Processing (L) > Simple Alchemy:
|
|
Violet Primordial Pigment – Sovereign |
Used to change the effect color of your Sovereign gear to purple |
|
Crimson Primordial Luster – Sovereign |
Used to craft a Crimson Primordial Pigment – Sovereign using Processing (L) > Simple Alchemy:
|
|
Crimson Primordial Pigment – Sovereign |
Used to change the effect color of your Sovereign gear to red |
|
Refined Essence of Devouring |
Used to craft Refined Origin of Hunger using Processing (L) – Heating
|
|
Refined Origin of Hunger |
Used to increase your failstack through devour Can be used when your current Enhancement Chance is at least +100 (excluding added Enhancement Chance from Valks’ Cry and Adventure Logs) |
- Other drops include Caphras Stones, Ancient Spirit Dust, Black Stones, and Corrupt Oil of Immortality
Titles
| Title | Requirement |
|---|---|
| Too Hot! | Defeat 5,000 Lava Field monsters |
| The Eternal Sauna | Defeat 10,000 Lava Field monsters |
| Heat Advisory | Defeat 20,000 Lava Field monsters |
| Smokin’ | Defeat 30,000 Lava Field monsters |
Dark Energy Floodlands
Rotations
Mechanics
- CC Type: Knockdown/Bound
- Packs of monsters are located within a black and white circle and there are 11-12 circles per rotation.
- Inside each circle there are 3 orbs, and the monsters will have a DP buff until all 3 orbs are destroyed.
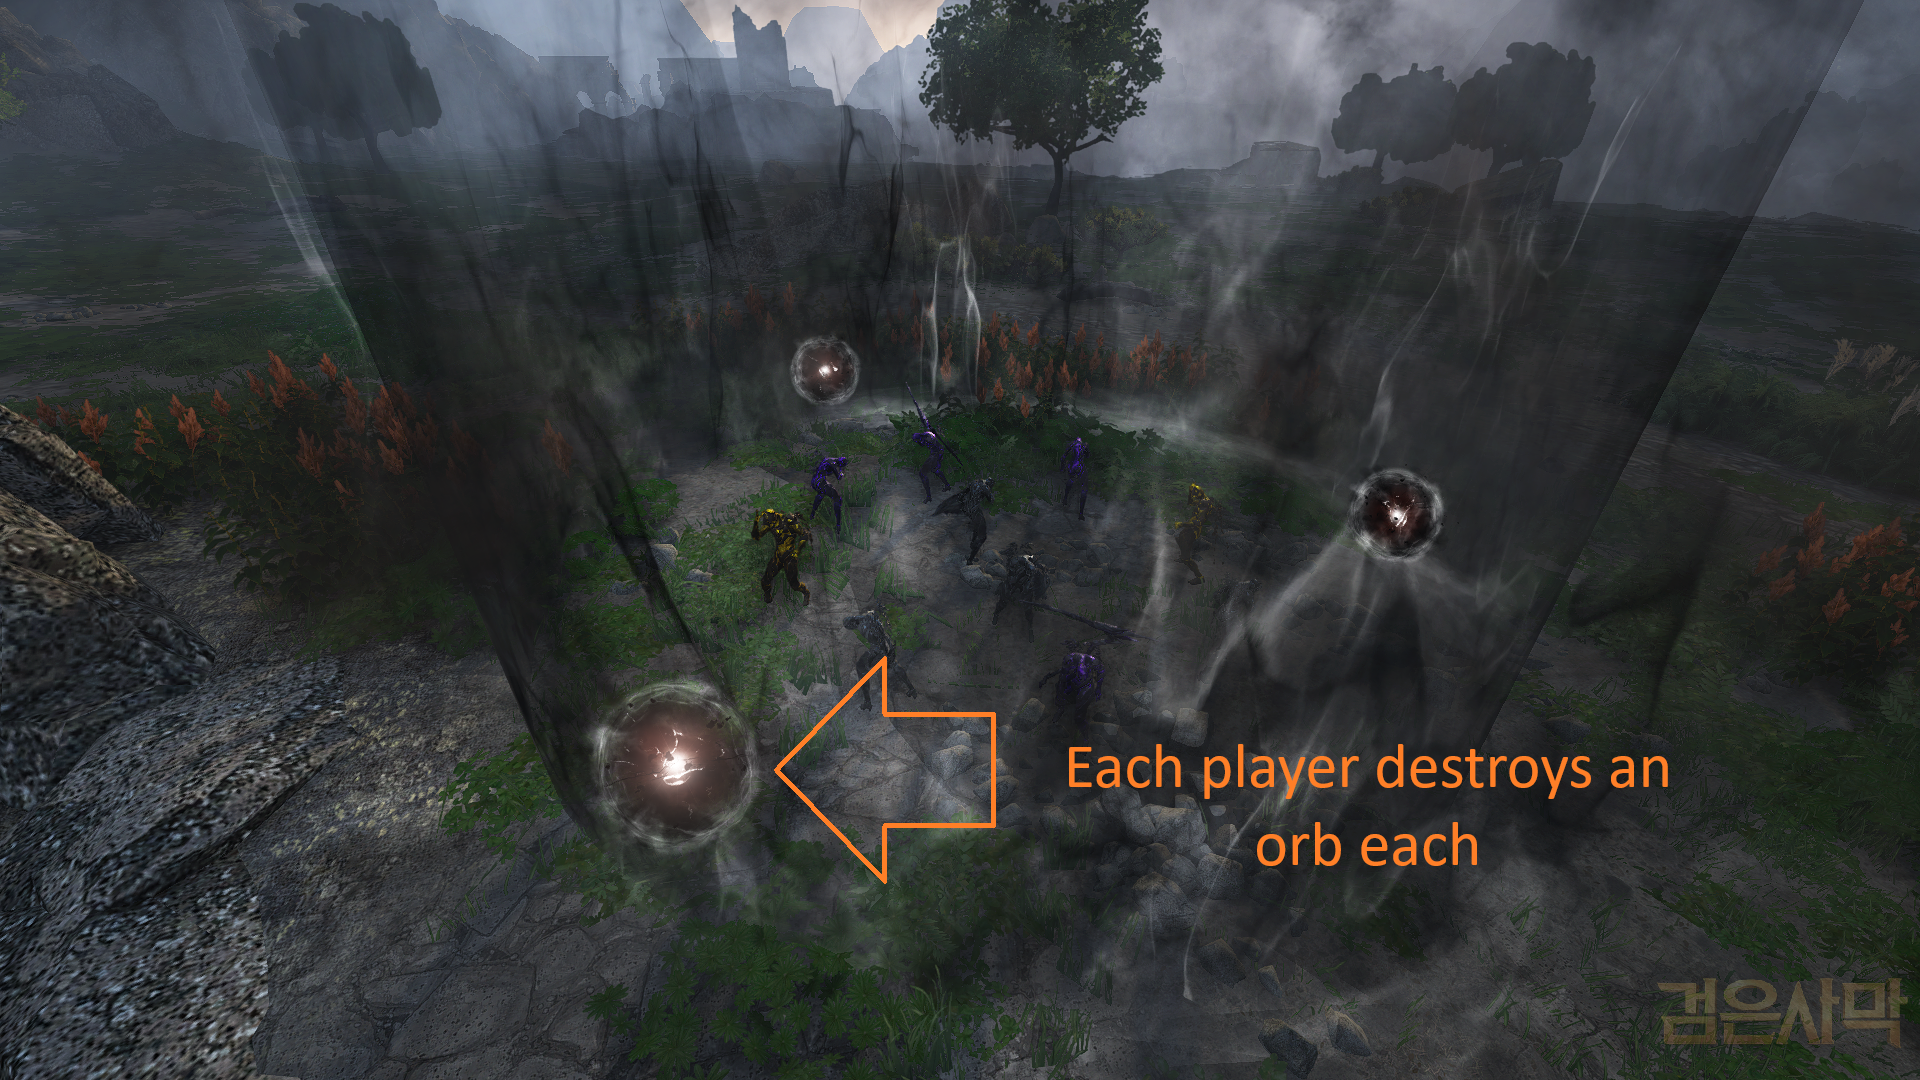
- Each player should focus one orb each, then AOE the monsters together.
- After killing all the monsters in the circle, move onto the next pack and repeat.
- Approximately every 10-15 minutes one of the circles will turn red and a mini-boss will spawn, which can be Titan, Manticore, or Beelzebub. The mini-boss has the same attack patterns at they do at the solo Edania spots.

- Towards the end of the hour, a boss will spawn, which can be Enslar, Cartian, or Caphras. When the boss reaches around 33% HP, they will start to charge an ability and yellow orbs will spawn in a circle around them. The orbs will move towards the boss and you need to destroy all the orbs before they reach the boss. If you are successful the boss will be stunned, making it easier to defeat them.
Loot
| Item Name | Description |
|---|---|
|
Tainted Armor Fragment
|
The trash loot has a selling price of 100,507 silver. |
|
Dark Faded Energy
|
The trash loot has a selling price of 597,680 silver. |
|
HAN Crystal of Ruin |
Used to craft a HAN Crystal of Dusky Ruin
|
|
HAN Crystal of Dusky Ruin |
Crystal that can be equipped for the following effects:
|
|
Silent Fragment of Origin |
Used to craft a Silent Crystal of Origin
|
|
Silent Crystal of Origin |
Used when enhancing Slumbering Origin Defense Gear from Silent to Wailing, prevents enhancement level drop |
|
Distorted Fragment of Origin |
Used to craft a Silent Crystal of Origin
|
|
Distorted Crystal of Origin |
Used when enhancing Slumbering Origin Defense Gear from Distorted to Silent, prevents enhancement level drop |
|
Crystallized Energy of Endtimes |
Used to create Amplified Lightstones or HAN Dawn Crystals |
|
Herald’s Crystal |
Used to craft a Flawless Herald’s Crystal Heating (L) with the following materials:
|
|
Flawless Herald’s Crystal |
Can be used to reform the following artifacts:
|
|
Deboreka Accessories |
Can drop Deboreka Accessories up to TET |
- Other drops include Caphras Stones, Ancient Spirit Dust, and Black Stones
Titles
| Title | Requirement |
|---|---|
| Photosensitive | Defeat 5,000 Failed Edanas |
| Vacuum Cleaner | Defeat 10,000 Failed Edanas |
| Inner Edgelord | Defeat 20,000 Failed Edanas |
| Triumphant Edana | Defeat 30,000 Failed Edanas |
Weekly Quests
Each grind spot (excluding Floodlands) has a weekly kill quest you can complete for extra rewards.
- Weekly quests reset every Thursday at 00:00 UTC
You can complete all 5 of the weeklies as long as you meet the requirements to accept the quest.
| Requirements | Quest Name and Quest NPC | Objective | Rewards |
|---|---|---|---|
|
Completed one of the following weekly quests: |
[Weekly] Purify Aetherion
Aetherion – Failed Edana |
Purify Aetherion
(Defeat 1,500 Aetherion Castle monsters) |
|
|
Completed one of the following weekly quests: |
[Weekly] Purify Nymphamaré
Nymphamaré – Failed Edana |
Purify Nymphamaré
(Defeat 800 Nymphamaré Castle monsters) |
|
|
Completed one of the following weekly quests: |
[Weekly] Purify Orbita
Orbita – Failed Edana |
Purify Orbita
(Defeat 1,000 Orbita Castle monsters) |
|
|
Completed one of the following weekly quests: |
[Weekly] Purify Tenebraum
Tenebraum – Failed Edana |
Purify Tenebraum
(Defeat 1,500 Tenebraum Castle monsters) |
|
|
Completed one of the following weekly quests: |
[Weekly] Purify Zephyros
Zephyros – Failed Edana |
Purify Zephyros
(Defeat 1,500 Zephyros Castle monsters) |
|
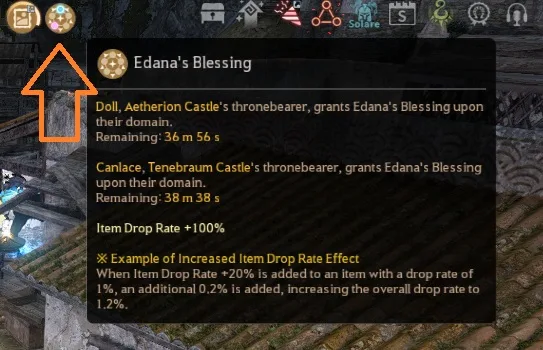
Throne of Edana Buff
The current Edana player occupying the Throne of Edana can activate the Edana’s Blessing buff up to 10 times per week (resetting when the Edana is crowned).
- The Edana’s Blessing buff gives all players, on every server, an Item Drop Rate +100% for up to 1 hour for that particular grind spot.
- Eg. The Orbita Edana can activate the buff and any player who grinds in Orbita will have an additional +100% Item Drop Rate.
- This buff applies across all servers and stacks with Arsha server and Conquest Lord buffs, allowing a maximum of Item Drop Rate +500%.
The Edana’s Blessing buff UI appears at the top of the screen and shows the buffs (if any) currently active.
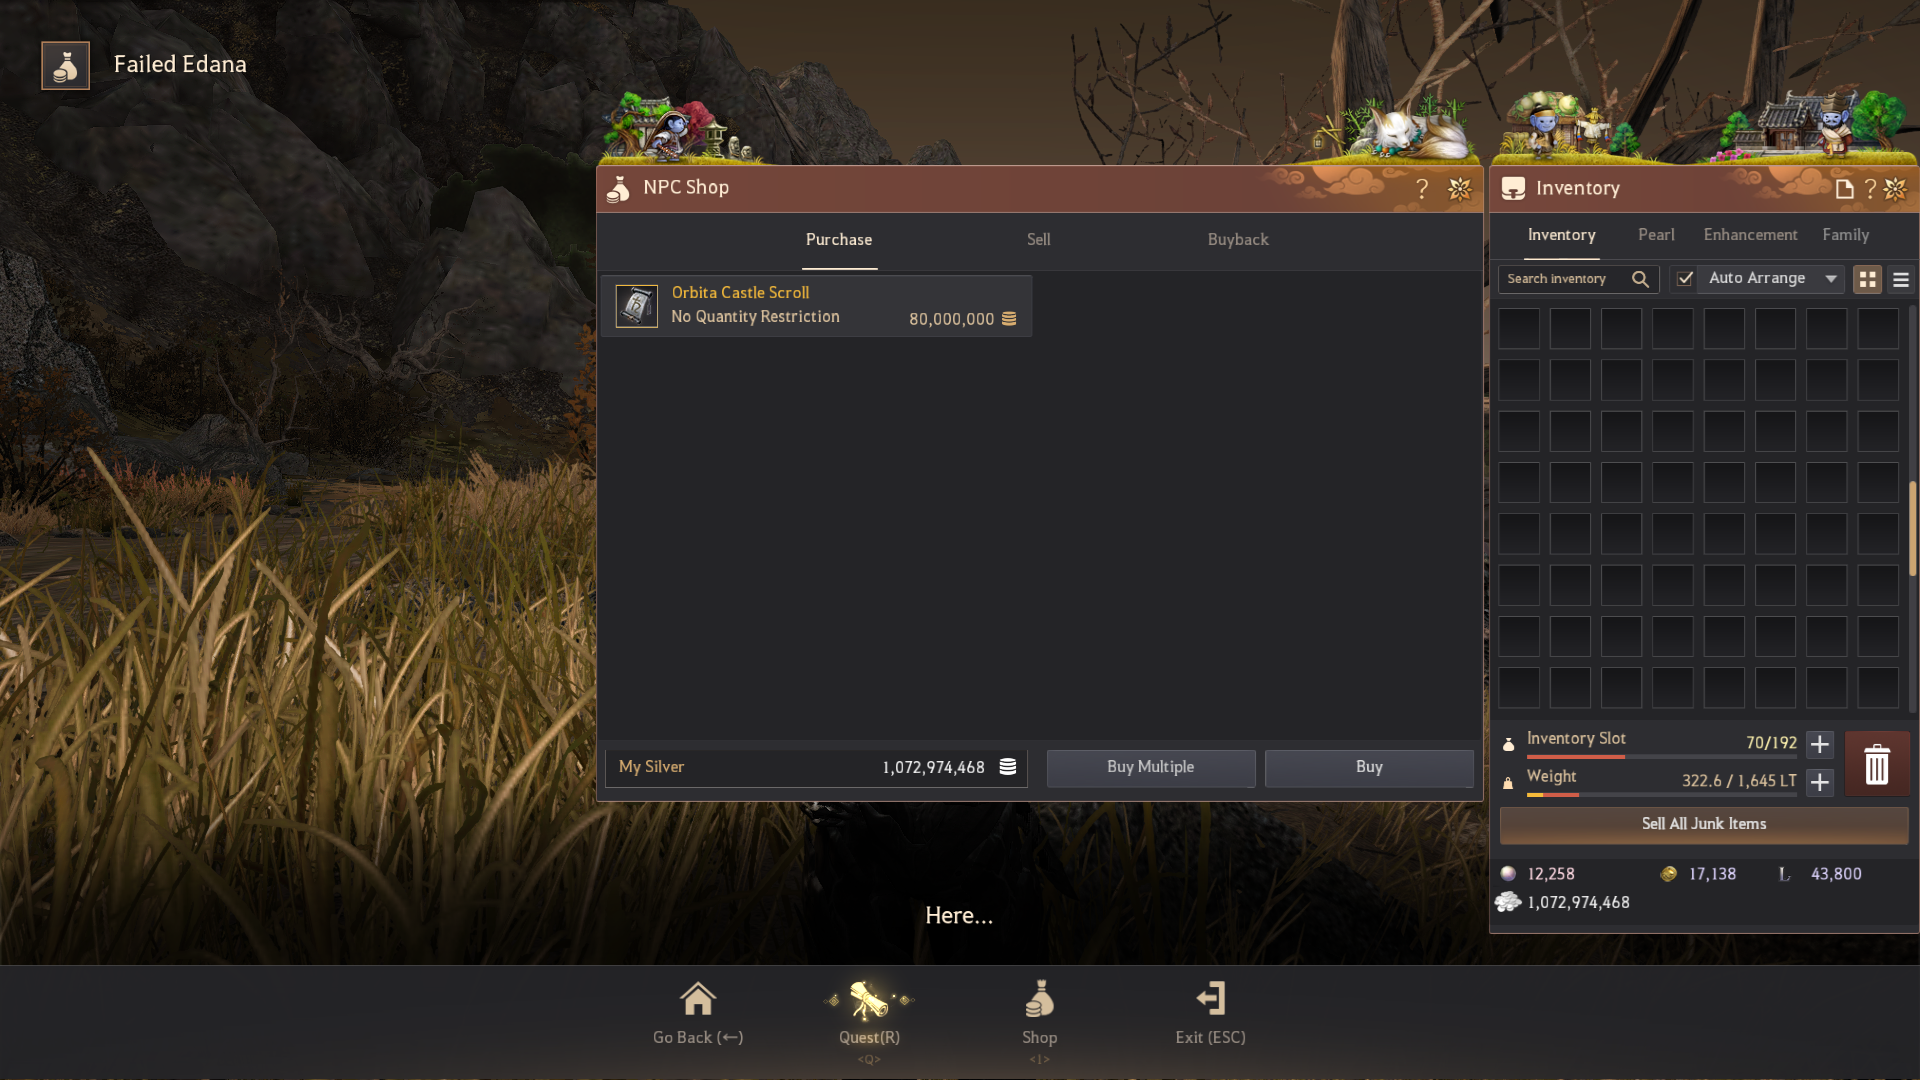
Edania Marni Realm
To enter Marni Realm for the Edania Monster Zones, you need to buy a Castle Scroll for the relevant grind spot. The castle scroll is purchased from the same NPC you obtain the weekly quest from.
| Monster Zone | How to Obtain | Price |
|---|---|---|
| Purchase from Failed Edana in Aetherion Castle | 50,000,000 | |
| Purchase from Failed Edana in Nymphamaré Castle | 70,000,000 | |
| Purchase from Failed Edana in Orbita Castle | 80,000,000 | |
| Purchase from Failed Edana in Tenebraum Castle | 90,000,000 | |
| Purchase from Failed Edana in Zephyros Castle | 100,000,000 |