
Introduction
Atoraxxion is a co-op dungeon for a party of 5 players, with strategies, puzzles, and a final boss to defeat. The dungeon was created by a Sage in the past as a last effort to train before the Black Spirits arrived in the world. Atoraxxion is divided into 4 different themes: Desert, Ocean, Canyons, and Forest, with each theme having its own unique mechanics.
All planned dungeons are now released:
- 1st Dungeon: Vahmalkea
- 2nd Dungeon: Sycrakea
- 3rd Dungeon: Yolunakea
- 4th Dungeon: Orzekea
Unlike other grind spots in Black Desert, the dungeon does not drop trash loot and only drops items needed to progress through the dungeon to the final boss. Players then get rewards for defeating the final boss and completing the weekly quests. However, the dungeon is not a “typical” dungeon style either and is not completely instanced until the final boss.
Atoraxxion Dungeon Teaching Runs
Atoraxxion Dungeon Teaching Runs are led by BDO Ambassadors who will teach you the mechanics of each dungeon and take you through a complete run. You can sign up to join one of these runs in the official BDO Discord in the Atoraxxion Sign-up channel.
How to enter the Dungeon
To enter the dungeon your character needs to be at least level 60 and it is recommended (but not mandatory) to complete the questline first through the solo adventure mode.
You can then enter the dungeon through the gate at Ancient Stone Chamber.
There are three difficulty options when entering the dungeon:
- Elvia Realm – recommended 280 Kutum AP and 340 DP
- Normal Server – recommended 250 Kutum AP and 300 DP
- Season Server – recommended DUO Tuvala gear

Main Quest – Solo Story Adventure
You can complete the Atoraxxion main questline “[5-person Co-op] The Last Stronghold, Atoraxxion: Valmakea”.
This is a family quest that has the following requirements to begin:
- Level 60 or higher
- Completed Black Spirit Main Quest (I’s Invitation)

When entering Vahmalkea you can select the “Solo Mode” button to proceed through the dungeon alone.
Solo Mode does not give you rewards for killing the final boss other than the first-time completion reward.
Solo mode is purely designed so that players can complete the story quests and knowledge alone without needing a full party for the mechanics and puzzles. It is recommended to use the solo mode for completing the main story questline.

Progressing through the Dungeon
Once you are inside the dungeon, the normal monsters are like a normal grind spot and players can see each other if they are on the same channel. However, the final boss will be focused and faced in a separate instance for your party only.
The normal monsters in the dungeon are Ancient Weapons called Cetus, Monoceros, Lacerta, Creomar, and Putrakium. Each monster has a special mechanic which makes them easier to defeat. The monsters do not drop normal loot/trash but drop items required to create keys needed to advance through the dungeon. Each item is affected by item drop increase buffs.
There are 2 mini-boss monsters called Krahtenn and Ahtenn which have a chance of spawning when defeating normal monsters in a specific zone. Krahtenn has a chance of spawning when defeating monsters in the Vaha’s Heart zone and Ahtenn has a chance of spawning in the Vaha’s Head zone.
The dungeon is split into several zones and each is blocked by a dark dawn barrier. To advance into each zone you must collect a key. In order to advance to the final boss room, all five party members must possess a “Lucretia Dagger” key item.
All loot except final boss rewards and “Lucretia Dagger” is deleted when you leave the dungeon.

Extra Vaha’s Cold Thorn materials can be exchanged for party elixir buffs at the Supply Depots in Vaha’s Sky and Vaha’s Heart zones. However, the buffs cannot be used in the final boss fight.
| Required Item | Exchanges for | Item Effect |
|---|---|---|
| Vaha’s Cold Thorns x5 | [Party] Vahmalkea: Emerging Star x1 | HP Recovery Greatly Increased for 20 sec |
| Vaha’s Cold Thorns x5 | [Party] Vahmalkea: Rainbow Bridge x1 | Movement Speed +30% for 20 sec |
| Vaha’s Cold Thorns x5 | [Party] Vahmalkea: Captured Sunset x1 | +100% resistance to monster CC effects for 20 seconds |
| Vaha’s Cold Thorns x2 | Vahmalkea Matchlock x1 | Needed to defeat Putorium |

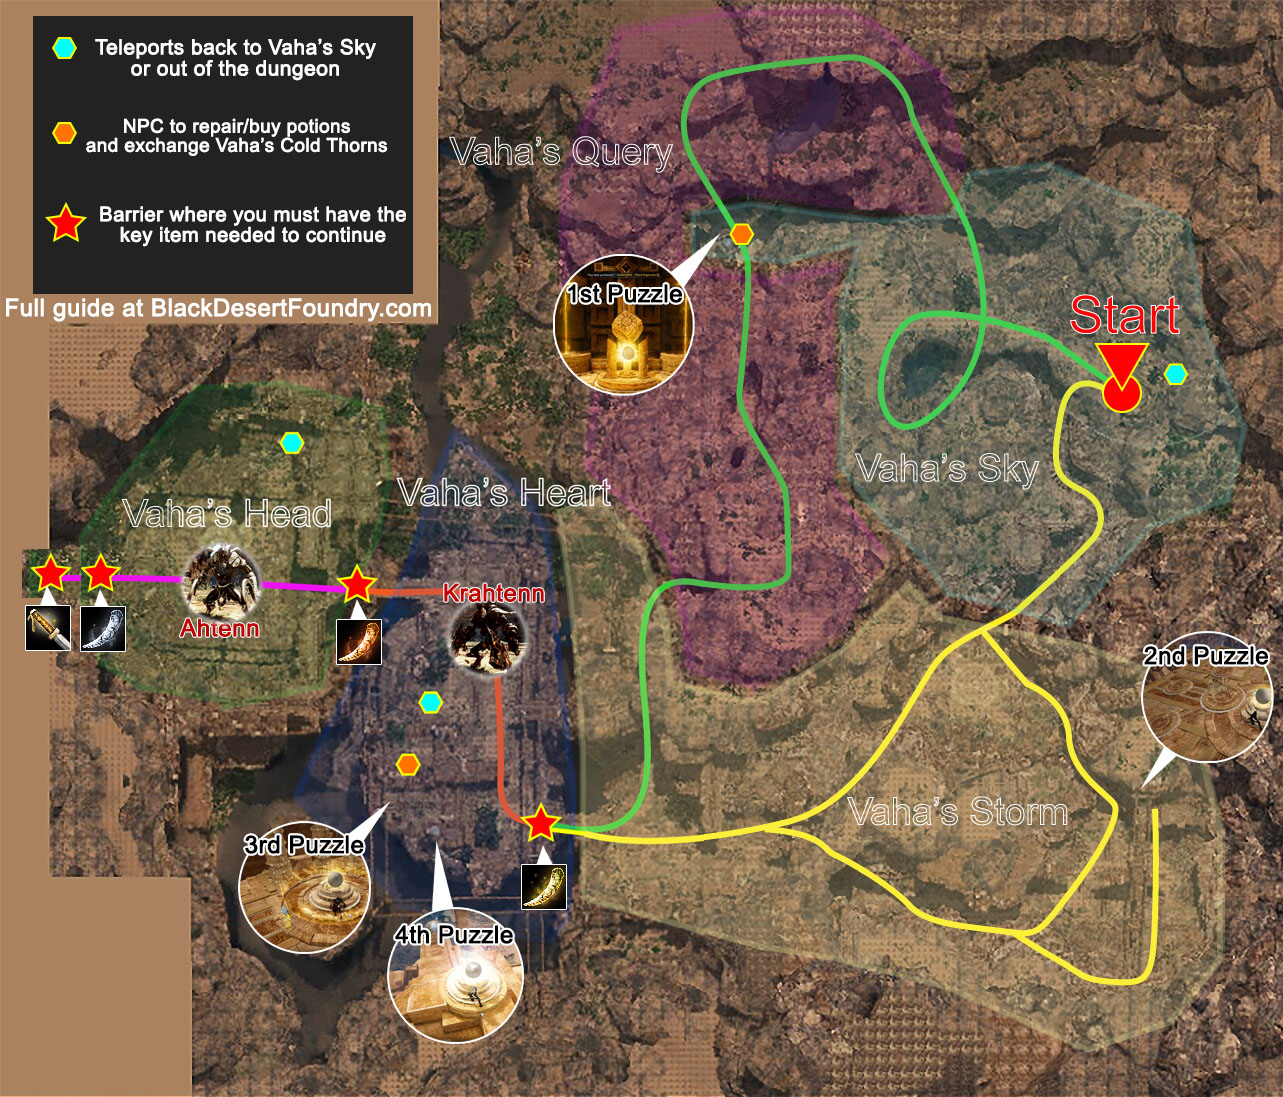
Atoraxxion NPC/Supply Depot – You can repair or buy potions and other items here
Map of Atoraxxion
Click image to view full size
Monster Mechanics
Each of the monsters has a special mechanic which makes them much easier to defeat.
Monoceros
- Monoceros is one of the easiest mechanics. All you have to do is pull Monoceros over the cracks that appear on the floor so that he is hit by the steam. This will weaken his DP and make him much easier and faster to kill.
Cetus
- Cetus will stop moving and begin to charge. A red text message will appear at the top of the screen when Cetus is charging. During the charge, use a skill with FLOAT CC to disable the monster and deal much more damage. A white text message will appear if you use the float at the correct time.
Creomar
- Cremoar is immune to damage and will only take damage from back attacks. He will also do a charging skill which will deal a lot of AoE damage around him when he is charging.
Lacerta
- Lacerta will summon additional monsters throughout the fight. After the monsters have been summoned he will attempt to empower them and will start to charge his skill. Red text will appear at the top as a notice when this is happening. During the charge, use a skill with KNOCKDOWN CC to interrupt him and also weaken him. A white text message will appear if you correctly CC him at the right time.
Putrakium
- Putrakium and the birds he summons can only be killed using the matchlocks. To get the matchlock you must exchange Cold Thorns x2 at the NPCs in Atoraxxion – check our map for their locations.
Krahtenn
- Krahtenn will charge lightning attacks throughout the fight. To stop the lightning attack you must hit him with a matchlock to CC him and damage his power core. The power core has a seperate HP and once destroyed he will become weaker and not do the charged lightning attack anymore, making him much easier to deal with. To get the matchlock you must exchange Cold Thorns x2 at the NPCs in Atoraxxion – check our map for their locations.
Ahtenn
- This mini-boss requires you to kill the spires around the room to weaken him. There are 3 spires in a triangle shape with the sphere from the puzzle in the middle. The spires have different names: Arrogance, Deceit, and Hypocrisy. During the fight, Ahtenn will try to empower himself using one of the spires and the name of the spire will appear at the top in red text. You must kill the correct spire to CC Ahtenn and stop him from dealing with more powerful attacks.
Puzzle Walkthroughs
There are 5 puzzles to complete during the questline through Atoraxxion and there are also 3 hidden puzzles you can complete for knowledge.
1st Puzzle – Balance Scales
- For this puzzle, there are 2 beams on either side that must be balanced.
- You will find 6 boxes in the area which must be placed on the platforms in front of the scales to balance them
- The boxes are different weights so you will need to trial and error to find the perfect balance and combination
- The scales will only move when all boxes are placed on the ground

2nd Puzzle – Ancient Weapon
- This puzzle has an ancient weapon in the middle which will start to perform attacks when activated by talking to the sphere
- If the ancient weapon swings to the left, that is position 1 which is the left platform
- If the ancient weapon swings to the right, that is position 2 which is the middle platform
- If the ancient weapon swings the ground, that is position 3 which is the right platform
- There will be 11 attacks in total but the last 3 attacks are always the same and the platforms will light up at the same time. These last 3 attacks are just to show you which attack is for which platform.
- You only need to remember the first 8 attacks and then stand on the correct platforms in order. It helps to write the number sequence in chat. If you stand on the correct platform the light will appear to confirm this is correct, if you stand on the wrong platform nothing will happen and you will need to start again.

3rd Puzzle – Blue and Red Lights
- When you arrive at this puzzle you will see 4 columns in a row. When you activate the puzzle by interacting with the sphere, red and blue lights will appear on the columns randomly in an order.
- You need 1 person in your party to remember the order of the blue lights, and one party member to remember which columns had all the red lights.
- At the end of the sequence, one color will be shown on all 4 columns at the same time and this is the color you must copy in the correct order.
- Talk to each column in the correct order to complete the puzzle. If you are correct then the column will flash yellow, if you are incorrect you will need to activate the sphere and start again

4th Puzzle – Platforms
- This is the easiest puzzle but requires 5 party members
- There are round platforms north, east, south, and west of the sphere. 4 people need to stand on each platform while 1 person stands in the middle of the sphere to complete their quest.
- Then the players must swap places 1 by 1 so that everyone can complete their quest.

5th Puzzle – Intruder Device
- This puzzle can be found in the center of Vaha’s Head zone. There is a large sphere in the middle and then 4 columns around the sphere.
- Behind each column is a button you can stand on to activate the columns and make them turn on.
- All 4 columns must be activated at the same time so that there are all 4 beams of light pointing at the sphere.
- When all 4 columns are activated the device will be switched on and monsters will appear in waves
- Kill all the monsters in each wave to summon the mini-boss Ahtenn. He will drop the items needed to get into the final boss room.

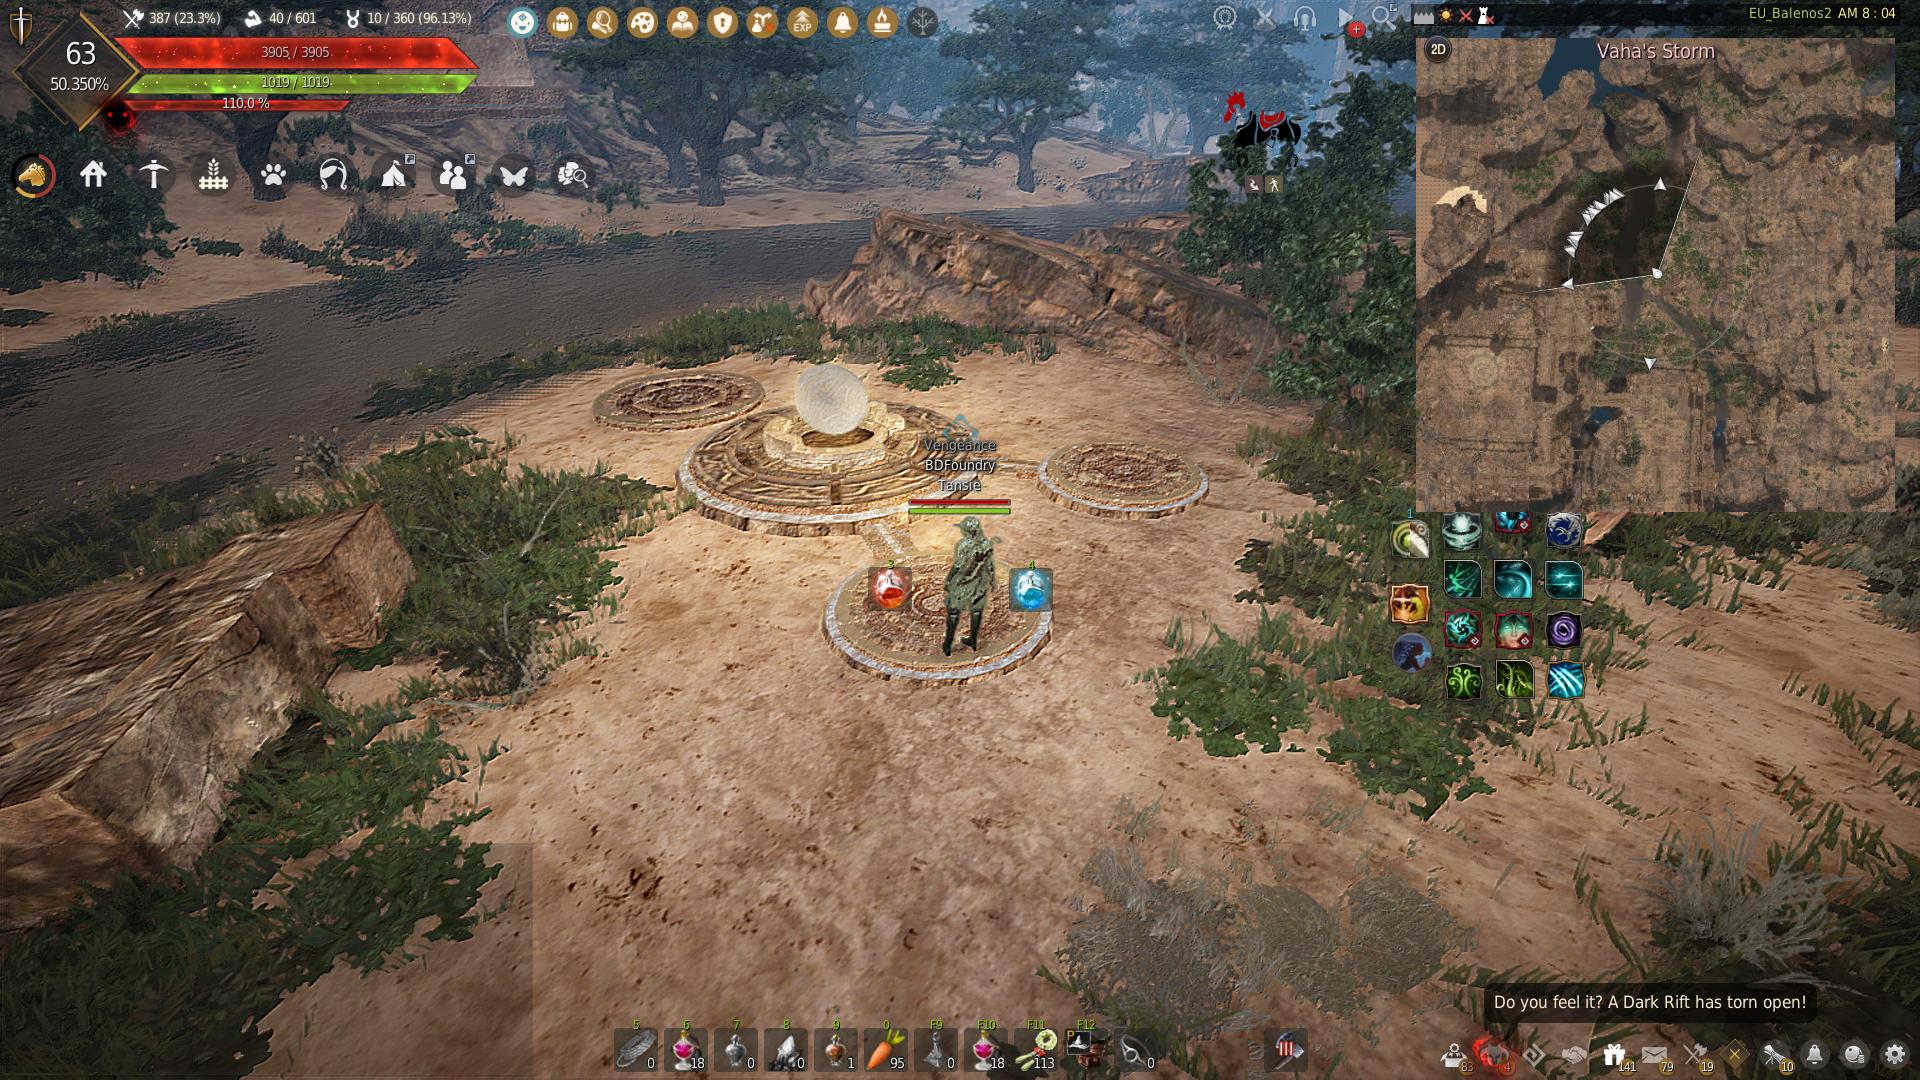
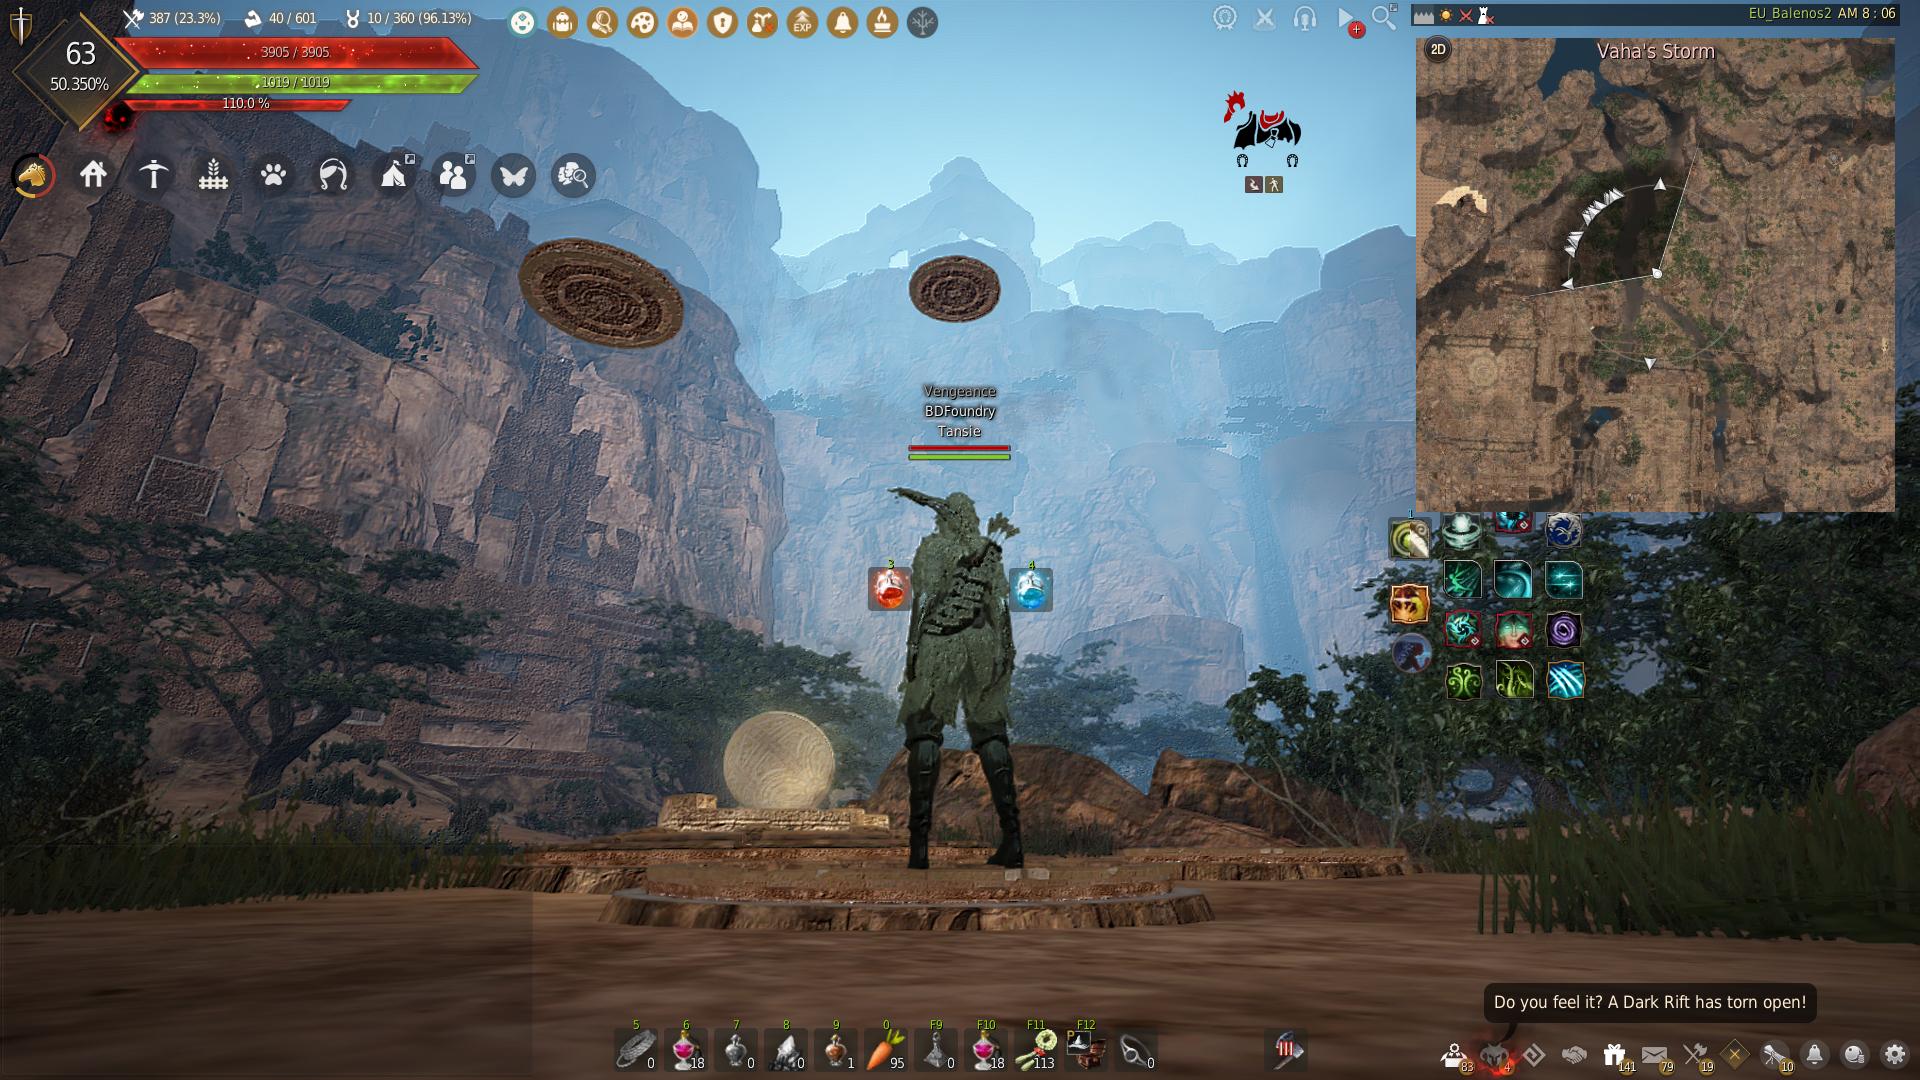
Hidden Puzzle – Jumping Puzzle
- This puzzle can be found in Vaha’s Storm near the river. Use the mini-map in the image below as a reference.
- This puzzle requires at least 3 people to complete
- Once you arrive you will see 2 platforms and the sphere in the middle. When you stand on one of the platforms a yellow light will appear on top of it to show that the platform is activated.
- You must activate the platforms in different combinations to make the other platforms above move in certain ways.
- Stand on the left platform only and interact with the sphere to bring the first platform down so that your party member can stand on it. Then do the same again to make the platform move back up again.
- Other combinations:
- Stand on the right platform only and interact with the sphere
- Stand on both platforms and interact with the sphere (if you move fast you can activate it with only 2 people at the bottom)
- Interact with the sphere without standing on any platforms
- Use trial and error to move the platforms so that your party member can jump to the end of the puzzle. The jumps are not hard and are mostly falling down onto a lower platform.
- Once your party member reaches the end there will be a cube to interact with. The cube will fall to the ground so that all party members can interact with it for the knowledge.
Hidden Puzzle – Sequence
- This puzzle can be found in Vaha’s Head, which is the area where Ahtenn can be found. There are 2 hidden puzzles in this area and both can be found by climbing up the side of Vaha’s Head.
- This puzzle is very simple and all you have to do is interact with the sphere to begin. Then slowly stand on each of the platforms in the order shown below. When you stand on the first platform, the column at the opposite side will show a beam of light and the platforms you stand on will get a yellow light on them to show they are activated. Make sure you move slow enough so that the light appears on each of the platforms.
- Once you have done the sequence shown below you will get the message saying that the puzzle has been completed successfully and you can interact with the sphere again to get the knowledge.

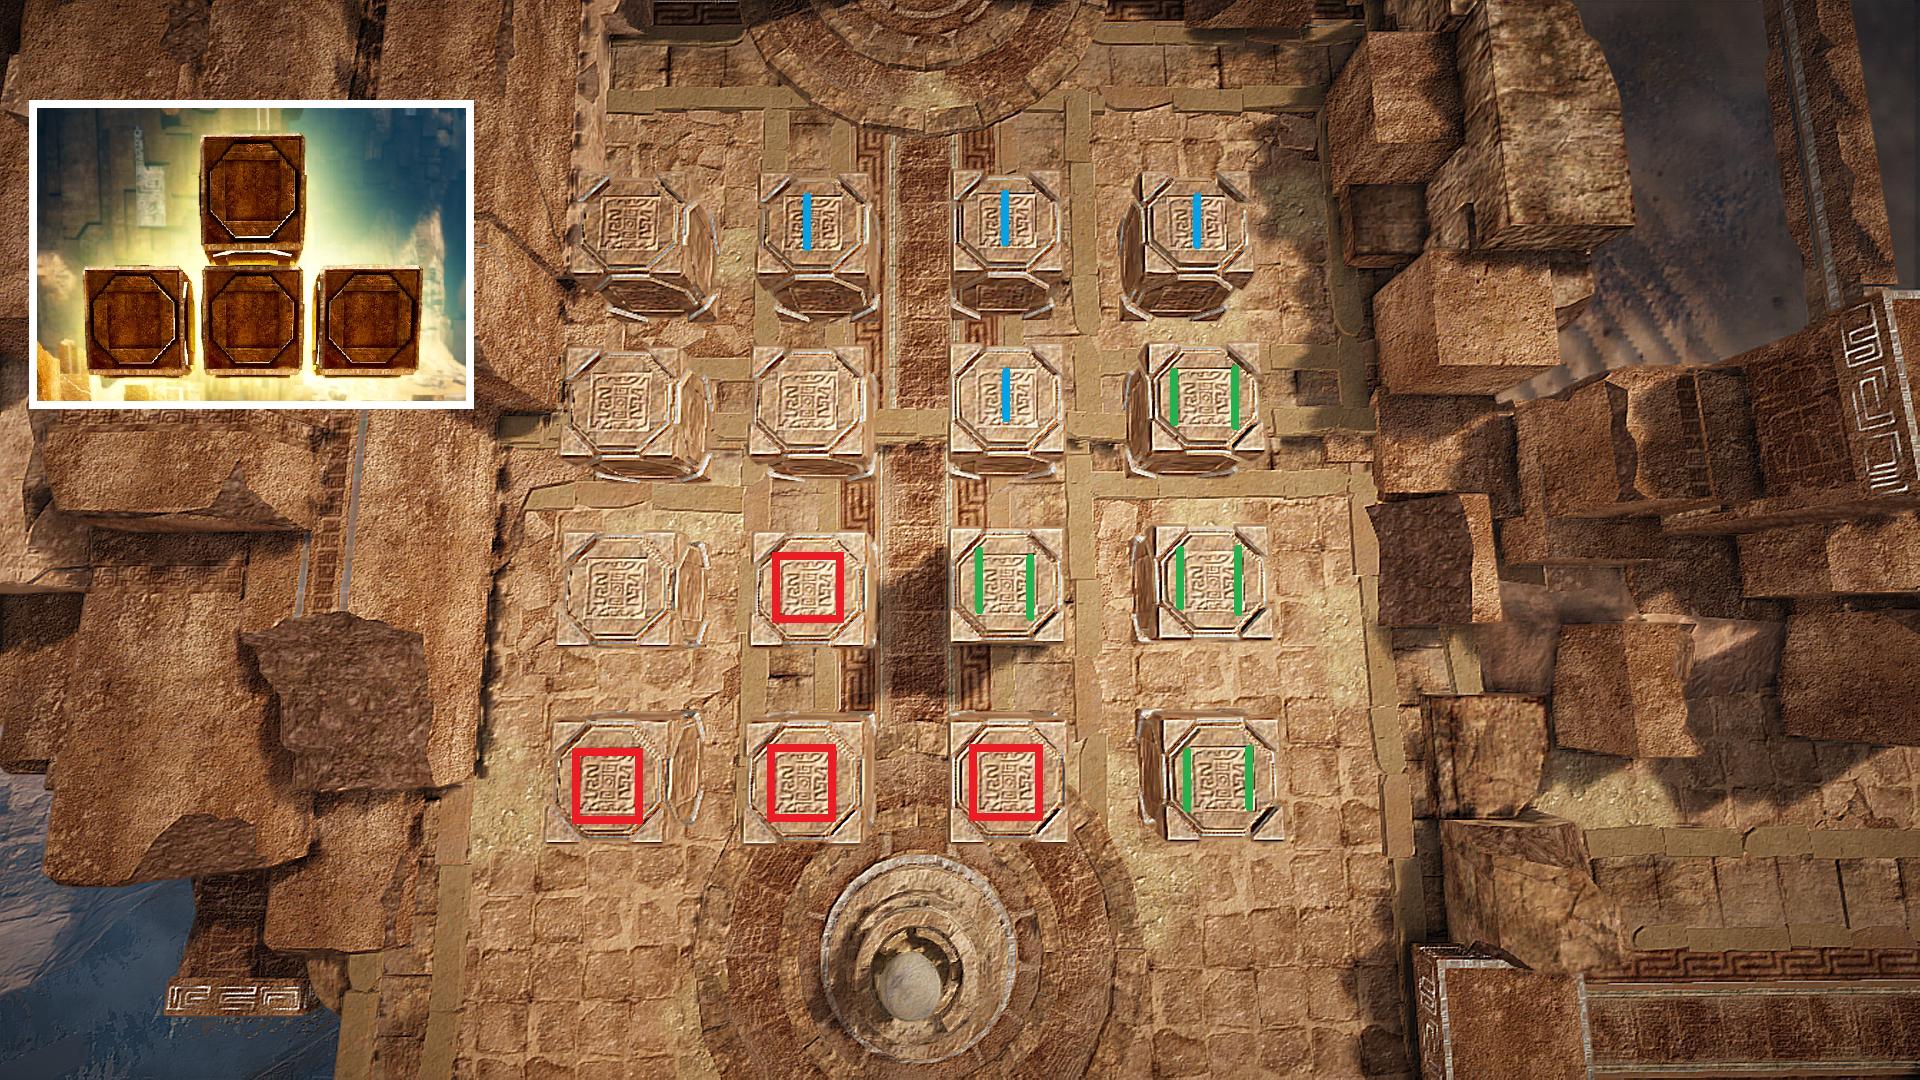
Hidden Puzzle – Tetris Cubes
- This puzzle can be found in Vaha’s Head, which is the area where Ahtenn can be found. There are 2 hidden puzzles in this area and both can be found by climbing up the side of Vaha’s Head.
- For this puzzle, there are 3 different answers and the correct solution depends on the floating cubes above the puzzle. Use the images below to find the correct solution.
- To start, interact with the sphere. This will activate the cubes so that you can talk to them and change the shape on them.
- There are 4 options when interacting with the cubes:
- Pitch Dark = changes the cube back to default
- A Warm Touch = changes the cube to the I marking
- Fading Memories = changes the cube to the II marking
- Recovered Life = changes the cube to the square marking
- When the cubes match the correct solution you will get a message at the top of the screen and will be able to interact with the sphere to get the knowledge


Final Boss
The final boss has 3 phases and if you die you cannot resurrect during the battle unless a party member resurrects you using a ![]() Medical Kit.
Medical Kit.
If all party members die then the boss will reset and can be challenged again. You can buy additional pots and Medical Kits in the final boss room before starting the fight.

Phase 1:
- For the first phase, Lucretia will appear on the left and Urukios appears on the right.
- Player A and Player B should get the aggro of Lucretia and keep her in the left corner of the room.

- Player C and Player D should get the aggro of Urukios and pull Urukios into the corner.

- Keep the 2 monsters separate because they will heal each other when they are close to each other, and deal a lot of damage.
- Try to keep the bosses at the same HP throughout the fight.
- Additional trash monsters spawn in the middle of the room and Player E will deal with these.
- If the trash monsters are near Lucretia or Urukios they will heal them.
- Player E must hit the 3 pillars in the room to spawn circles on the floor.

- This message will appear if the trash dies inside the circles: “Curses! The fusion has failed. But why? Is it the drive system?”
- This means the boss is debuffed and will now take much more damage.
Hit the Tower to spawn the circles

Trash monsters (Cetus) must die inside the circles

- When both of the bosses reach 50% HP at the same time, they will merge into 1 boss.
- If the bosses don’t synchronize at the same time, their HP will reset and you will have to repeat phase 1.
- When the bosses merge, you can hit Urukios (on the right side) to deal damage before the 2nd phase starts.
- A cutscene will then appear to transition into phase 2 and Urukios will move to the middle of the room.

Phase 2:
- At the start of phase 2, everyone can freely hit the boss to deal damage.
- Moving floating rocks will appear all around the room and act like bombs that will explode when touched to deal damage and knockdown.
- The boss also does a breath attack which can deal quite a lot of damage if you are hit by back attacks.
- After a certain amount of time, a message will appear saying “My friends, it’s time to play. One each, got it?”

- Colored orbs will appear like a fairy and will follow the player if you go up to them.
- However, be careful when using dashes, moving too quickly, or walking past other players, because the orb may stop following you.
- There will be a different colored pillar in each corner of the room and you must take the colored orb to the correct color tower.


- When 3 correctly colored orbs are taken to the tower, it will turn off.

- If you turn off all 4 pillars quickly enough a message will appear “You’re not too bad yourselves! Next time, I shan’t lose!”
- The boss will be debuffed for a period of time after the message appears. Use this time to deal as much damage to the boss as possible to try and rush to phase 3.

- When the monster reaches approximately 30% HP a cutscene will appear and he will go into phase 3.
- You may not be able to push the boss into the phase fast enough, and if that happens, 2 trash monsters will appear. Split your party into 2 groups and kill them, then return to the boss.
- The “play time” colored orb phase may happen multiple times before you push the boss into phase 3, it depends on the dungeon difficulty and your party damage, you just have to repeat the mechanic each time.
Phase 3:
- For phase 3 you can just put as much damage as possible into the boss.
- A red message will appear saying “Urukios! Let your stomps engulf the earth in flames!”

- Shortly after the message, a light beam will appear above the boss and large lava AOE will appear around Urukios. Don’t stand in the AOE as it deals a lot of damage over a short amount of time.
Lightbeam above the boss

- The lava AOE will remain for the rest of the fight, so you should pull the boss to a corner of the room, then move around the edge of the room in a circle so you have areas that are safe.
- You can also use CC’s to knock down the boss for a couple of extra seconds. The AOE will still appear as soon as the boss fully stands up.


- Make sure you pick up your loot!
- Then walk into the dark energy to teleport to the final room and collect your rewards.
- A platform will come down from above, so don’t walk into the area before the dark energy appears, or you might get stuck.

Quests and Rewards
Once per Family Reward
- “[Atoraxxion] The First Savior” can be completed via the Black Spirit (/) – Main Quest (A) once per Family with a character from Lv. 60.
- Clear the dungeons of Atoraxxion: Vahmalkea for the first time.
| Quest Name | NPC | Reward |
|---|---|---|
| [Atoraxxion] The First Savior: Vahmalkea | Vaha’s Time Capsule (Located in Vaha’s Paradise after defeating the final boss) |
     Golden Tears of the Desert x1 |
Weekly Quest Reward
- There are weekly quests available where you can collect a chest in the room after you defeat the final boss
- You can complete the dungeon once a week
- Weekly quests reset every Thursday at 00:00 UTC.
|
Guaranteed Rewards:
Chance of obtaining:
|
Dehkima: Token of the Oath Exchange
Dehkima: Token of the Oath tokens can be exchanged through the Manage Currency UI.
- Click the Manage Currency icon
 on the top right of the screen (next to your mini-map).
 - Or open the UI by going to the ESC Menu – Rewards (F3) – Manage Currency Menu
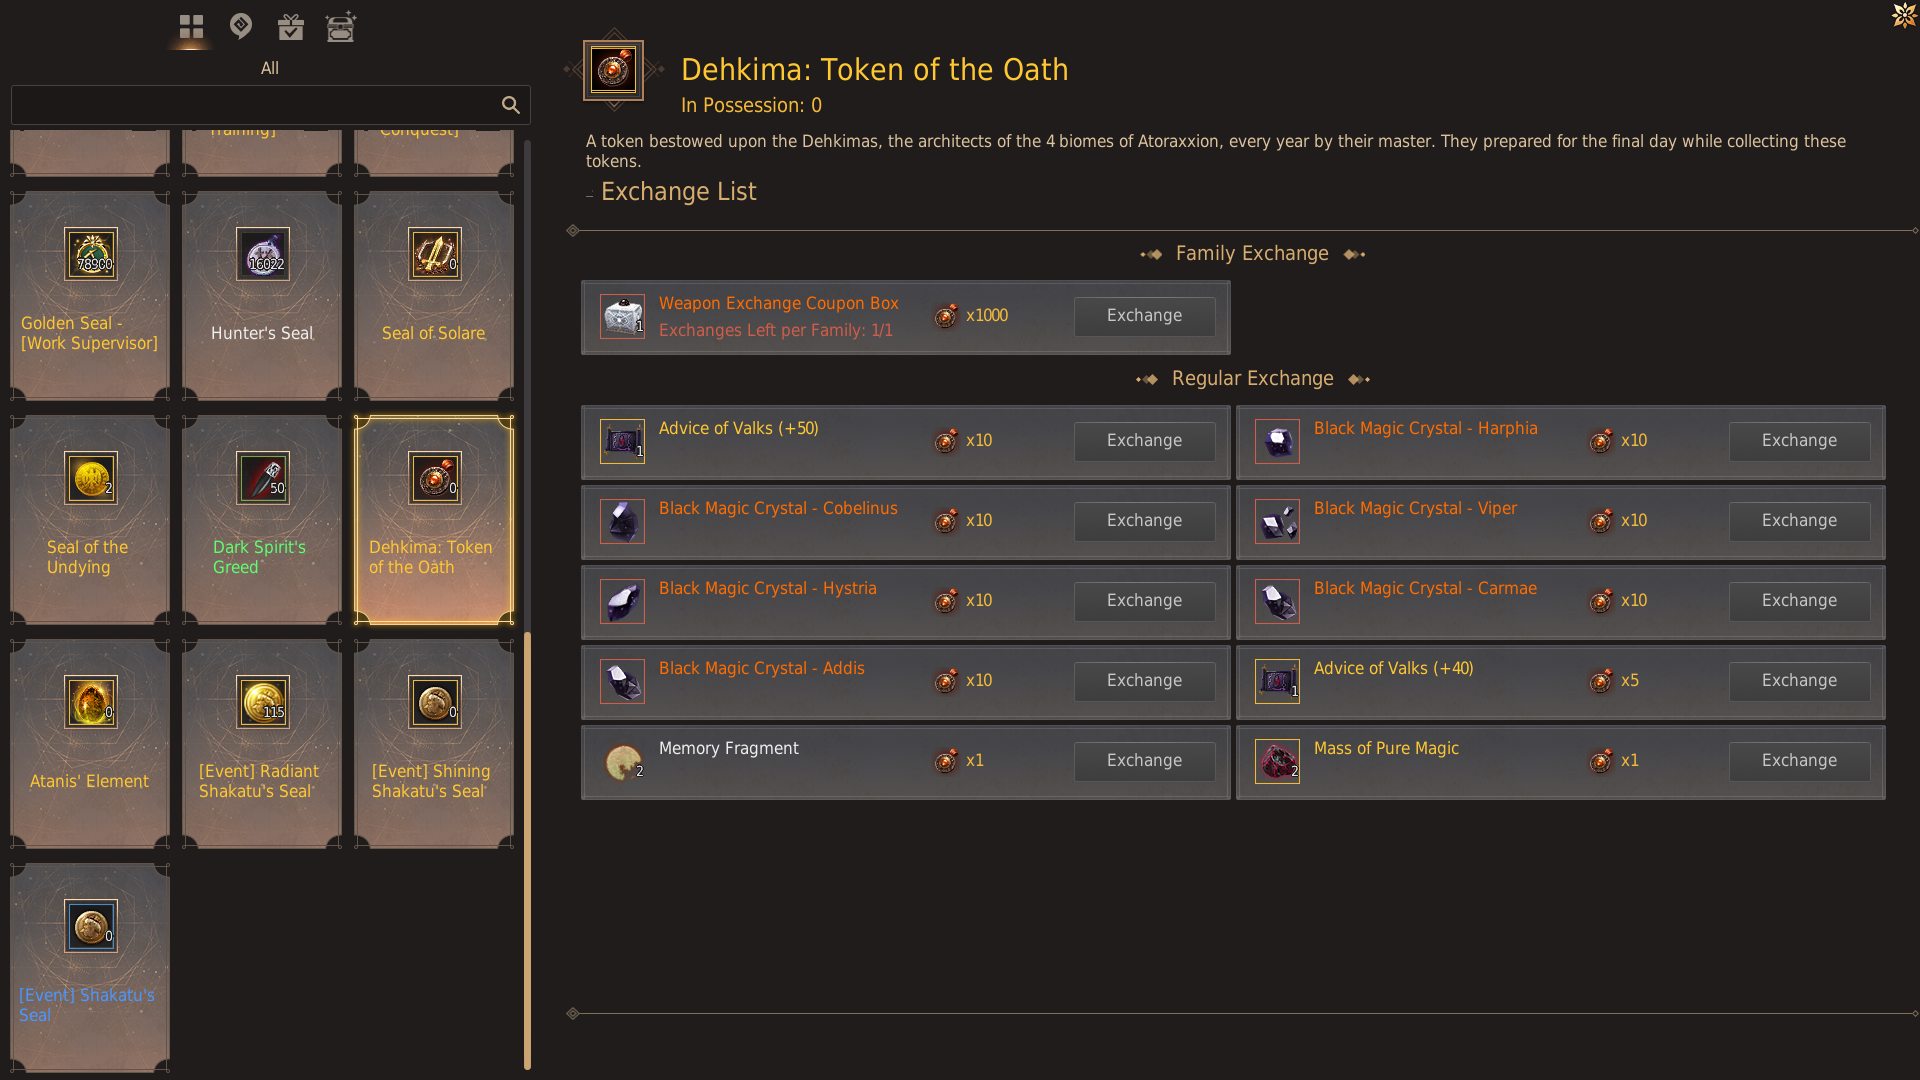
| Exchange Item | Required Item |
|---|---|
(max of 1 exchanges per family) |
 Dehkima: Token of the Oath x1000 Dehkima: Token of the Oath x1000 |
(max of 8 exchanges per family) |
Dehkima: Token of the Oath x5 |
 Advice of Valks (+150) Advice of Valks (+150) |
Dehkima: Token of the Oath x500 |
| Advice of Valks (+100) |
Dehkima: Token of the Oath x200 |
| Advice of Valks (+50) |
Dehkima: Token of the Oath x10 |
| Advice of Valks (+40) |
Dehkima: Token of the Oath x5 |
| Dehkima: Token of the Oath x10 |
|
| Dehkima: Token of the Oath x10 |
|
| Dehkima: Token of the Oath x10 |
|
| Dehkima: Token of the Oath x10 |
|
| Dehkima: Token of the Oath x10 |
|
| Dehkima: Token of the Oath x10 |
|
 Mass of Pure Magic x20 Mass of Pure Magic x20 |
Dehkima: Token of the Oath x10 |
| Mass of Pure Magic x2 |
Dehkima: Token of the Oath x1 |
 Memory Fragment x20 Memory Fragment x20 |
Dehkima: Token of the Oath x10 |
| Memory Fragment x2 |
Dehkima: Token of the Oath x1 |
Knowledge
There is a total of 140 knowledge entries to collect from the dungeon and two quests you can obtain from the NPC inside Atoraxxion which will give a once-per-family quest to collect 50 knowledge entries and 130 knowledge entries. Both these quests will reward you with the new Vaha’s Dawn earring and an Enchanted Scroll.
To collect all of the knowledge you will need to do multiple runs through the dungeon for monster knowledge. You will also need to complete the main story questline for Atoraxxion and solve all of the puzzles, including the hidden puzzles. Once you have completed all the puzzles and the story questline you will unlock the Atoraxxion – The Last Tome by speaking to your Black Spirit and completing his special event quest. This tome allows you to gain extra knowledge from some of the puzzles and other interactions throughout the dungeon.
Once you have the Tome, you can gain additional knowledge by interacting with the various objects in Atoraxxion. The video below shows all the knowledge locations. You can gain some of the knowledge without the Tome but will not get the additional knowledge to complete the 130 knowledge quest.
Whilst you are killing monsters in Atoraxxion, you can also drop an item called Vaha’s Circuit of Special Information. You can buy the Ancient Weapon Blueprints from the NPCs in Atoraxxion for 1 million silver. When you combine these two items together you can make a special Blueprint that will give you random Atoraxxion knowledge when opened. You can also exchange 10 of these to obtain a specific knowledge entry of your choice.


You can solo puzzle 4, by putting 4 Heavy Wooden Crates (purchased from NPC Shop) onto the 4 locations indicated.
To start it actually you need Lv.60 because tha “Invitation From I” is unlocked by reaching lv60 through black spirit
https://imgur.com/a/EXOcYVz